How to Paint Goblin Skin
Last Updated on January 19, 2021 by FauxHammer
Let’s face it – goblins are great. Whether it’s gits, grots or snotlings, there’s something quite charming about the nasty wee blighters. When Emvicreative sent us some of the goblins from the Castle Greenskull range for preview, it struck me as a golden (green?) opportunity to work on a method for how to paint goblin skin.
And here we are!
Please Note: This site uses affiliate links. Our Affiliate Partners are shown below
(Affiliate links will result in compensation to the site on qualifying purchases)
Click this link & buy your hobby stuff from Element Games for the UK & Europe to support FauxHammer.com – Use Code “FAUX2768” at the checkout for double reward points.


Our Affiliates / Hobby Stores
- UK: Element Games, The Outpost, Wayland Games, Mighty Lancer, Goblin Gaming, Forbidden Planet, Model Scenery Supplies, eBay, Amazon
- US/Canada: MTechCave, GameKastle, eBay (US), eBay (CA), Amazon
- Germany: Taschengelddieb
- Europe: eBay (DE), eBay (FR), eBay (ES), eBay (IT), Amazon
- Australia: eBay, Amazon
- Global: RedGrass Games, Warcolours
- 3D Printers: Phrozen 3D, Elegoo, Anycubic
FauxHammer – Latest Video on YouTube
With it being a New Year and all (rot in hell 2020), we’re hoping to bring much more tutorials your way this year. These will cover a range of skill sets within the hobby (not just painting) and will be aimed at hobbyists of all different levels of experience.
This one is for you folks who want to start pushing things a bit further with your painting. The following guide will focus solely on the skin as there are quite a few steps to it. A guide for painting 100 Night Goblins ASAP this is not – think of this more as a good way for painting a wizard, general or that reimagined Gorzag Gitstompa you’ve been eyeing up.
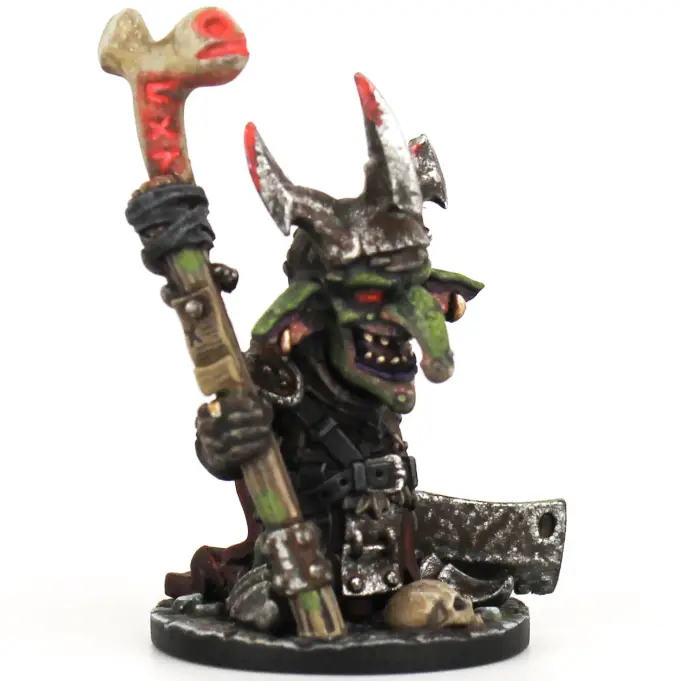
In this guide, I’ll be using the Snikt model from Emvicreative’s Castle Greenskull range. As the first of the models designed for the range, he’s a paragon of everything gobliny and makes an excellent case study for painting a goblin in such a way as to compliment their insidious natures.
How to Paint Goblin Skin – Paints and Tools
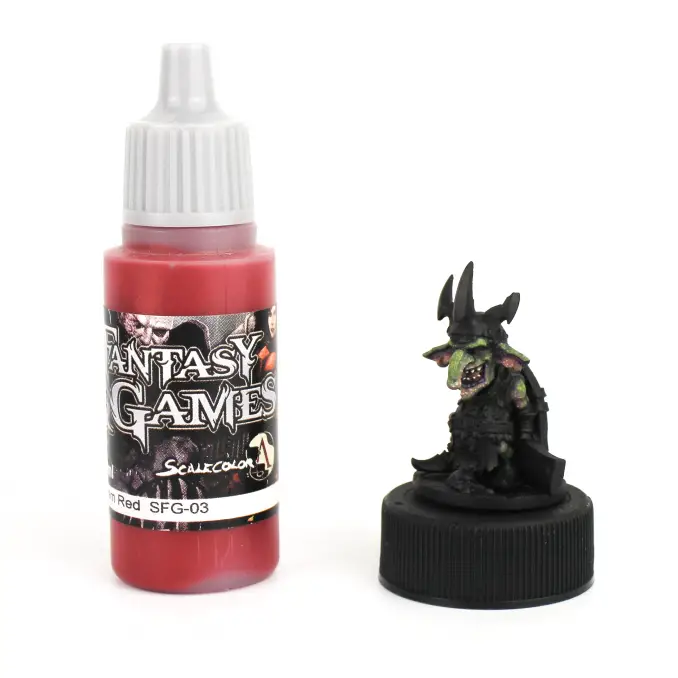
All of the paints I used for painting Snikt’s skin are from the Scale 75 Fantasy and Game range. Scale 75 paints tend to be a bit more fluid and so don’t need as much thinning. Their consistency means that they are also slightly more translucent, which makes them great for glazing and blending – both techniques that are used a lot in painting skin.

These paints dry quite slowly compared to Citadel and Vallejo so just bear that in mind if you intend to paint along exactly as I have. If you don’t have these paints – or don’t want to use them – equivalents can easily be found in both the Citadel and Vallejo Game Color ranges.
But Scale 75 are generally the best for blending
Because we’ll be doing a lot of mixing, it’s a good idea to use a wet palette for this method. Handily, we have compiled an article listing the Top 10 Best Wet Palettes for Miniature Painting. Or, if you are reluctant to invest in a wet palette, we also have a guide for making you own.
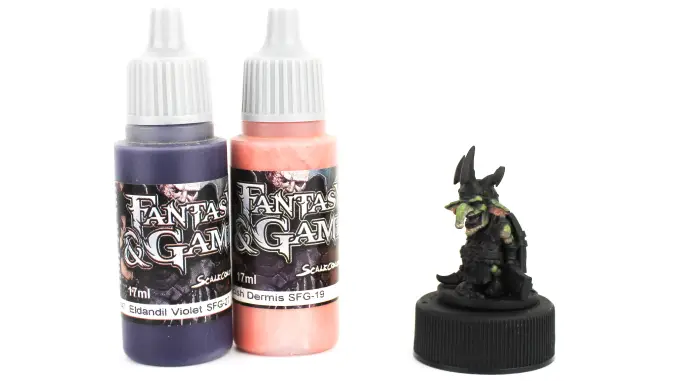
Paints
- Surface Primer – Black (Vallejo)
- Misfits Green (Scale 75 Fantasy and Game)
- Arbuckles Brown (Scale 75 Fantasy and Game)
- Mern Green (Scale 75 Fantasy and Game)
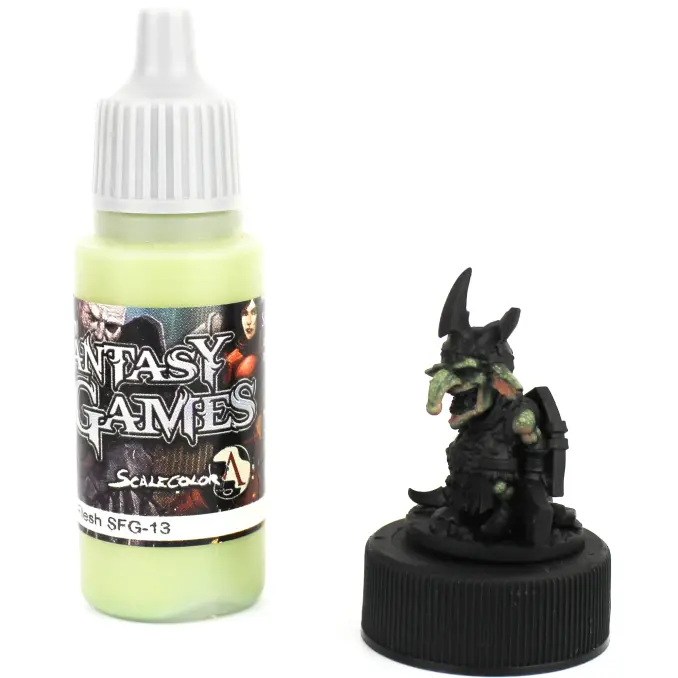
- Undead Flesh (Scale 75 Fantasy and Game)
- Orcish Dermis (Scale 75 Fantasy and Game)
- Moonray Flesh (Scale 75 Fantasy and Game)
- Goblin Flesh (Scale 75 Fantasy and Game)
- Eldandil Violet (Scale 75 Fantasy and Game)
- Bosh Chestnut (Scale 75 Fantasy and Game)
- Lilith Yellow (Scale 75 Fantasy and Game)
- Mayhem Red (Scale 75 Fantasy and Game)
- Baal Crimson (Scale 75 Fantasy and Game)
- Beherit Red (Scale 75 Fantasy and Game)
- Ecstasy Red (Scale 75 FX Fluor)
Brushes
- Broken Toad Miniature Series III (3/0)
- Broken Toad Miniature Series III (0)
- Windsor and Newton Series 7 (2) (For mixing paints)
Palette
How to Paint Goblin Skin – Tutorial
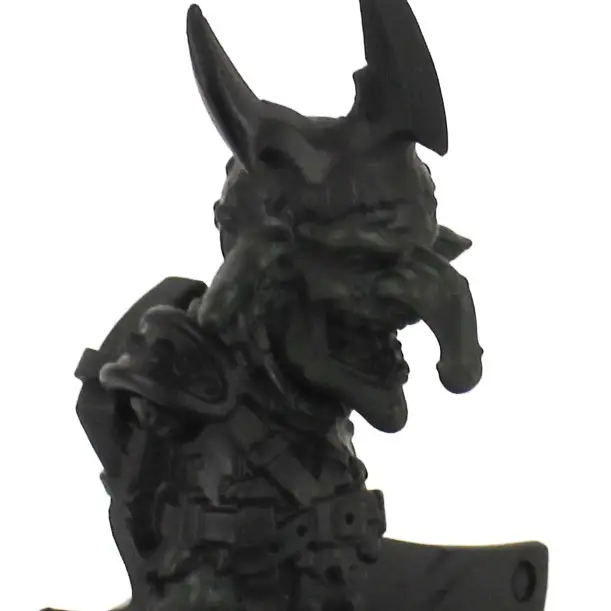
Priming
I primed the model using Vallejo Black Surface Primer. This was applied in a few thin coats using my airbrush, mixed with a bit of flow improver. A black rattlecan primer or a brush-on primer would also be acceptable for this. Nothing fancy is required for this stage – I just used the airbrush because I have it.
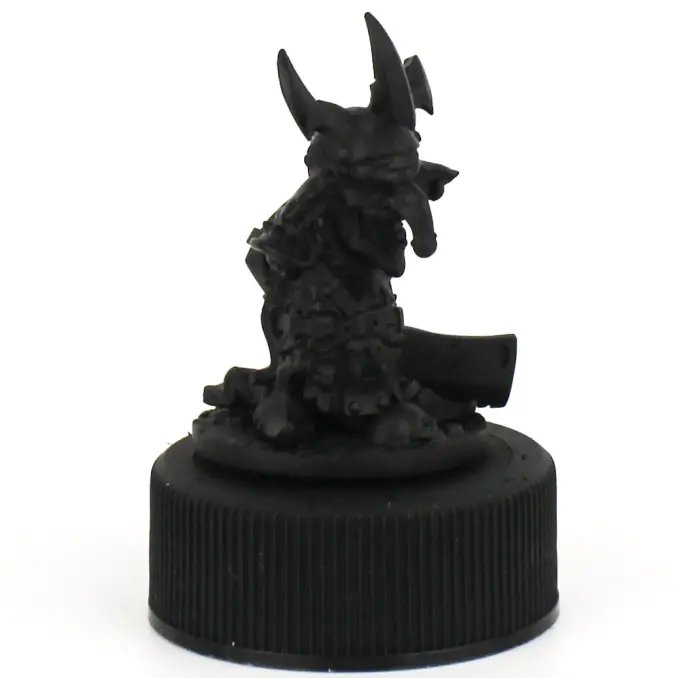
If you’re painting a resin model such as Snikt, always remember to soak it in lukewarm soapy water for a while to get rid of any residual mould release agent. Otherwise, any paint you apply adheres to the residue and not the model. Make sure to give any models you’ve soaked a rinse in cold water to get rid of the soap, too.
Basecoat
And now the real work begins!
On my palette I mixed equal parts of Misfits Green and Arbuckles Brown to give a very dark, drab green. I added the tinest amount of water to the mix to improve the flow and applied it all over the areas on the model where the skin would be visible, using my Broken Toad Miniature Series III (0).
Apply the paint quickly in 1 thin layer and allow it to dry completely before applying enough layers to ensure a solid body of colour on the miniature. I applied 3 layers of this mix. A thin layer applied quickly will ensure a smoother basecoat. Don’t be tempted to slap it on in a thick coat to save time.
1st Layer
To the 50/50 mix of Misfits Green and Arbuckles Brown, I added some Mern Green. This was probably a 50/50 mix of this to the previous combination with the newly added Mern Green to yield a slightly lighter – but still murky – green.
The new mix was applied all over the skin in 2 thin coats using a Broken Toad Miniature Series III (0) once again, leaving only the deepest recesses to allow the previous colour to show through. Only a small amount of water needs to be added to improve the flow of the paint.
2nd Layer
This next stage is where we begin to see the character really come to life.
Taking the 1st Layer mix on the palette, I then added some Undead Flesh to make a 50/50 mix of 1st Layer/Undead Flesh.
This step involves quite a big jump in tone. In order to make the transition less jarring, I added a bit more water to my first layer of the new mix. This created something of a glaze consistency and would allow me to grandually intensify subsequent layers for a smoother transition. I switched from the larger Broken Toad brush to the 3/0 as I transitioned into the raised areas.
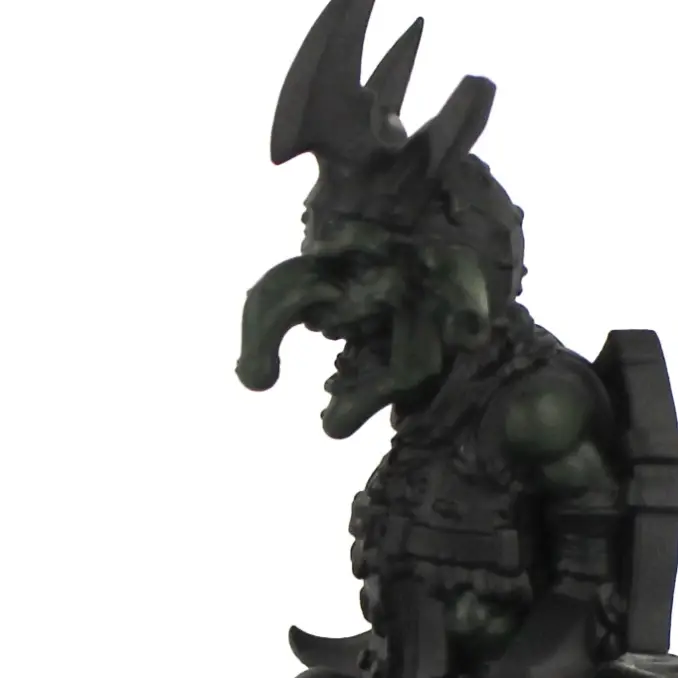
Now we need to pay a bit more attention to the direction of the light on the miniature. Note in the image above that intensifying the colour in the raised areas has created a natural looking highlight. This is how we really bring miniatures to life.
3rd Layer
Time to shift gears.
To inject a bit of believability into our goblin – and since all good fantasy has one foot in reality – we need to introduce some natural tones to the skin. If you look closely at orcs and goblins painted by high performers, you’ll notice that this is a trick used very often to bring such models to life.
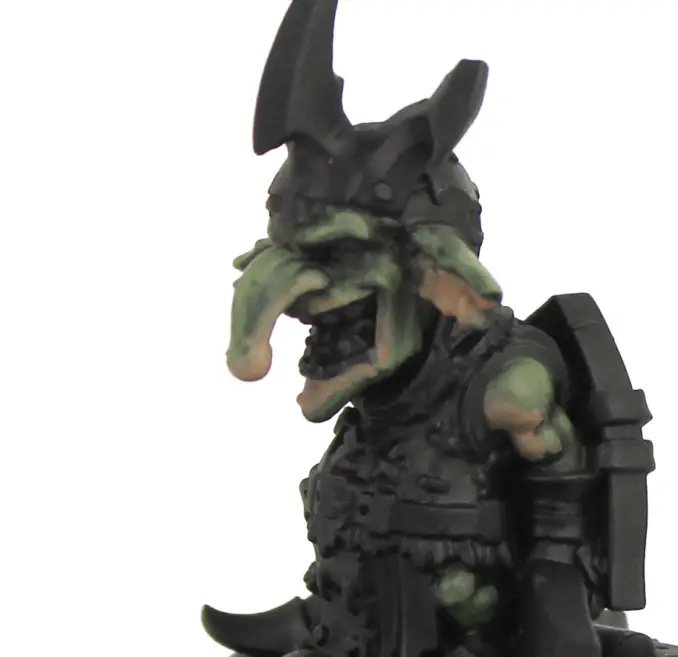
On the palette, I added some of the 3rd Layer mix to some Orcish Dermis at a ratio of about 1:2. Using a similar approach to that used in the 3rd Layer step, I added a bit more water to my first layer of the new combination to create a sort of glaze. Subsequent layers were applied with less water to create a smoother transition between the green and pinky tones.
This mix was applied around the mouth and the underside of the nose, inside the ears and around the armpits and undersides of the arms. Don’t worry if some of this goes into the recesses where the dark green is as some shading will be added later.
Checkpoint!
If you’re painting goblins for gaming pieces, you could stop at this stage and skip ahead to painting eyes and teeth. Using the steps outlined so far, you could feasibly paint skin to a pretty good tabletop standard.
However, if you wish to push the detail further, you’ll find some further steps for adding more to your goblin should you wish to do so.
1st Pink Highlight
Taking some pure Orcish Dermis (no more of the green mix for now), I applied a more intense pink highlight to the extremities of the flesh-toned areas.
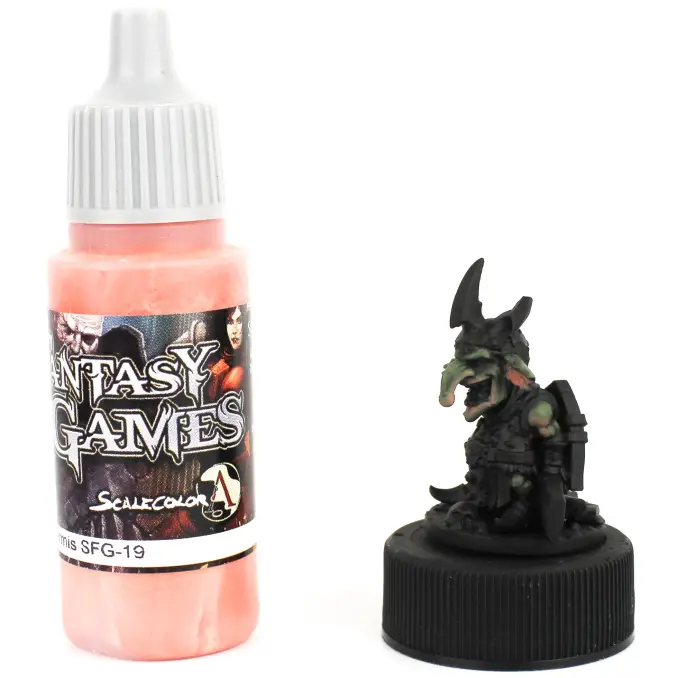
I applied this layer using my Broken Toad 3/0. Only a small amount of water was added to improve the flow. This will increase the vibrancy of the fleshtone areas, turning up the contrast on the miniature a notch.
Warty Texture – Green
Goblins are generally pretty gross. It also seems that as they rise in prominence that they take on a wartier appearance to denote their higher station in goblindom. Goblin character models commonly feature warts and Snikt is no exception. I wanted to turn that up a little and introduce a bit of texture to the skin.
As a general rule, painters tend to aim to keep the skin on a model smooth. It tends to look better, but it’s also a good way of creating further contrast on the model and – by extension – further definition. I wanted to really underpin the grotesqueness of Snikt, however.
Taking some pure Undead Flesh ( with just a tiny drop of water to improve flow), I stippled over the raised areas of the green parts of the skin. I intensified the effect somewhat in areas that would catch the light and applied it more sparsely in recessed areas.
The result is that we have an almost frog-like texture to the skin. This is a fairly simple way of adding detail to a miniature without having to go to great lengths without conversions or freehanded insignias or tattoos.
Warty Texture – Pink
I repeated the process described above on the pinkish areas of the skin, using Moonray Flesh instead of Undead Flesh.
Don’t worry if any of your stippling looks a bit too stark or intense as we can glaze over it later on to pull the colours together. The aim at this stage is to lay down the warty texture.
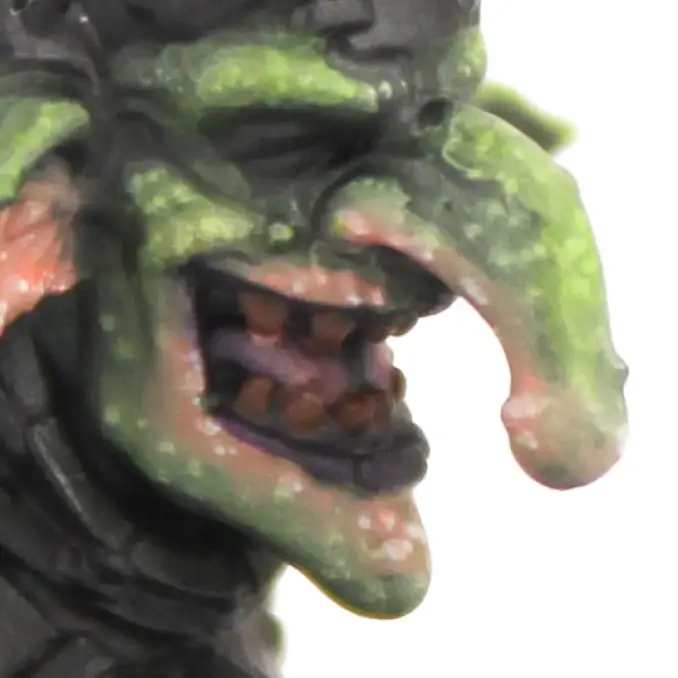
Green Glaze
Glazing the green areas is going to serve two purposes for us. Firstly, it will pull together the somewhat disparate stippled tones and the tones we painted earlier on the green. Secondly, it will enhance the green and turn up the vibrancy. Giving us…?
MOAR CONTRAST!
On my palette, I added a fair amount of water to some Goblin Flesh to give me a “wash” consistency. Using my Broken Toad 3/0, I dipped into the Goblin Flesh wash and wiped the tip until a barely perceptible amount was coming off of the brush. Then, I applied the glaze all over the raised green areas, pulling the paint towards the centre of said parts.
The result is undeniably. Gross as he still is, we’ve now got a quite attractive array of greens on our lad.
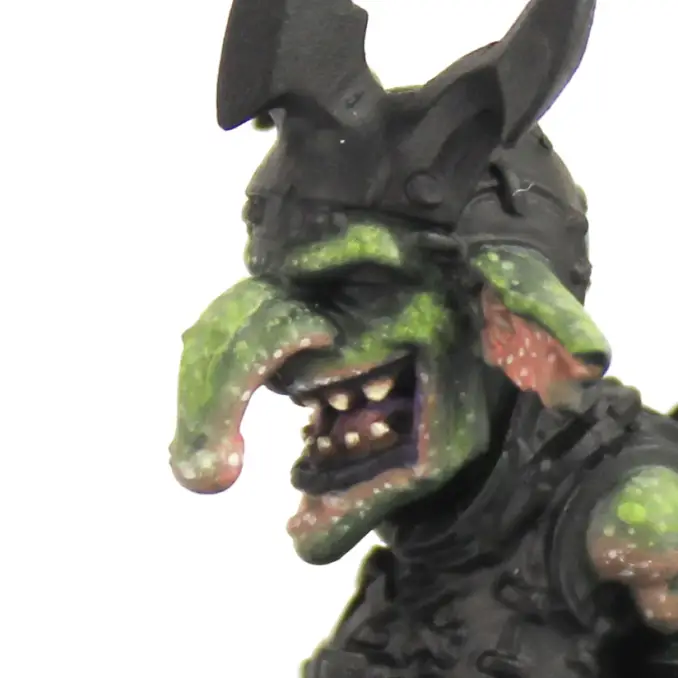
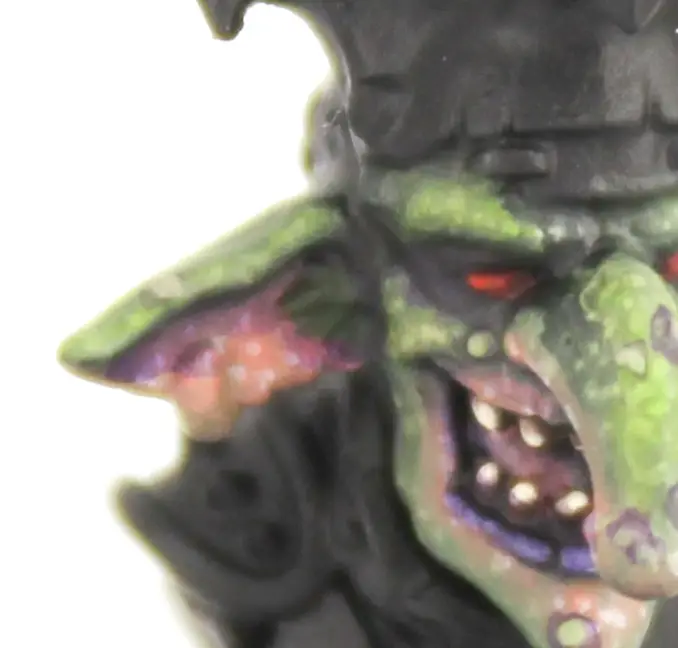
Mouth Basecoat
Shifting gears again.
Using Eldandil Violet, I painted the entirety of Snikt’s mouth a dark purple. This is a very dark colour so it works very well for shading and basecoating.
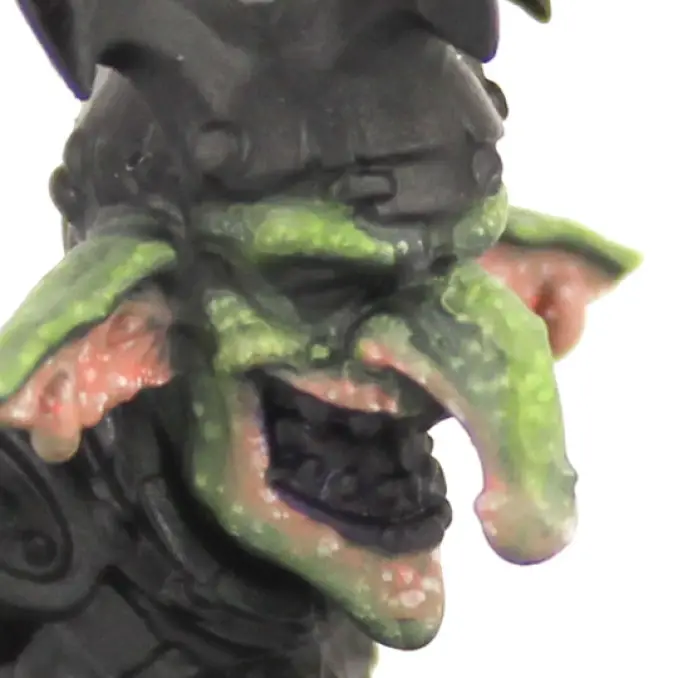
Purple and green are complimentary colours so they sit beautifully well together. (Just look at ya boi the Joker.)
I used my Broken Toad 3/0 for this and applied the paint with only a dash of water to improve the flow. About 2 or 3 coats should suffice.
Tongue
Nothing particularly fancy here. I mixed some Orcish Dermis with Eldandil Violet at a ratio of 2:1 and applied the paint to the tongue, leaving the darker recesses showing
Just a dash of water should be adequate to get the paint flowing nicely. I applied two thin coats to get the colour I wanted. Simple.
Teeth Basecoat
As we’ve already established, hygiene isn’t generally high up on a goblin’s list of priorities. To represent this dirty, yellowed teeth work best. They also serve to underpin the crooked nature of our goblin.
I applied 2 thin layers of Bosh Chestnut to the teeth. Be very careful with how much water you add to improve the flow of your paints at this stage as you don’t want brown paint running into all of your previus work. As always, a small dash is generally enough for paints from the Fantasy and Game range but always test your paints before applying them.
Teeth 1st Highlight
Leaving the area around the bottom of the teeth brown, I mixed Bosh Chestnut with some Lilith Yellow (50/50) and applied the paint to the teeth.
Again, take care with how much water you add here. You may not need any at all depending on the consistency of your paint. Remember that no two pots of paint are the same so always test before applying.
Teeth 2nd Highlight
To finish the teeth, I applied some Lilith yellow. Again, I moved further away from the recesses towards the top of each tooth, leaving some of the previously applied colour visible below the new layer.
On a larger model with larger teeth there would obviously be a bit more involved, but Snikt has nasty little teeth and these steps are quite sufficient for what we want.
Lip Highlight
The last area of the mouth to do is to highlight the lip. Only the bottom lip is coloured and highlighted because otherwise our goblin will look like he’s had lip fillers.
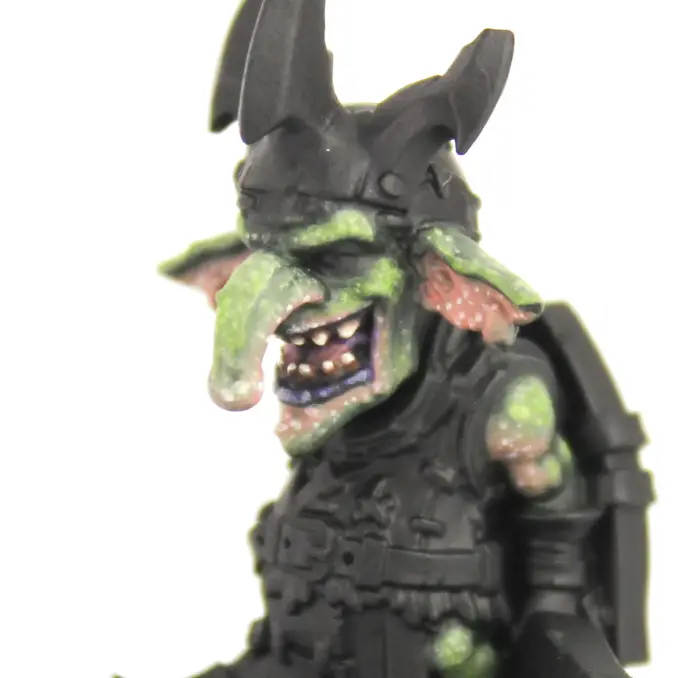
With a ratio of 2:1, I mixed Hykey Yellow with Eldandil Violet. Again, just the tiniest amount of water is needed here because we’re highlighting.
Though you could just trace the top of the lip to create a highlight, I liked the idea of his lips seeming a bit parched and cracked. I painted in a series of small vertical lines – in exactly the sort of pattern that we all have on our own lips – to create a textured highlight.
Purple Glaze
Introducing contrasting colours can be a delicate balance. Whilst painters generally strive to introduce as much contrast to a miniature as possible (light and dark, hot and cold, etc) it is also important to be mindful of visual harmony.
One way to attain this is to introduce subtle volumes fo contrasting elements to one another. Which is exactly what I did in the next step.

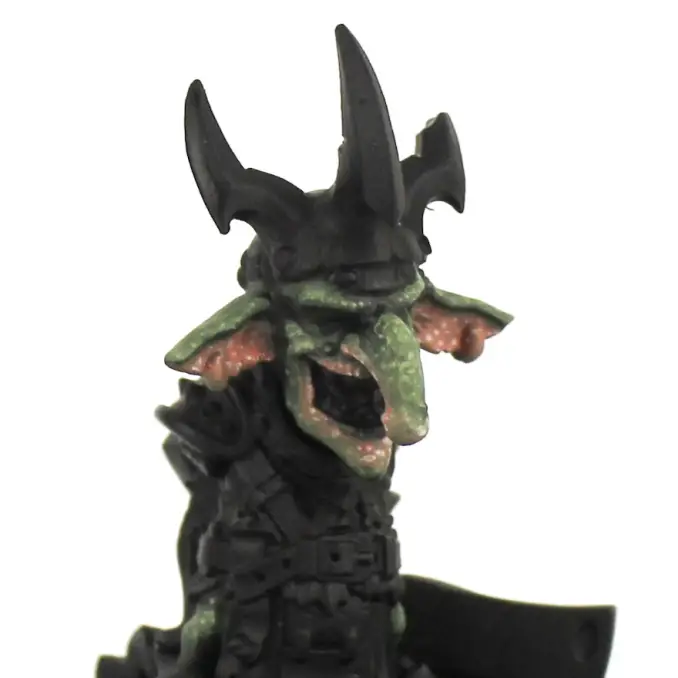
Thinning some Eldandil Violet to a wash consistency with water, I glazed some of this into the deepest recesses on the inside of the ears, around the eyes, and – using very small amounts – into some of the deepest recesses in the green areas. I also ran a thin glaze over the lips to pull those colours together further.
Whilst it is quite an attractive shade of purple, it also serves to visually unify the lips, and the pink and green elements of the skin, which perhaps were looking a bit too separate from one another.
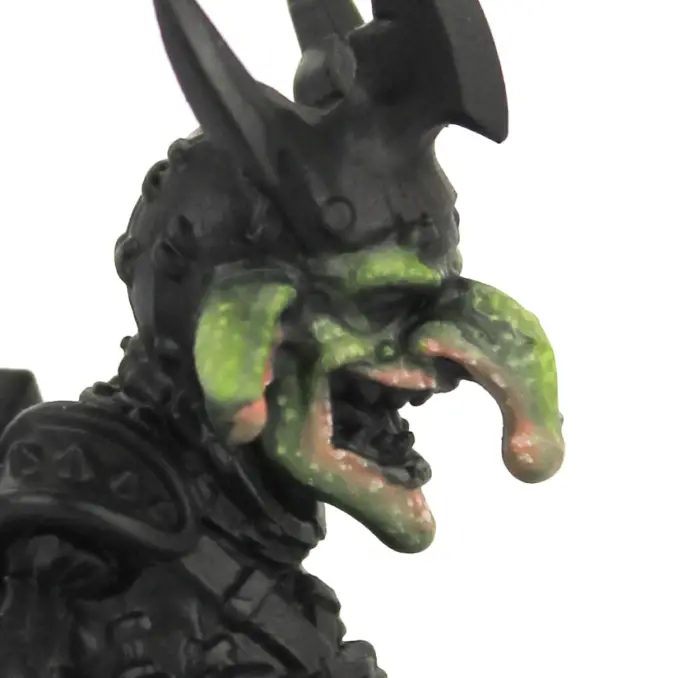
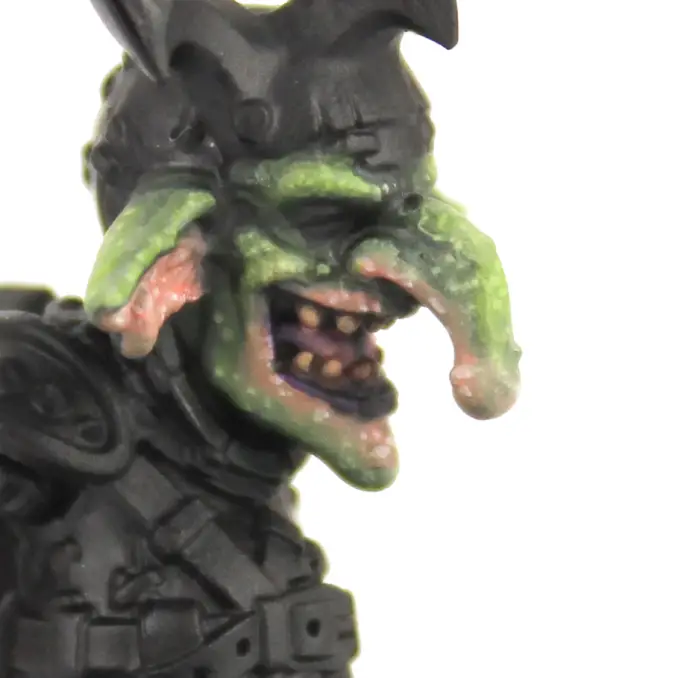
Red Eyes
When it comes to goblin eyes, you can’t go wrong with red.
Red is a complimentary colour to green, but it also goes well with purple because of how closely related the two are. We have a lot of purple and green in our model so far, so red it is.
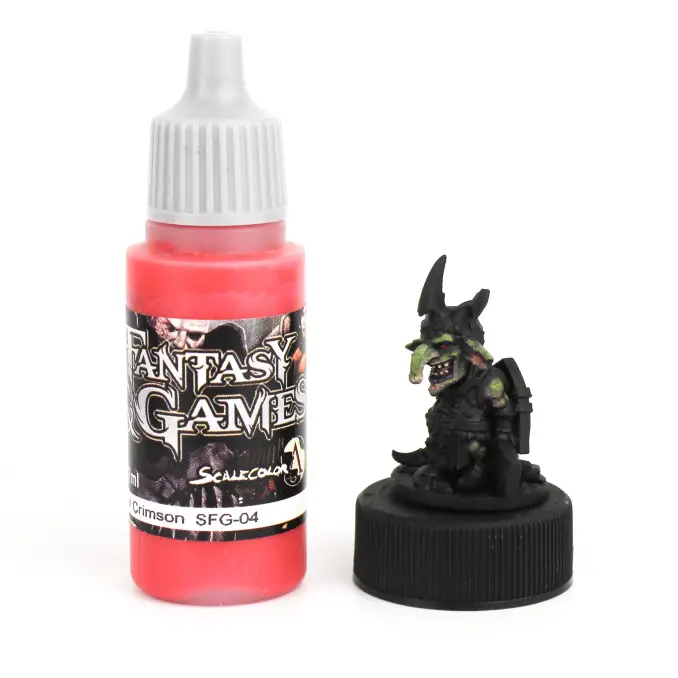
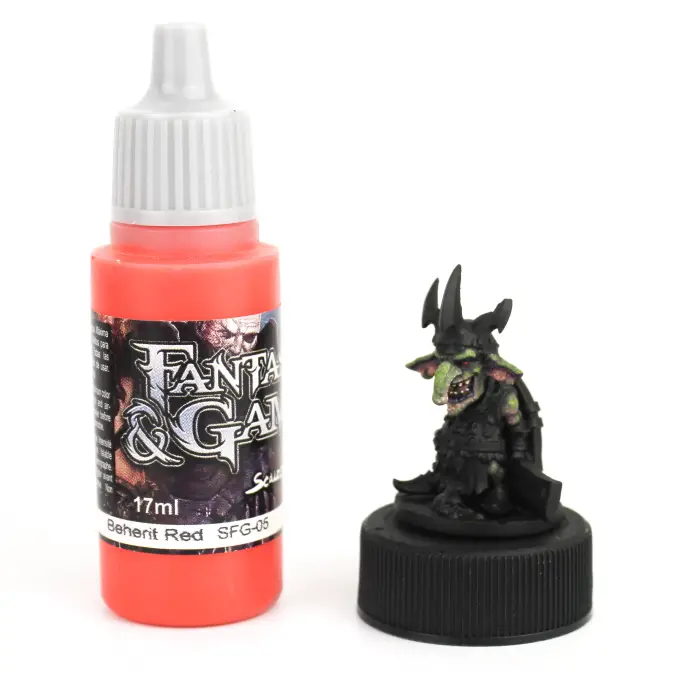
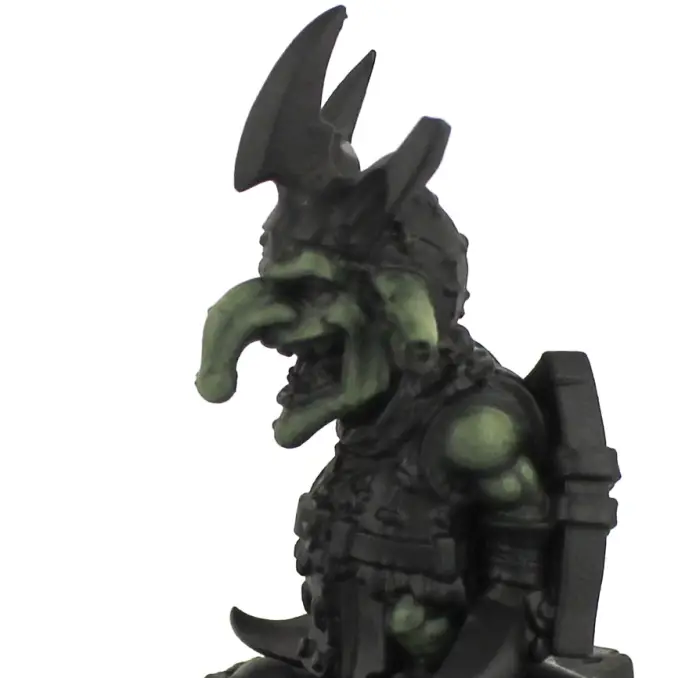
The eyes are very straight forward. I applied a coat of Mayhem Red to entirety of the eye. Then, I appplied a layer of Baal Crimson, leaving some of the Mayhem Red visible around the edges. Finally, a small highlight of Beherit Red was applied to the uppermost portion of each eye.
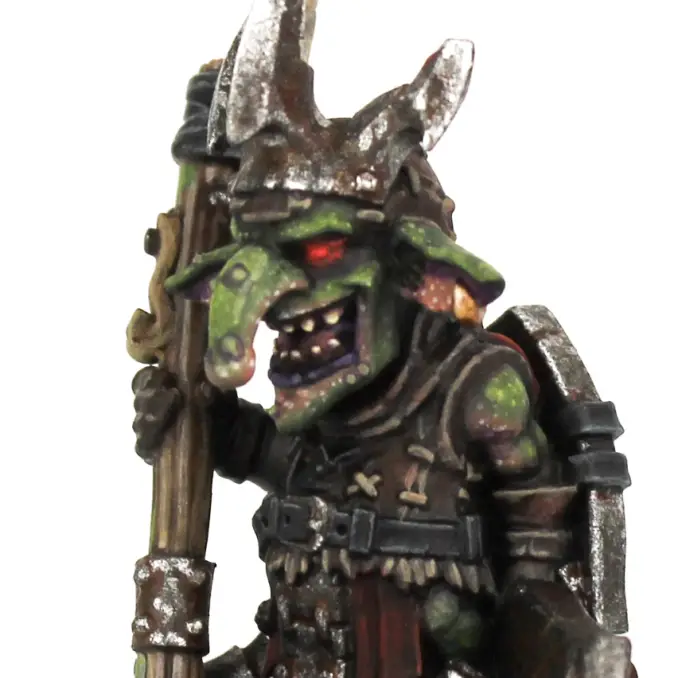
Afterwards, I applied a few glazed layers of Ecstacy Red from the Scalecolour Fluor Effects range to give the impression that the model had a demonic glow to his eyes reminiscent of the fantasy goblins of yesteryear. This also tied the eldritch glow from his staff together with him.
Warts and Ear Hair
Always save the best for last.
For what goblin would be complete without his throbbing warts and protruding ear hair?
I shaded each of the large warts using the same glaze mixture of Eldandil Violet from earlier, and finished each of them off with a highlight of Undead Flesh. The ear hair I simply painted using Mern Green as black would have been too stark against the surrounding colours.
These are small things that perhaps a man running for a bus wouldn’t notice, but they add a lot to the overall character of the piece. The Castle Greenskull goblins very much embody the archetypal villainous goblin, and thing such as these serve as manifestations of their wicked, twisted nature.
How to Paint Goblin Skin – Summary
There we have it – a big tutorial for a tiny miniature!
I certainly hope that you’ve learned something in reading this that you’ll be able to adapt into your own painting technique. Even if you don’t paint goblins, I daresay you’ll have found something of use to you in here.
If you enjoyed this article, please check out my Patreon The Ashenhold Art Creature Feature, where I post WIP shots and guides for miniatures I’ll be working on based on the weird and wonderful creatures of our very own world.
Thank you for reading! Please feel free to post your feedback in the comments below, or you can email me at theforge@ashenholdart.co.uk.
Please Note: This site uses affiliate links. Our Affiliate Partners are shown below
(Affiliate links will result in compensation to the site on qualifying purchases)
Click this link & buy your hobby stuff from Element Games for the UK & Europe to support FauxHammer.com – Use Code “FAUX2768” at the checkout for double reward points.
Our Affiliates / Hobby Stores
- UK: Element Games, The Outpost, Wayland Games, Mighty Lancer, Goblin Gaming, Forbidden Planet, Model Scenery Supplies, eBay, Amazon
- US/Canada: MTechCave, GameKastle, eBay (US), eBay (CA), Amazon
- Germany: Taschengelddieb
- Europe: eBay (DE), eBay (FR), eBay (ES), eBay (IT), Amazon
- Australia: eBay, Amazon
- Global: RedGrass Games, Warcolours
- 3D Printers: Phrozen 3D, Elegoo, Anycubic
FauxHammer – Latest Video on YouTube
What did you think of this Tutorial? please let us know in the comments.
If you like what we’re doing here you could really help encourage more content with a share on any social media platform.
Click the share links at the bottom of this screen (or on the left for computers and tablets)
Want to keep updated with the blog? You can subscribe in the sidebar for RSS or by email below
(Sidebar is below the article on Mobile Devices)