
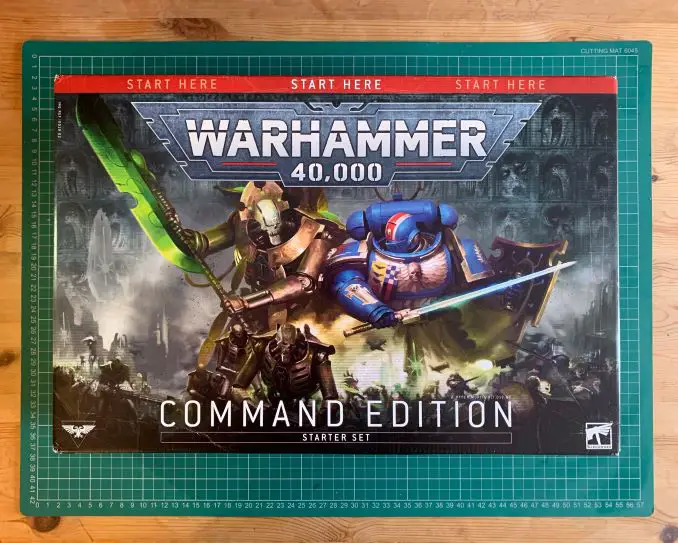
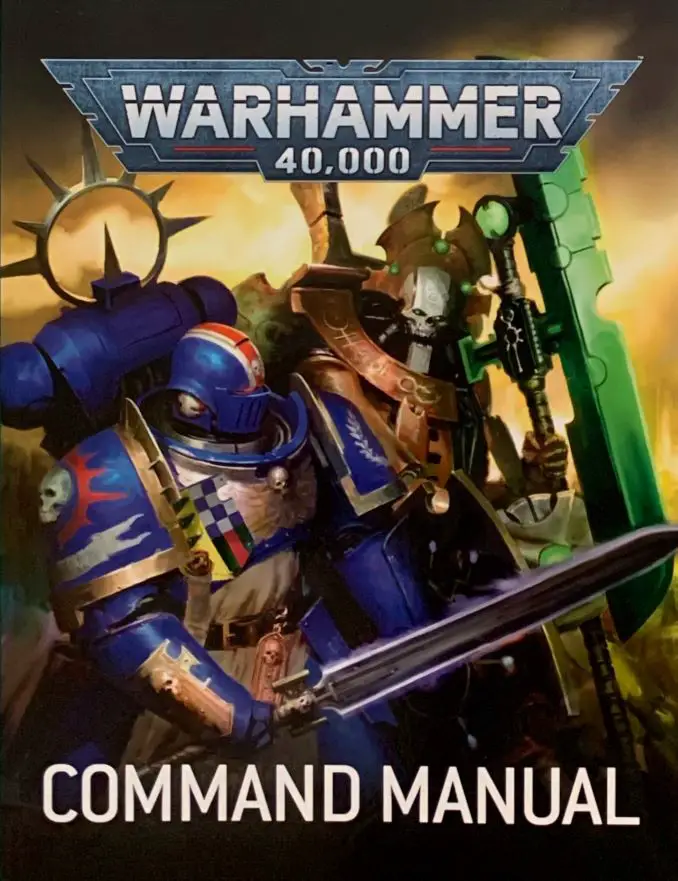
Warhammer 40,000 Command Edition Starter Set Review
Last Updated on April 23, 2021 by FauxHammer
Big, bad, and overflowing with everything the beginner needs to dive into the latest iteration of the classic tabletop game, the Warhammer 40,000 Command Edition new Warhammer 40,000 Starter Sets range is the perfect place for brand-new hobbyists to kick-start their eternity of warfare in the 41st millennium
Please Note: This site uses affiliate links. Our Affiliate Partners are shown below
(Affiliate links will result in compensation to the site on qualifying purchases)
Click this link & buy your hobby stuff from Element Games for the UK & Europe to support FauxHammer.com – Use Code “FAUX2768” at the checkout for double reward points.


Our Affiliates / Hobby Stores
- UK: Element Games, The Outpost, Wayland Games, Mighty Lancer, Goblin Gaming, Forbidden Planet, Model Scenery Supplies, eBay, Amazon
- US/Canada: MTechCave, GameKastle, eBay (US), eBay (CA), Amazon
- Germany: Taschengelddieb
- Europe: eBay (DE), eBay (FR), eBay (ES), eBay (IT), Amazon
- Australia: eBay, Amazon
- Global: RedGrass Games, Warcolours
- 3D Printers: Phrozen 3D, Elegoo, Anycubic
FauxHammer – Latest Video on YouTube
Warhammer 40,000 Starter Sets Compared
See a breakdown of all Warhammer 40,000 Starter Sets (with links to individual set reviews) by Clicking the image below
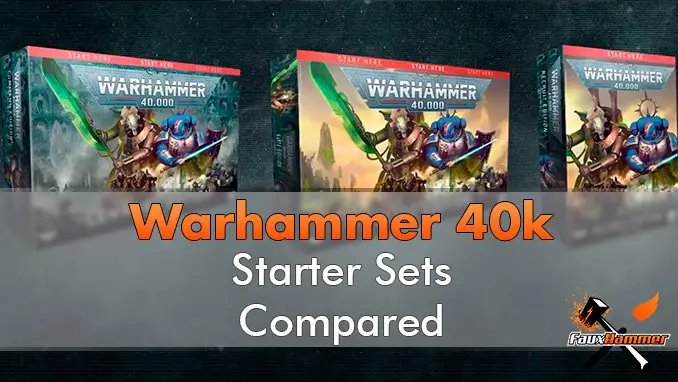
This quick overview should help you decide which is the best set for you
Warhammer 40,000 Command Edition Starter Set Review – Summary
Oh boy, this is it. The big one.
The ultimate treasure trove for the beginner ready to take the plunge and commit to 40K. The Holy Grail for all those wanting to grab Ninth Edition by the horns and wrestle it into submission. The kick-start into Space Marines, Necrons and the grim darkness of the far future that everyone’s been waiting for.
Well, technically Indomitus was all those things, but this is as good as it’s going to get for those of us who watched starry-eyed from shore as that exclusive, miniature-laden ship sailed away over the horizon, lost to us forever.
Given some of the contents in this box, it might be more accurate to consider this a child of Indomitus. If the Recruit Edition is its toddler and the Elite Edition is its teen, then the Warhammer 40,000 Command Edition is its golden eldest child. It’s good. It’s almost there, but it’s in danger of struggling to get out of the long shadow cast by its super-successful (and, let’s be honest, probably super hot) parent.
And therein lies the issues with all of these boxes. No matter how one looks at either the Recruit, Elite or Command versions of any of these starter sets, they’re always going to be compared to its forerunner, and Indomitus was one of the best things to happen in 2020 (which, given how low the bar has been set by the various global events that have taken place this year, that isn’t quite the accolade it could be), so from the get-go, the New 40K Starter Sets are in danger of having to eat its made-to-order space dust.
That said, some real effort has been made to set the Command set apart from all the other new starter sets and its predecessor with the inclusion of a pocket-sized 184-page rulebook – a necessity for anyone looking to dive right into the game. Also, differentiating this set not only from the other sets in this range, but from Indomitus as well, are the inclusion of some sweet new terrain pieces.
So, how does it do?
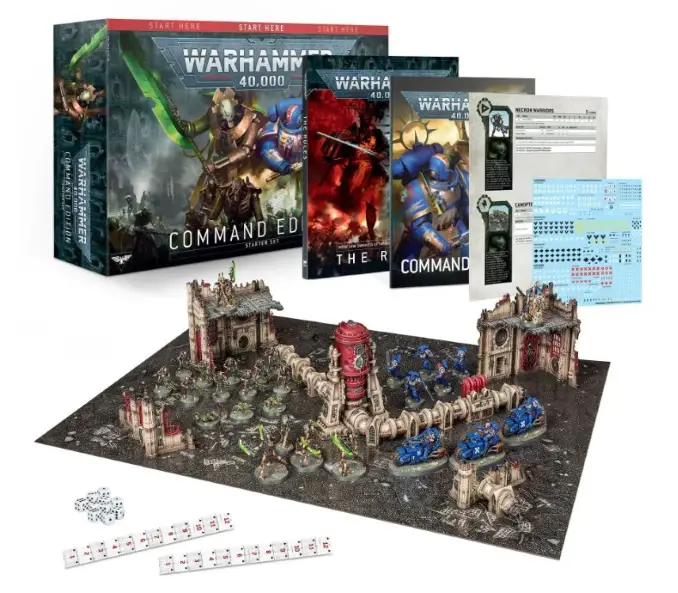
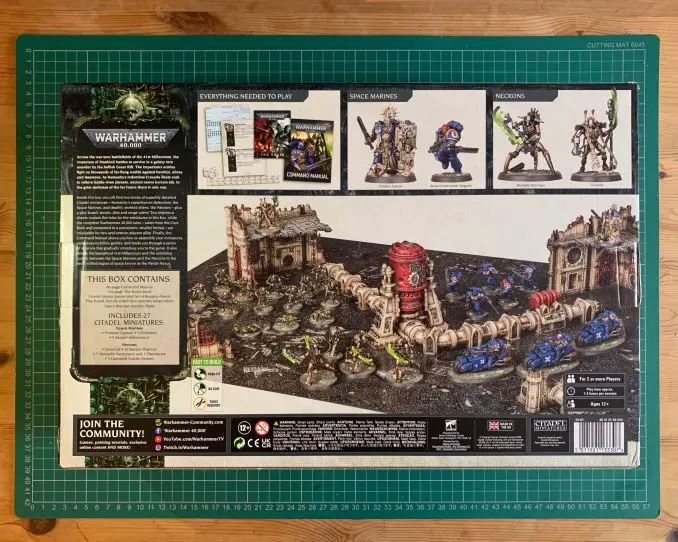
Warhammer 40,000 Command Edition Starter Set Review – Contents
It might not be as miniature heavy as Indomitus, or have that sheen of exclusivity it’s late predecessor so effortlessly flaunted, but as far as starter sets go, the Warhammer 40,000 Command Edition shapes up pretty nicely and is packed with absolutely everything you need to get started in Ninth Edition.
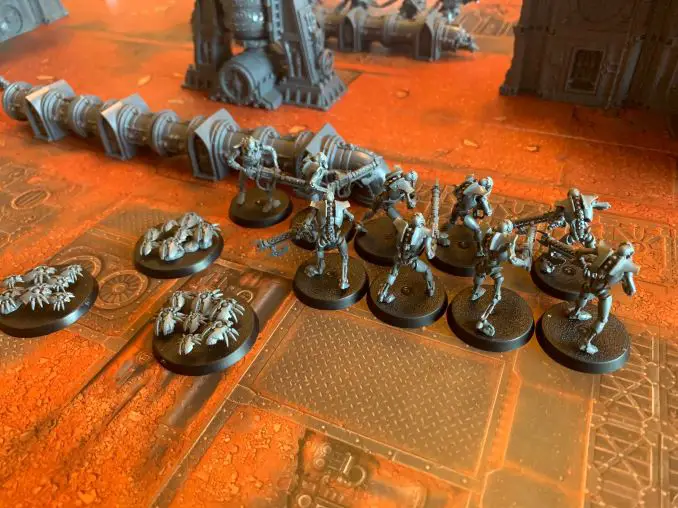
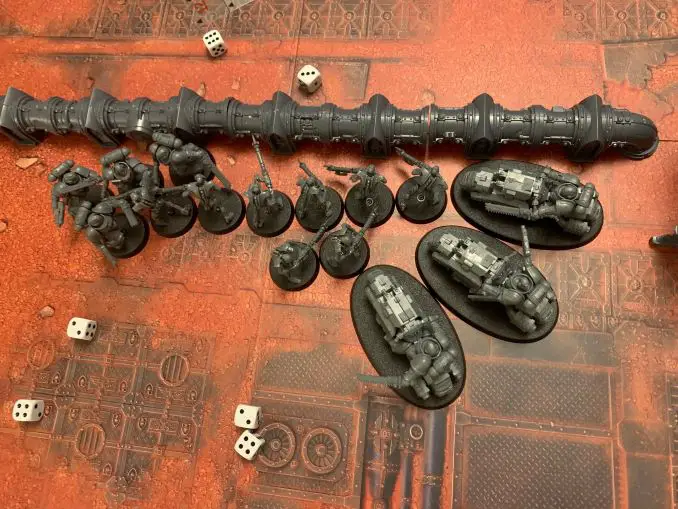
In terms of models, you’ll be flush with:
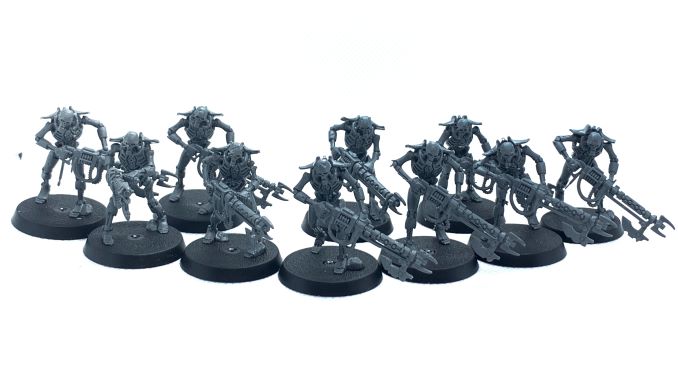
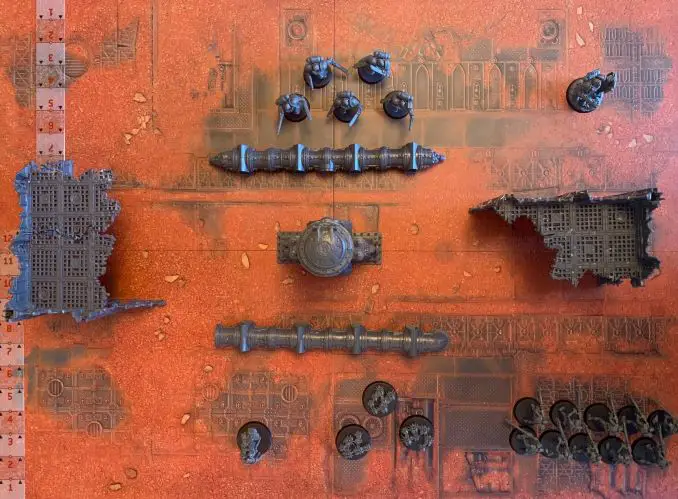
- 1x Necron Overlord
- 10x Necron Warriors
- 3x Necron Canoptek Scarab Swarms
- 3x Necron Skorpekh Destroyers
- 1x Necron Canoptek Plasmacyte
- 1x Space Marine Primaris Captain
- 5x Space Marine Assault Intercessors
- 3x Space Marine Outriders
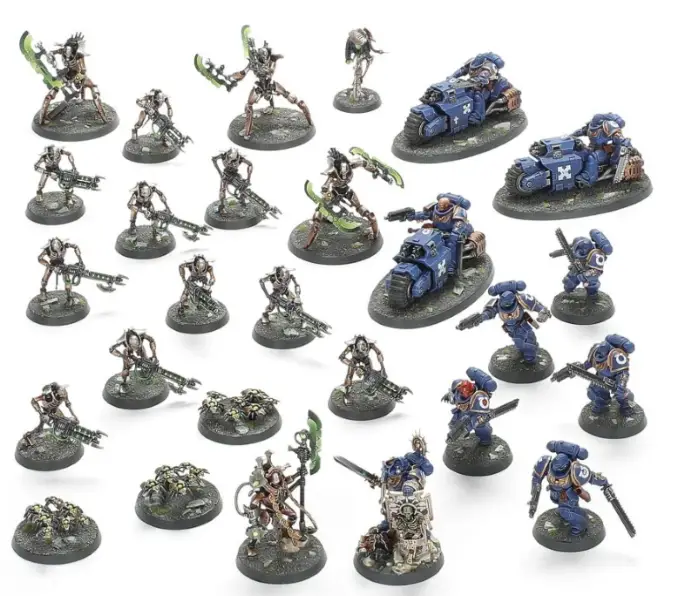
Weighing in with 27 models, it’s nowhere near as many as Indomitus, which was bursting at the seams with a staggering 61, but does come with more – and different – figures to the Recruit Edition. The Command Edition does, however, contain exactly the same models as the Elite Edition, so if you’re only after one of these sets for the figures – which, it is worth noting, include the awesome Primaris Captain and Necron Overlord first released with Indomitus – you might want to save yourself a few bob and grab the Elite Edition.
What sets the Command Edition apart, though, is what else is in the box:
- The Warhammer 40,000: Command Manual
- A thick card 30″ by 22.4″ gaming board
- Push-fit plastic terrain
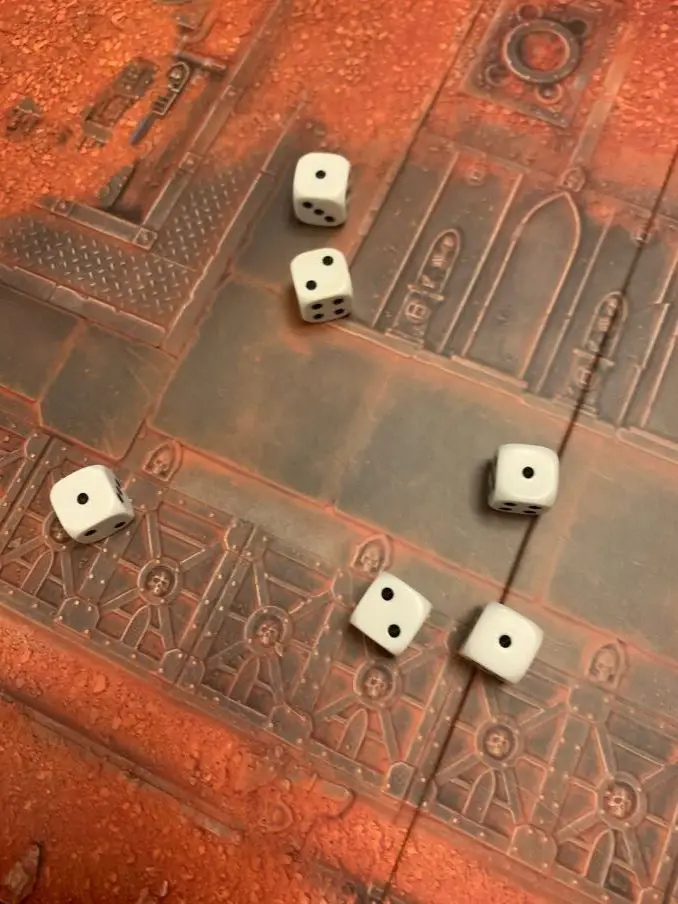
- Two range rulers and ten dice
- Datasheets
- A Space Marines Transfer Sheet with over 600 transfers
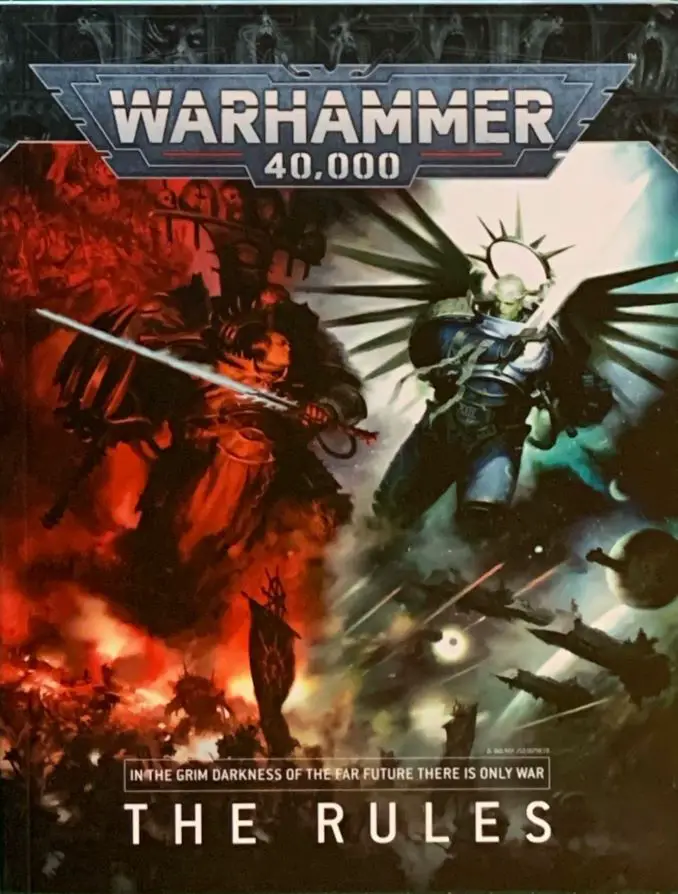
- Warhammer 40,000: The Rules
Whilst both the Elite and Recruit Editions match the Command Edition with range rulers and dice, datasheets, and the transfer sheet, the Command Edition includes a swish, hard-wearing gaming board (unlike the Recruit and Elite edition peasants who have to make do with a paper mat) and enough push-fit terrain to make your living room look as if it’s just been hit by an Exorcist Launcher.
But what the Command Edition really holds over the other boxes in this range is the new “Warhammer 40,000: The Rules” book. This text is unique to the Command Edition, so if you’re serious about getting into Ninth, this is the box for you.
From the contents alone, this box is looking tantalising. Packed with twenty-seven miniatures and everything else you could possibly need to have your first real game of Ninth Edition, this box is a one-stop purchase to getting stuck in to 40K.
Warhammer 40,000 Command Edition Starter Set Review – Unboxing
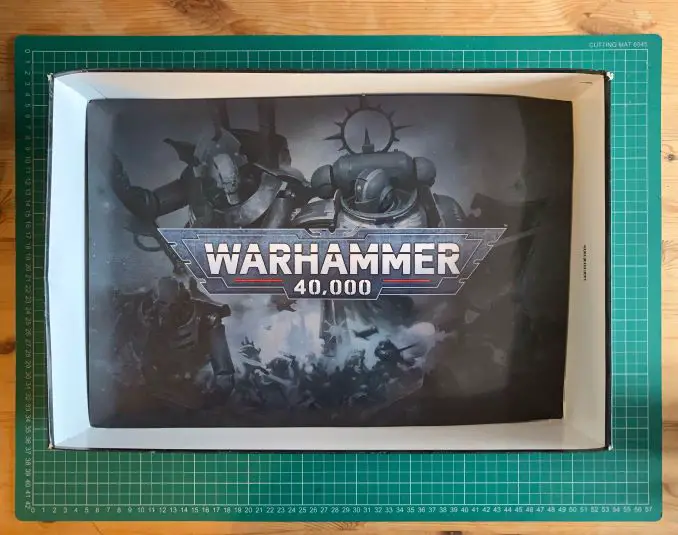
Before we start pulling this thing apart in earnest, I want to take a moment to draw everyone’s attention to the box art.
Striking, dramatic, and exciting. The art for Ninth has, so far, been absolutely spectacular – and the new dynasty of Necrons look awesome.
The box is quite weighty, but this is to be expected when you’ve got nine sprues, a couple of books, and a whacking great gaming board packed into it.
The cover slides off the box with the unslotting of a tab on either, and then, there is it.
Plastic. Reams and reams of beautiful, unassembled, unpainted plastic.
There are no airs and graces with this box, no fancy, glossy sheet of broody, colour-washed art waiting for you. It’s just good, solid plastic. And a lot of it.

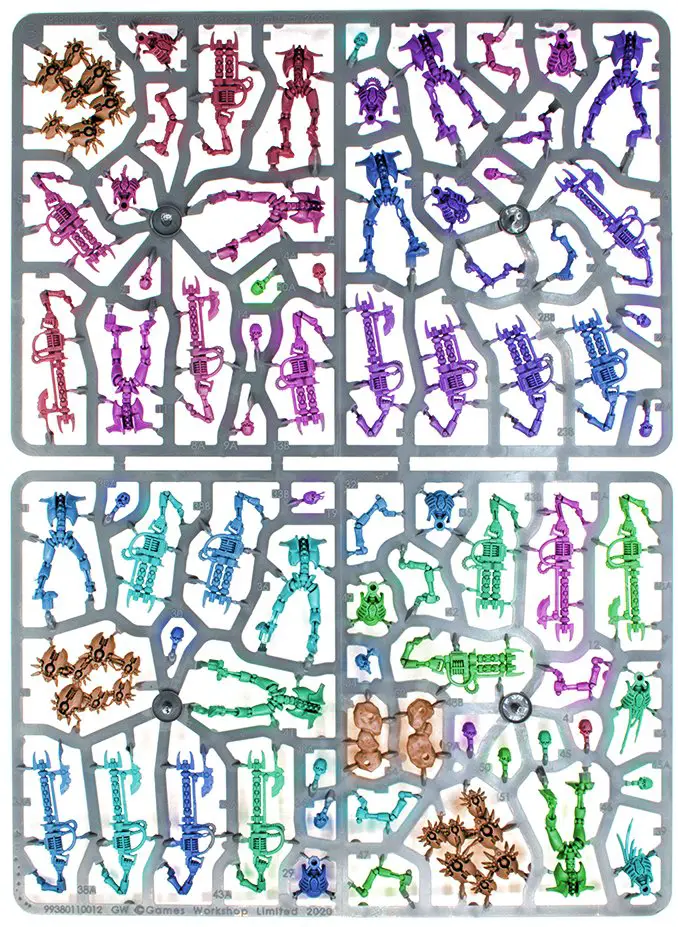
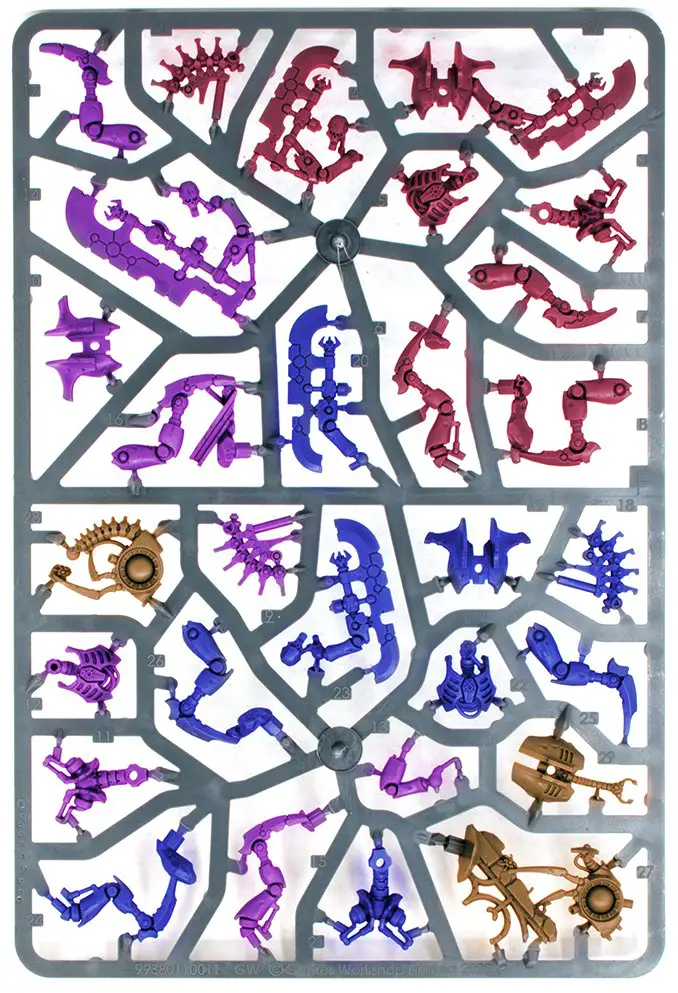
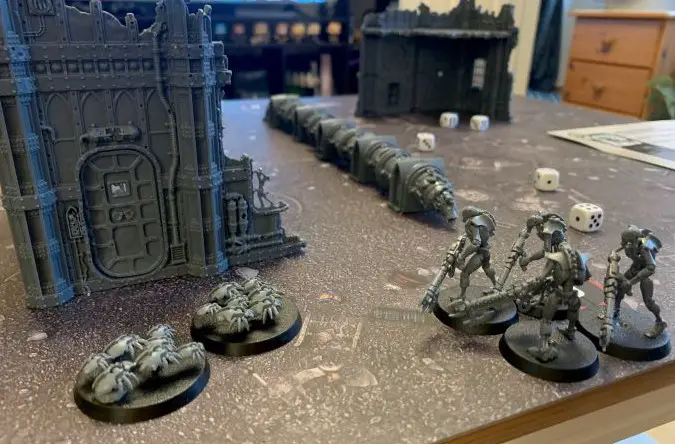
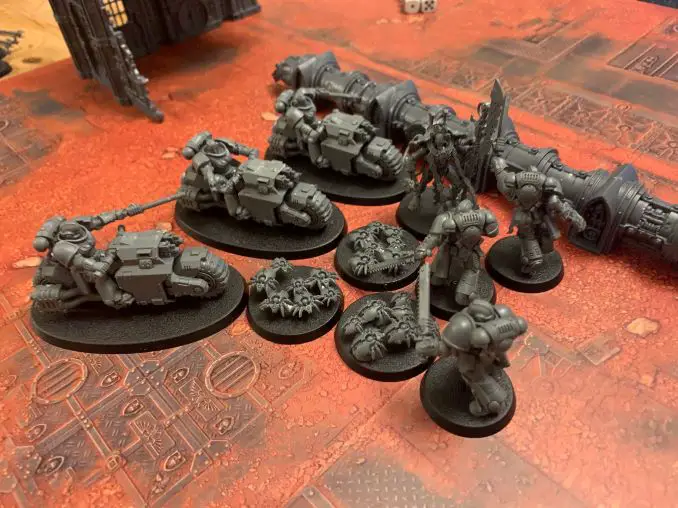
There are nine sprues in the box, four for the terrain, and five for your new miniatures – and no duplicates in sight. Already, I’m struck by how fiddly the Necron Warriors look like they’re going to be, so I’ll (not) look forward to putting them together.
Beneath about seventeen feet of grey plastic lies this piece of protective artwork – a nice touch, and something any die-hard fans could frame or tack up to the walls of their hobby room – provided, that is, it hasn’t fallen victim to any particularly pointy bits on the sprues on top of it.
Below the artwork lies everything else promised in the box.
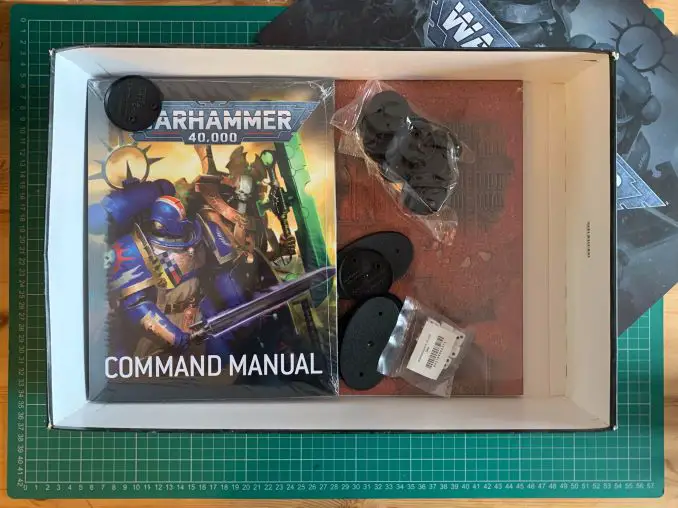
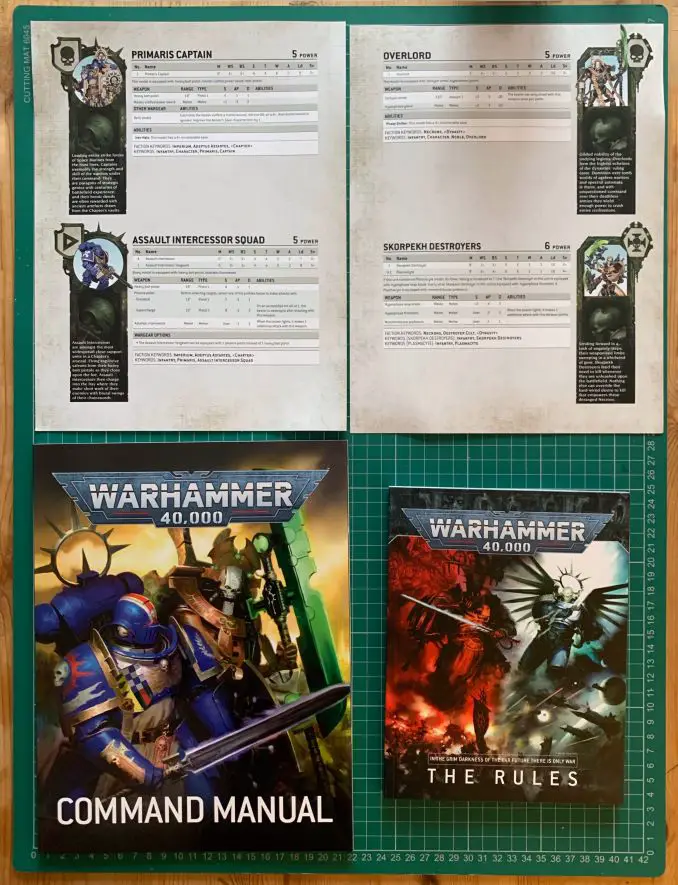
The literature included in the set – that is, your new copy of the Warhammer 40,000: The Rules rulebook, the Command Manual, and the datasheets are all shrink-wrapped in plastic. Because the rulebook, which is far smaller than the product contents image would have you believe, is sandwiched between sturdy A4-sized Command Manual and the two also A4 card datasheets for your new units, the datasheets may well be a little bent at the top due to the wrapping, as mine were.

Even though it’s designed to be a concentrated version of the Core Book, I was a little disappointed to see the size of The Rules book. As one of the things designed to set this box apart from the other editions, it really doesn’t have the gravitas I was hoping.
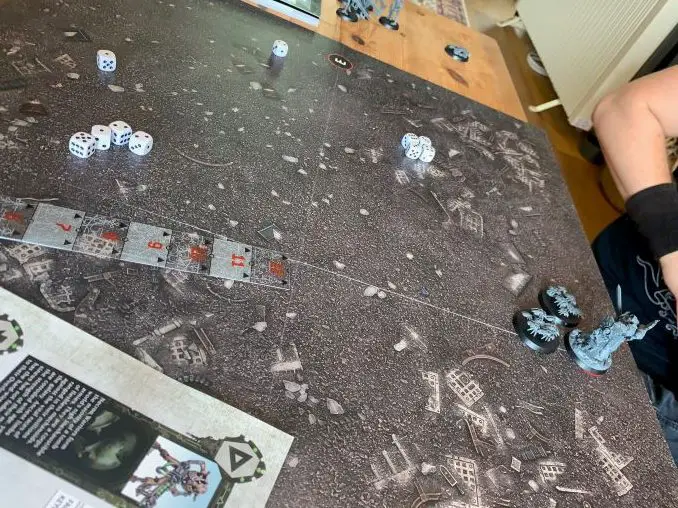
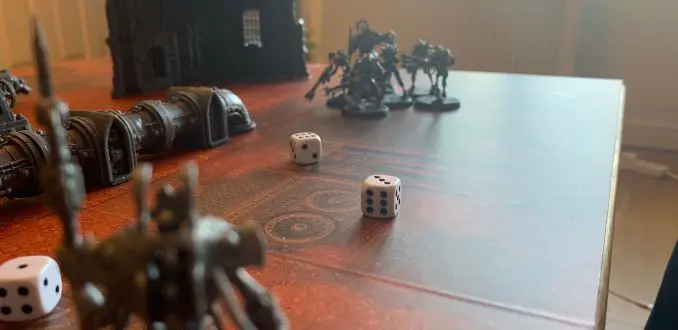
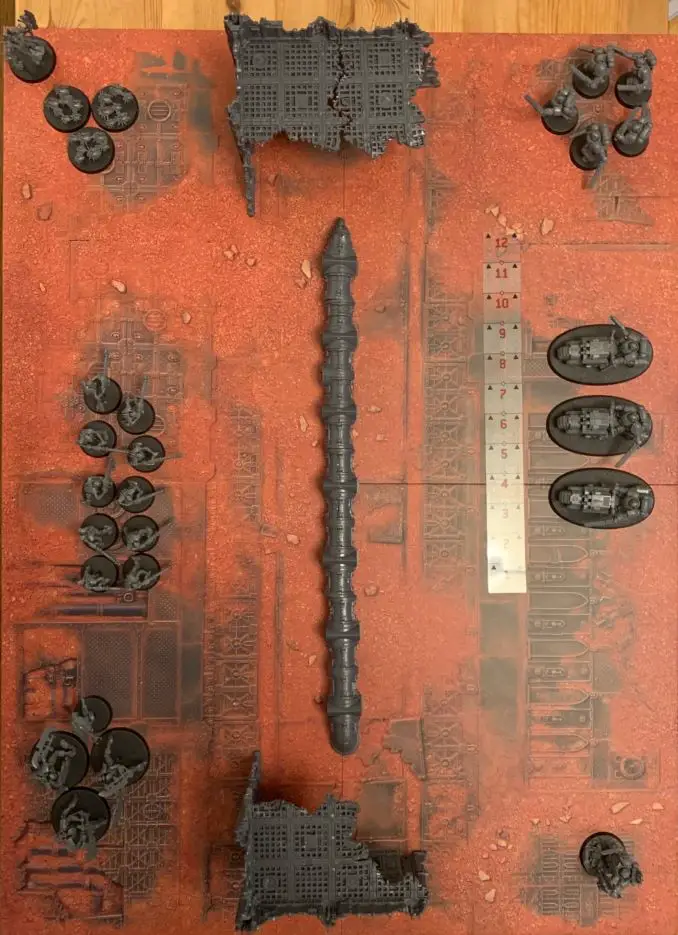
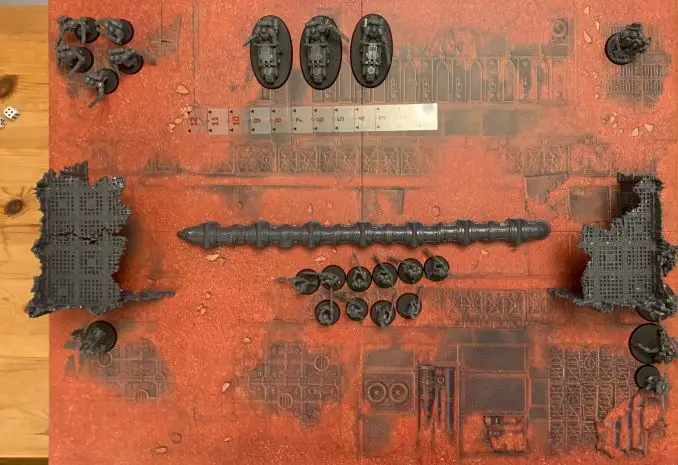
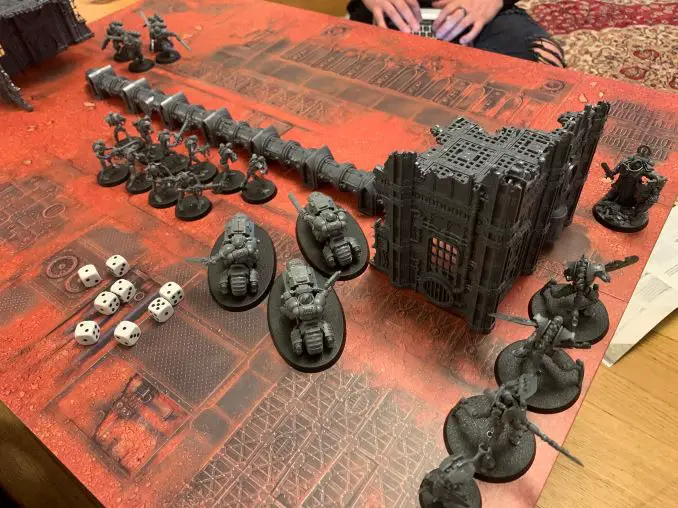
As for the other bits rattling around at the bottom of the box, this is where you’ll find your bases, your bag of dice, your two rulers, your goliath-sized sheet of Space Marine transfers, and the massive 30″ by 22.4″ folding gaming board.
Oh, did I also mention it’s also nice, hardwearing cardboard?
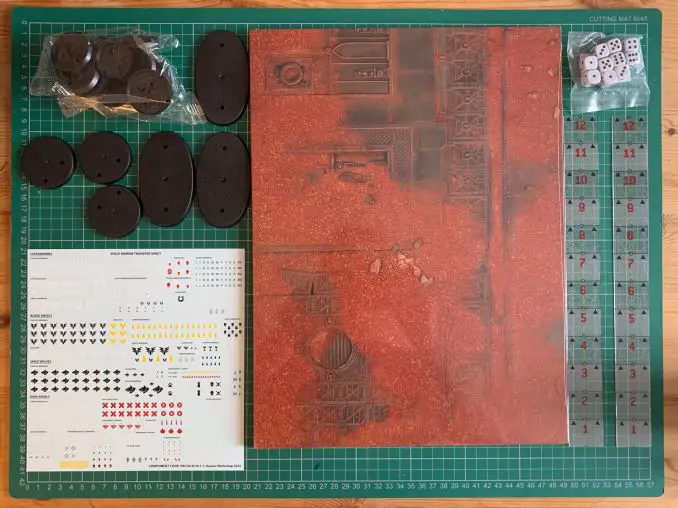
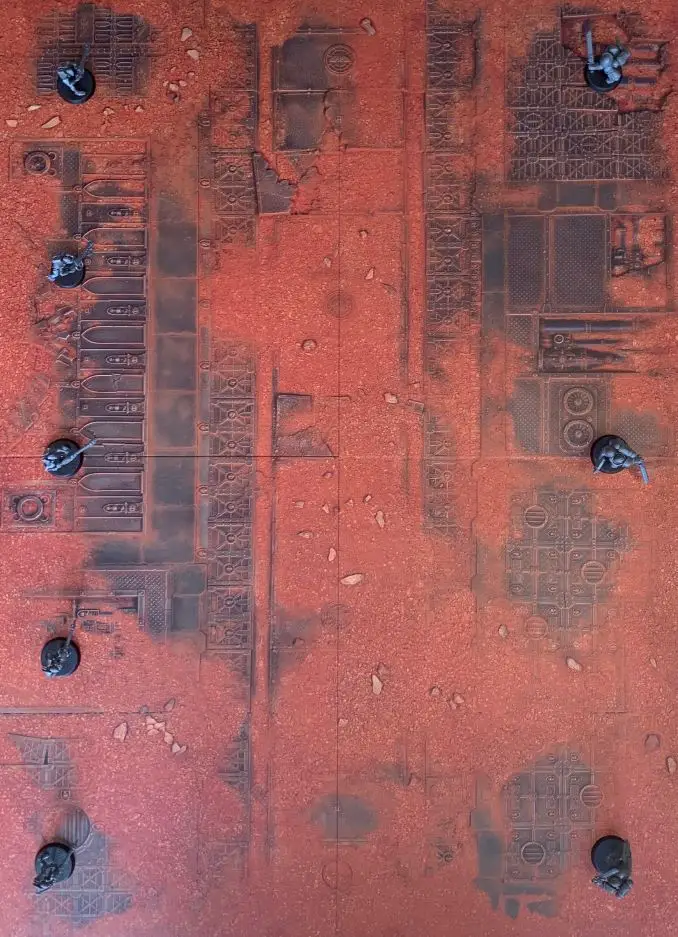
The gaming board is a really nice feature. Unlike the paper mat included in the starter and recruit sets, the gaming board that comes with the Command Edition Made of thick card and cut and scored to fold and unfold easily, this thing is durable enough to survive a good few battles on its face.
I had to decamp from the coffee table I had been taking my pictures on and set myself up on the floor in order to get the gaming board folded out properly. It’s easily big enough for all the models in this box, all the terrain, and even a few more pieces.
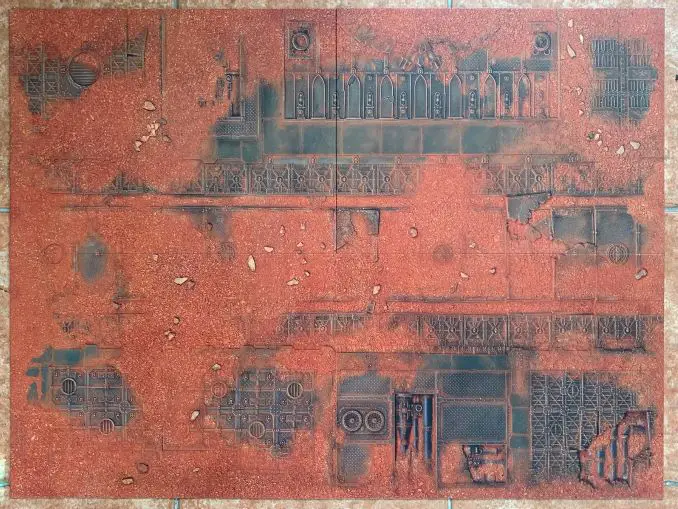
It’s also double-sided, with printed markers on the reverse for those objective-based games. A nice, thoughtful touch – though the fact they are printed on does mean you won’t be able to move them if you so wish to. Just cover ’em with all your new terrain, if needs be. You’ve got enough pieces to do so.

It was at this point I realised something was missing. I had all the books promised, the board, frames upon frames of plastic parts, dice, rulers.
But where the hell are the build instructions?!
My stomach dropped. Had I got a faulty box? That would be my luck: with the deadline for completing this article looming, was I going to have to source another box last minute or wait for Games Workshop to send me some separate build instructions? That would be a disaster.
Suddenly terrified I might have to risk FauxHammer’s wrath by telling him the product I had received was faulty, this upsetting his meticulous publishing schedule and utterly ruining his weekend, I frantically upended the box , hoping that some slip of paper might come floating out, but there was nothing. I checked the gaming board to make sure that nothing had somehow ended up caught between its folds. I grabbed the Command Manual and gave it a flick through, hoping to find the instructions caught up in the pages there. No. Nothing.
FauxHammer messages me on Discord mind-search, asking how I’m getting on. The ping sends a shiver through my spine. It’s like he knows!
But as I was frantically leafing through the Command Manual, hoping for some small booklet to fall out, I saw that the build instructions were, in fact, scattered throughout the booklet, woven in amidst a number of missions designed to initiate players into Ninth.
It’s a novel feature, and one designed at gently introducing brand-new players to the game by having them gradually assemble only the models they need for certain missions. Whilst it’s a good idea for the totally new player, this may well be a frustrating way of doing things for anyone uninterested in the literature in this set, who just want the miniatures, or who is keen to get into battling straight away.
It’s a clever tactic by Games Workshop: forcing the painters and modellers only interested in the figures to confront just how quick and easy it can be to pick up 40K in the hope of converting them to playing.
As a reference for those interested in buying the Warhammer 40,000 Command Edition but who do not want to have to faff around flicking through the Command Manual to find the build instructions for their models…
For the Necrons:
- The Necron Overlord build instructions are on page 66.
- The Necron Warriors build build instructions are on pages 41-43.
- The Necron Canoptek Scarab Swarms build instructions are on page 43.
- The Necron Skorpekh Destroyers build instructions are on pages 53-54.
- The Necron Plasmacyte build instructions are on page 54.
For the Space Marines:
- The Primaris Captain build instructions are on page 48.
- The Assault Intercessor Sergeant build instructions are on page 40.
- The Assault Intercessors build instructions are on pages 38-39.
- The Primaris Outriders build instructions are on page 58-59.
For the terrain:
- The Fuel Pipes build instructions are on page 55.
- The instructions for both Ruins are on pages 60-61.
- The Thermo-Exchanger Shrine build instructions are on page 67.
But there we are.
Warhammer 40,000 Command Edition Starter Set Review – The Rules
Smaller than expected, which is a little disappointing, the Warhammer 40,000: The Rules rulebook that is included in the Command Edition is one of the features exclusive to this box over the others in the range.
My last experience of a Warhammer 40,000 rulebook was back in 2004 when, as a ten-year-old, I was getting into T’au – a phase that didn’t last very long, as I quickly decamped to Beastmen after a quick flirt with Imperial Guard.
This was a meaty monster of a hardback that I’m pretty sure is now lying abandoned in a box at my parents’ house. Whilst the Core Book will, no doubt, be a similarly weighty brick of a tome, the Warhammer 40,000: The Rules included in this set is a more friendly, pocket-sized book with substantially fewer pages.
The new Warhammer 40,000: The Rules book is a handy thing, well-designed and intended to be by your elbow during the heat of battle without taking up too much room. It’s lightweight and can easily be slipped into a bag – and although it is printed on lovely, glossy paper, the fact it is not hardback does mean it will be susceptible to more signs of wear.
It’s also an easy read. As a total 40K novice, I was a little apprehensive about picking up the rulebook. My memories from being a ten-year-old, straining under the weight of the Fourth Edition Rulebook, are basically of giving up on all the wordy stuff in tiny text and just looking at the pictures instead.
But this time round, things are much more digestible. Core information is displayed both as in-depth paragraphs with examples for those people requiring more info either due to inexperience or situationally, but key information also shown as quick-reference bullet points before and after in-depth sections.
The rulebook is broken down into a number of easy-to-follow sections: a step-by-step guide for getting through the phases involved in a turn, and then an in-depth look at the three different styles of play: Open, Matched, and Narrative, which I won’t get into here.
The book is bursting with examples, fabulous pictures, and, of course, more beautifully-painted models than you can stuff into a cardboard box and print “Indomitus” on the front of. It’s a lovely piece of literature, and not too intimidating for the beginner.
Although its smaller than what the buyer is led to believe they are receiving, it’s nonetheless a well-designed, well-thought-out, and handy thing to have.
Nice one.
Warhammer 40,000 Command Edition Starter Set Review – Command Manual
If the Warhammer 40,000: The Rules book is the Core Book distilled and concentrated for ease of use, then the Command Manual takes this even further by removing all the scary long words and sweetening everything with enough sugar to make Mary Poppins blush.
This is another great book – and another thing that sets this set apart from Indomitus. Whilst anyone who already knows the basics of Ninth will have absolutely no use for this whatsoever (beyond, of course, the aforementioned assembly guides which are scattered throughout its 81 pages), if you’re totally new to Warhammer 40,000 or tabletop games as a whole, the Command Manual will be a lifeline.
This book is to this set what the Soul Wars’ Core Rules book is to Age of Sigmar. It’s the perfect place for a total beginner to start, and gradually drip-feeds you the basics and background to the hobby whilst simultaneously guiding you through your first few battles. It’s also filled with all the info a beginner needs to know about collecting, building, painting and gaming, as well as some more smashing artwork and pictures of pro-painted miniatures to get you hungry for more.
But that’s it for the books. Now, let’s get on to the really good stuff.
Please Note: This site uses affiliate links. Our Affiliate Partners are shown below
(Affiliate links will result in compensation to the site on qualifying purchases)
Click this link & buy your hobby stuff from Element Games for the UK & Europe to support FauxHammer.com – Use Code “FAUX2768” at the checkout for double reward points.
Our Affiliates / Hobby Stores
- UK: Element Games, The Outpost, Wayland Games, Mighty Lancer, Goblin Gaming, Forbidden Planet, Model Scenery Supplies, eBay, Amazon
- US/Canada: MTechCave, GameKastle, eBay (US), eBay (CA), Amazon
- Germany: Taschengelddieb
- Europe: eBay (DE), eBay (FR), eBay (ES), eBay (IT), Amazon
- Australia: eBay, Amazon
- Global: RedGrass Games, Warcolours
- 3D Printers: Phrozen 3D, Elegoo, Anycubic
FauxHammer – Latest Video on YouTube
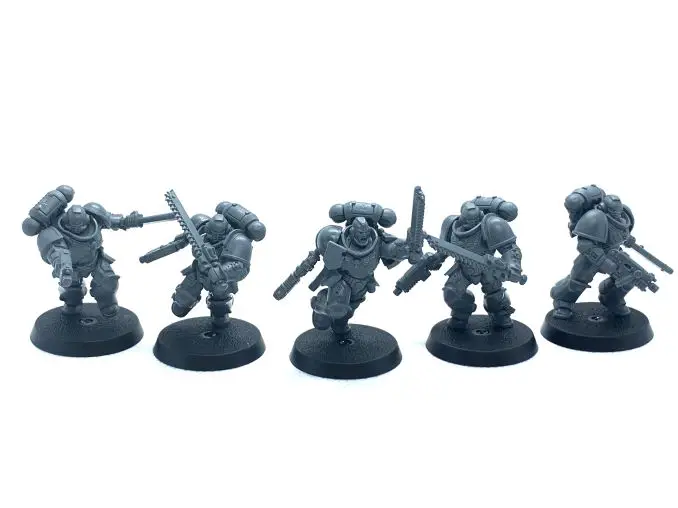
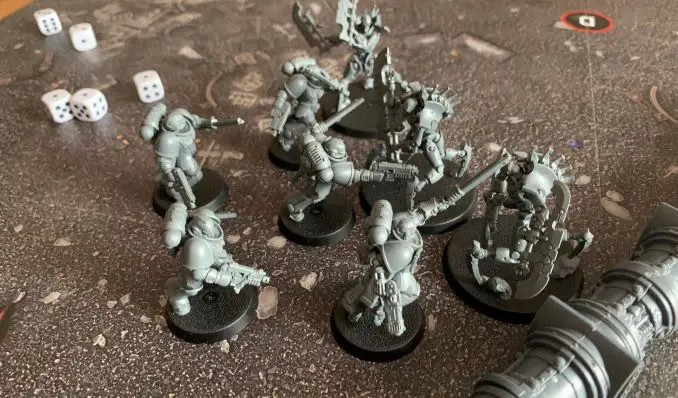
Warhammer 40,000 Command Edition Starter Set Review – Models
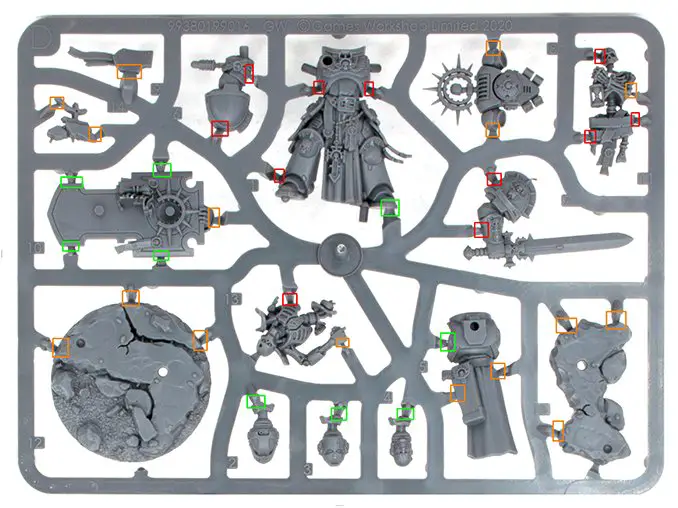
Warhammer 40,000 Starter Set – Sprue A
It’s miniatures time!
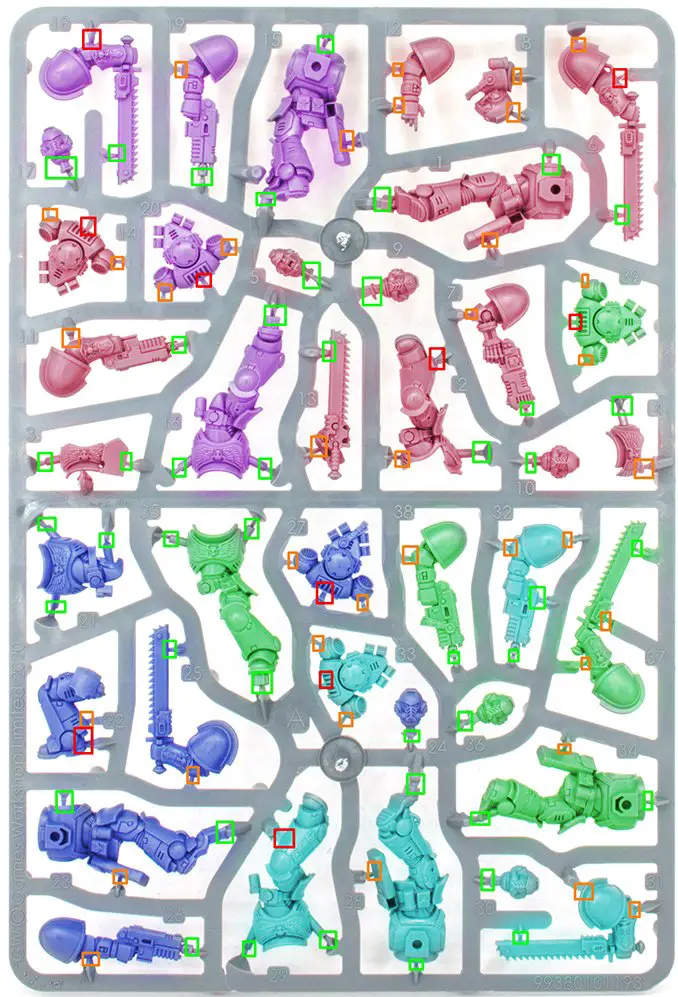
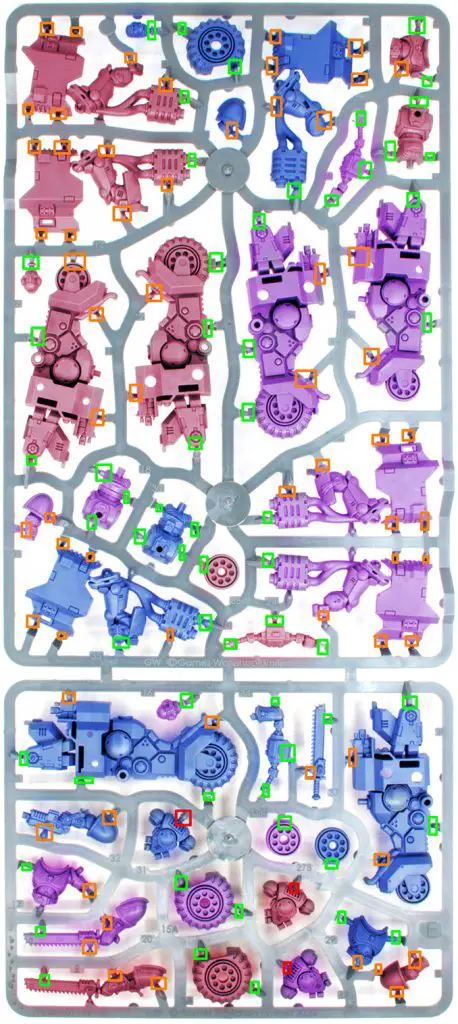
Before we begin, it’s worth noting that every sprue found in the Command Edition is lifted straight from the Indomitus box. As you’ll see in the review below, the fantastic colour-coded cutting and modelling guides used in our Indomitus Review to help you match up all those small parts feature again here. So, to steal paraphrase what was written in our Indomitus Review, you use them as follows:
1. The matching parts of each model, where there is more than one model per sprue, have been coloured so you can easily match them up.
2. The sprue gates have been colour-coded to show how difficult they are to remove from the model, using the following key:
- Green – Easy, barely an inconvenience. Normally these areas can be cut right up close, as most will be hidden from view anyway (like base pegs), or they are parts which are against flat parts of the model so may just need slight sand, file or hobby knife shave to stay flat.
- Amber – These areas are on larger and often curved surfaces, and will require some clean up afterwards such as a hobby knife shave and then a gentle sand
- Red – Use caution. These areas are a tricky. They are either large areas which will need a lot of aforementioned aftercare work, or they are gates close to detailed parts you could damage if you are not careful
The sprues lettering system matches the one found in Indomitus, quite literally down to the letter, as you’ll see below.
- Spure A: Space Marine Assault Intercessor Squad
- Sprue B: Necron Canoptek Scarab Swarms and Necron Warriors
- Sprue D: Space Marine Primaris Captain and Necron Overlord
- Sprue E: Space Marine Outriders
- Sprue F: Necron Skorpekh Destroyers and Necron Plasmacyte
So, without further ado, Sprue A.
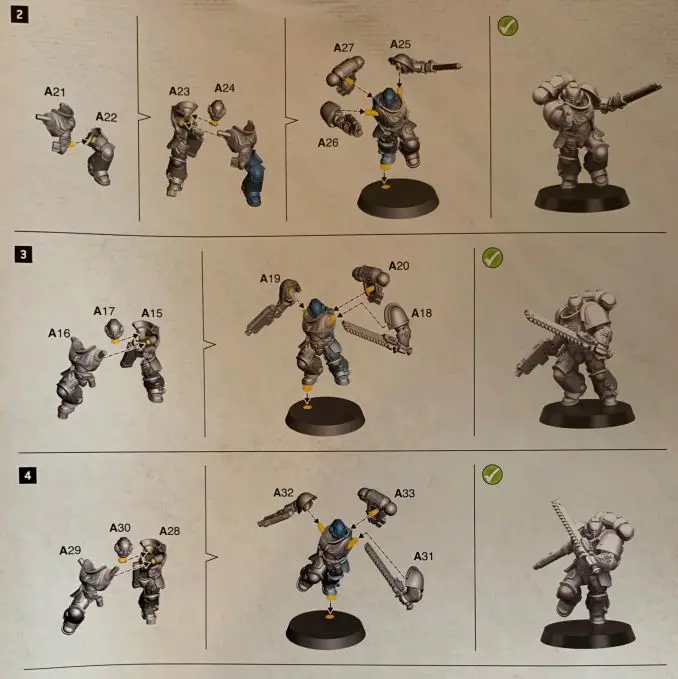
The Command Manual advises you build the Assault Intercessor Squad first, so that’s where we’ll begin.
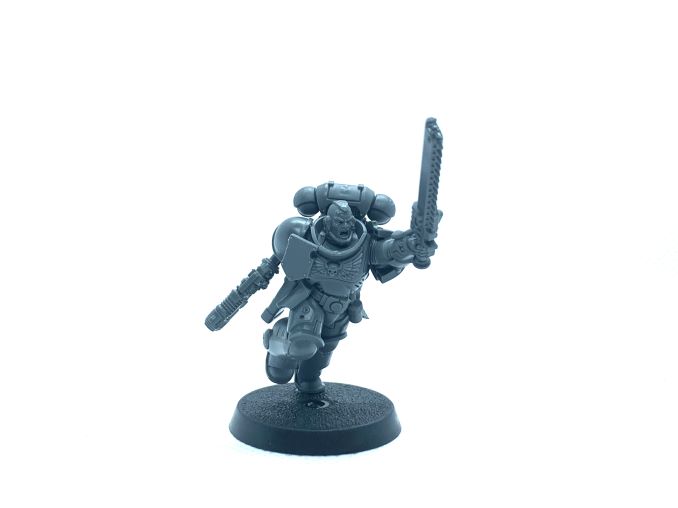
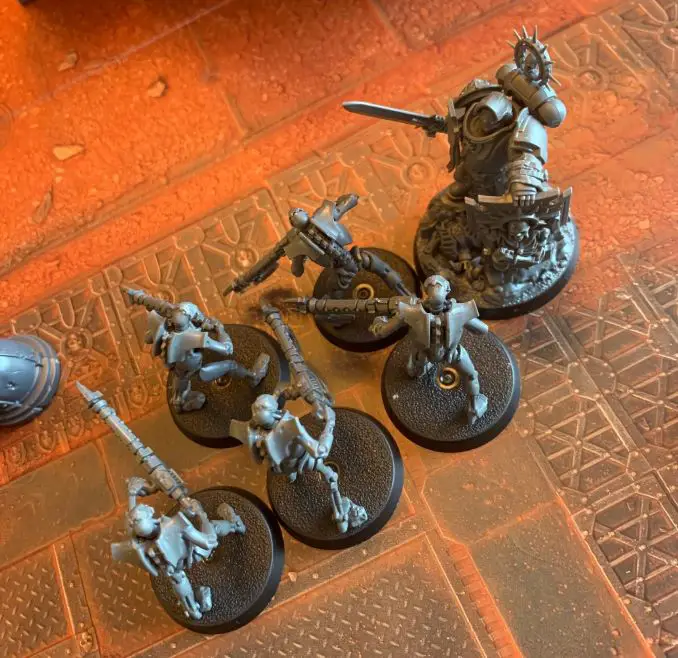
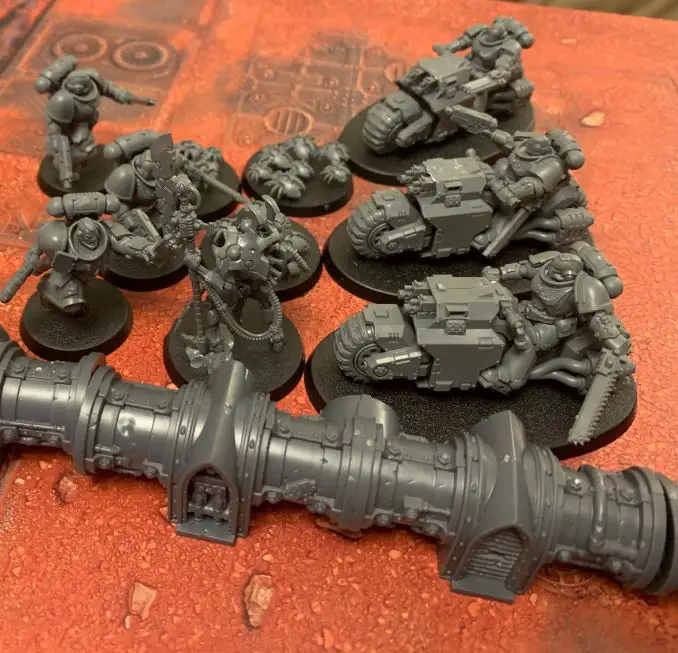
Space Marine Assault Intercessor Squad
Differing from the Indomitus box insofar that you only get one sprue of these guys as oppose to a pair – but that’s not necessarily a bad thing if you hate having lots of miniatures in the same position – the Intercessors have that classic Space Marine look and energy every 40K starter set needs.
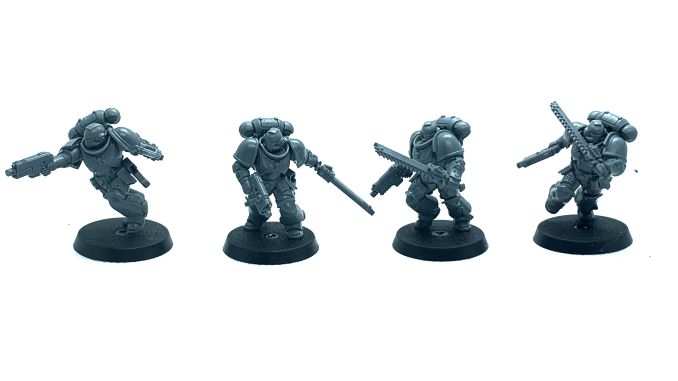
These guys look great; you get a real sense of action and dynamism with them. They charging, aiming, brandishing their weapons, not just standing idly by, waiting to be pushed back and forth into and out of combat. They want to get there. They’re vibrant and exciting – and really damn easy to put together.
Push-fit plus a little glue here and there best describes the process with these guys. Whilst you could put them all together without even opening your glue, you might want to put a few dots in some places – but that’s entirely up to you.
They’re easy – and utterly perfect for a beginner.
Next up, the Intercessor Sergeant, and with him comes the builders first choice of parts. Option A: a heavy bolt pistol, or option B, a plasma pistol and chainsword.
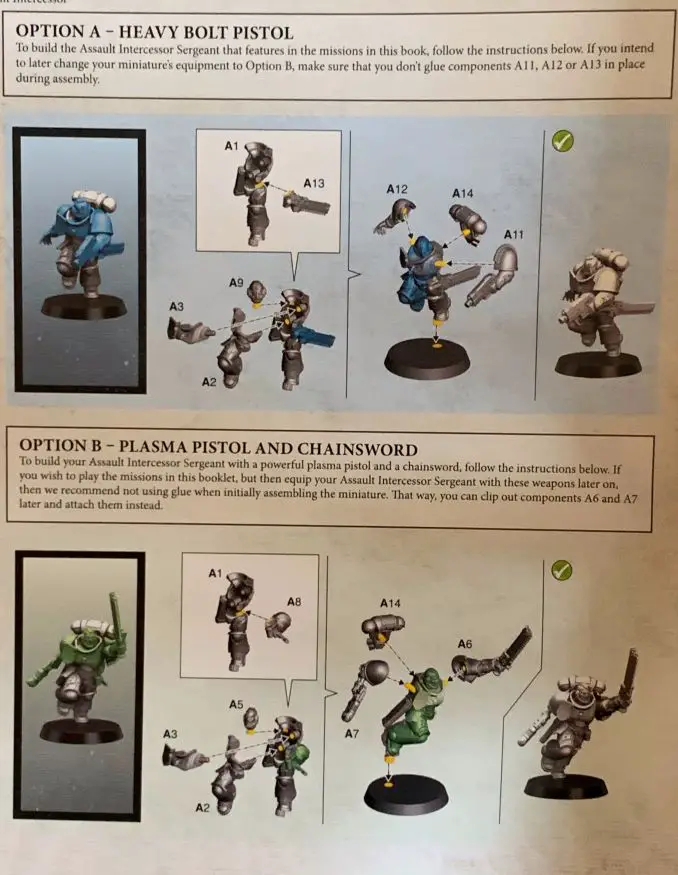
A little PhotoShop wizardry from the Dark Wizard FauxHammer himself reveals what the two variants from this box can look like, option B on the left and A on the right.
The book recommends you equip your sarge with his chainsword and plasma pistol for use in the imminent missions – as, after all, the plasma pistol packs way more of a wallop.
Personally, I went for option B because, you know, chainswords. Again, it was an incredibly easy assembly: push-fit with a few dots of glue to just ensure everything is held in place forever.
There are a handful of extras left on the sprue – including a variant chestplate for your Intercessor Sergeant (one without the shield-shaped badge) that is not noted in the construction guide, so it’s something to be aware of if you’d rather not have that on your sergeant instead.
Frozen in action and rendered in great detail, side-by-side together, they look like the universe’s most deadly boyband.
With the addition of their leader, the Intercessors are done! There are very few mould-lines or other bits you might need to remove, so once they’re all together they’re ready for you to begin painting.
Smashing. So, what’s next?
Warhammer 40,000 Starter Set – Sprue B
Sprue B, which is awash with the vast majority of the Necron models in the box, is where the Command Manual next directs the reader.
The ghoulish and spindly – and also concerningly fragile-looking – Necron Warriors await, along with their Canoptek Scarabs.
Necron Warriors
These guys are cruel.
My single biggest issue is the final bit of assembly you need to do before you stick your Necron onto its base. This involves sticking a chest and attached head to the rest of the body. Sounds simple? Sure.
Is it…?
No.
So, because your Necron’s arms need to be attached to the inner-torso/back, of your miniature before you attach the chest/head, and your Necron is holding their weapon across their body, this makes getting that chest/head component attached top the rest of the body really difficult – especially as the socket on the back of the front-chest needs to be pushed onto a little peg at the rear of the torso cavity. Doing this when your little robot skeleton is swinging his weapon across his chest is really awkward.
Aside from that, and in spite of a few really tiny components (heads/faces and left arms) these guys aren’t too terrible to put together. Cleaning them up, though is another matter. With mould lines on some of the smallest components, and all the heads are attached to the sprue gates by their chins, for example, getting rid of these may be a bit of an ask for a novice.
But once you’ve managed to get them all assembled, they look pretty nice.
They possess a different kind of dynamism to the Intercessors; the Necrons don’t leap and bound, flailing chainswords and blasting bolters. Instead, they advance.
There is a menacing synchronicity in the unit: ten skeleton-like space robots fearlessly marching ahead, driven by pure mechanical desire. Their contrast to the Space Marines is stark, but they have their own unique dark energy.
Mine Warriors were built with the gauss flayers, as recommended by the book itself, though there are enough leftover weapons (and Necron heads, for that matter, as each Necron Warrior comes with a choice of two heads) which leaves you with a ton of excess plastic to do with as you wish.
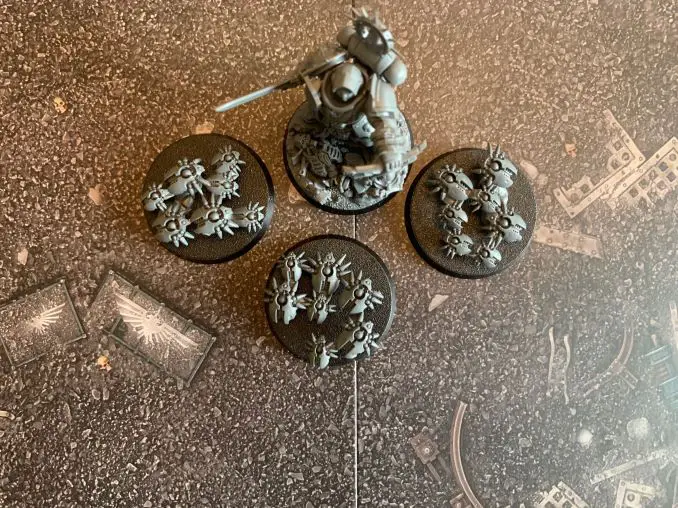
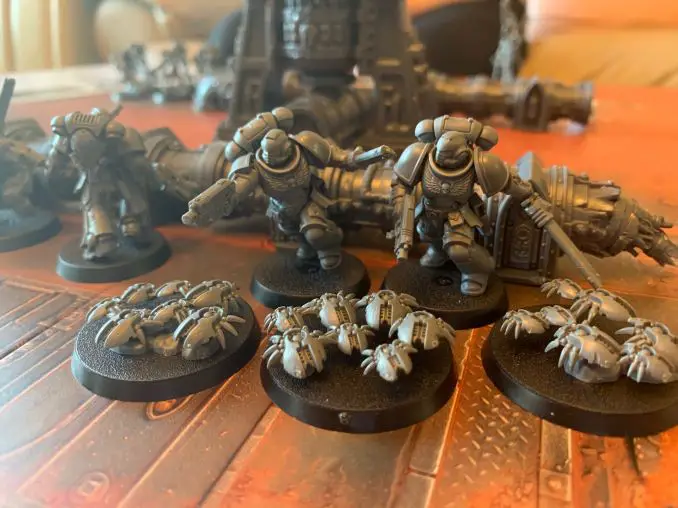
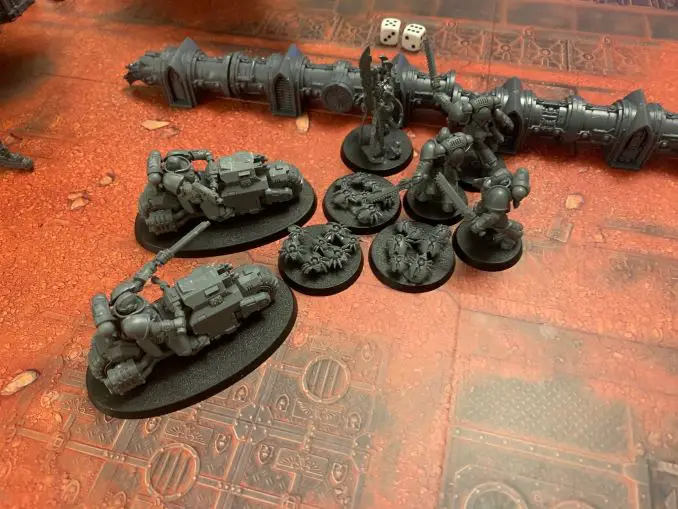
Canoptek Scarab Swarms
In stark contrast to the Necron Warriors with whom they share a sprue, the Canoptek Scarab Swarms are an exceptionally easy, unit to assemble.
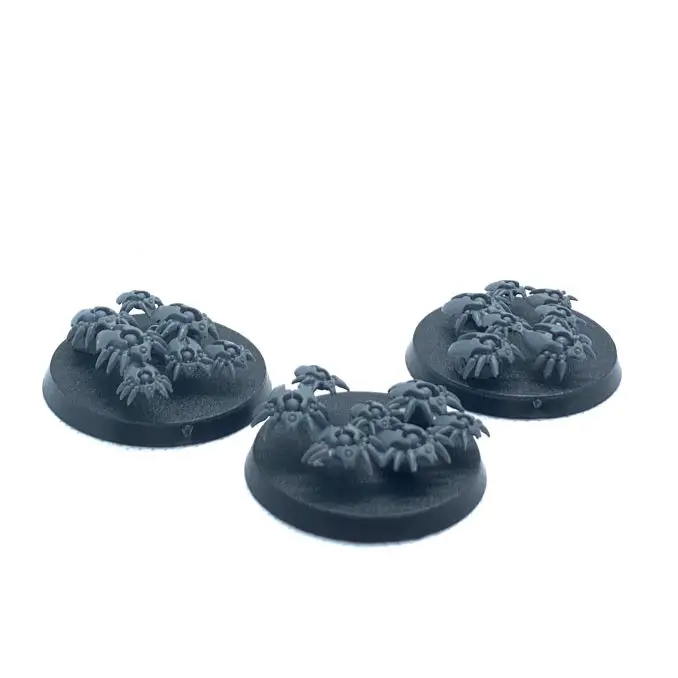
There are threee swarms in the box. Two have three parts (a single group of scarabs, some rocks, and their base) and one has only two (the scarabs and their base). It’s a case of cutting them from the sprue, pushing them together, and calling it done.
Personally, I wouldn’t glue these guys to their bases straight away, and given they’re all push-fit, there’s absolutely no onus on you to do so. When it comes to painting, you will find it much easier to do a decent job of the small clusters of rocks the scarabs are perched on if you are able to disassemble the model – which is no big ask.
Warhammer 40,000 Starter Set – Sprue D
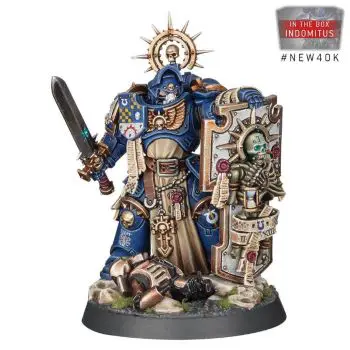
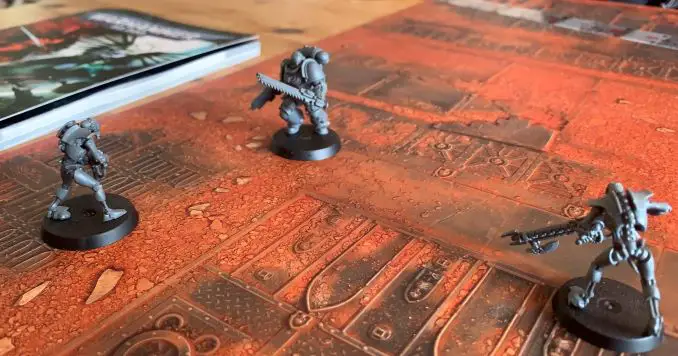
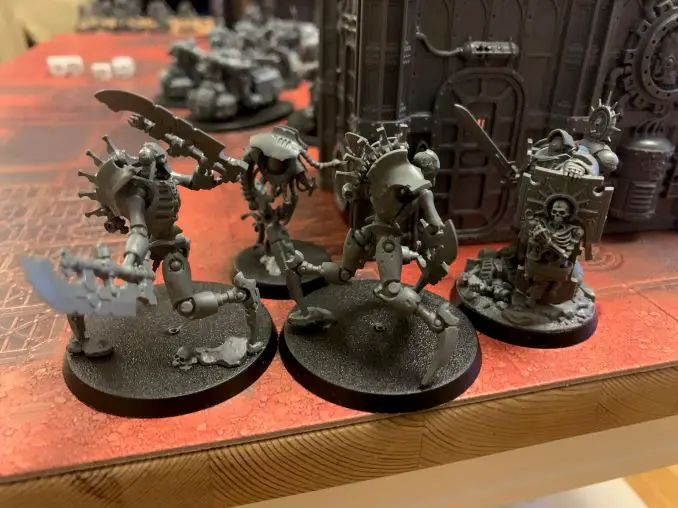
Things start to get unique with Sprue D. Here you’ll find the towering Necron Overlord and the beautiful Primaris Captain – the iconic warrior clutching his sword and shield so synonymous with Ninth Edition.
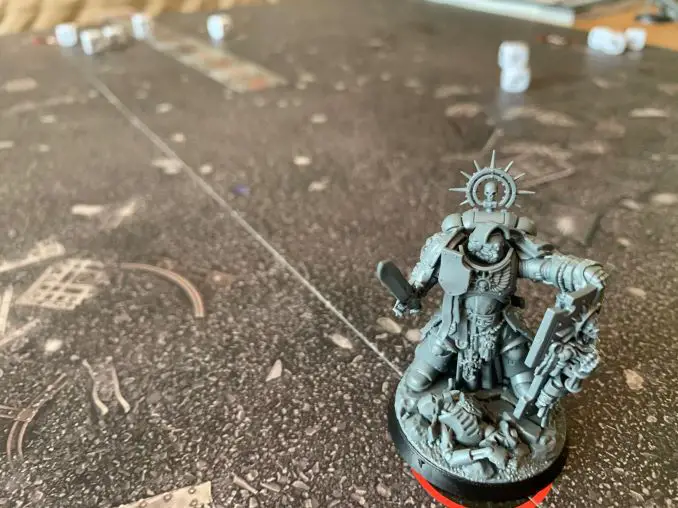
Space Marine Primaris Captain
Since the release of Indomitus, the Warhammer community has been awash with some of the gorgeous, unique models that come in the set. In my humble opinion, there are two that stand out about all others: the Judicar and the Primaris Captain.
Their sculpts are gorgeous, their looks are spectacularly unique, and they exude some real presence. That the Command Edition comes with the Primaris Captain is a great feature – condemning those wonderfully unique models to Indomitus alone would have been a travesty.
Once again, the builder has options with this chap, as shown below in this lovely picture swiped straight from our Indomitus review. The Primaris Captain has three possible heads: helmeted, helmeted with visor raised, and without a helmet. The builder also has three different options with the Captain’s base: a fully scenic base that can have either a defeated Necron or some additional debris attached to it, or a cluster of rocks upon which he can stand.
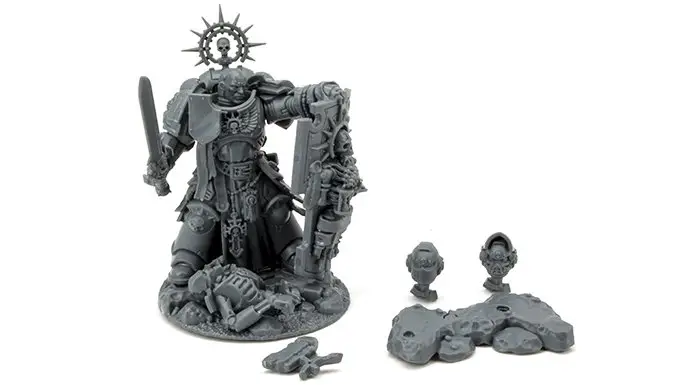
He’s easy to put together. Like everything else in this box, he’s more-or-less push-fit, but his fabulous sculpt and dynamic base is what truly sets the Primaris Captain apart from everything else in this box.
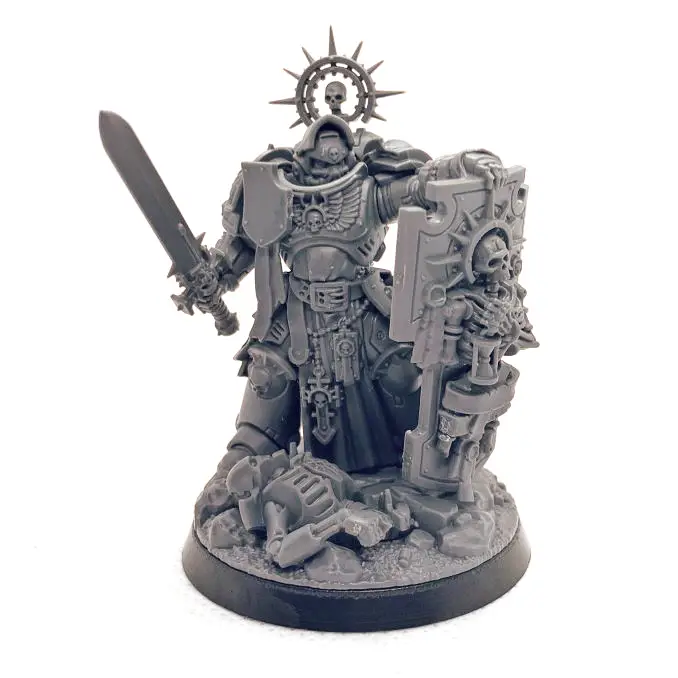
I went with the raised-visor look and defeated Necron on the base for my Primaris Captain. There’s something a bit mediaeval about him that really calls to the historian in me.
Anyway, 10/10. Best model ever. Buy the set just for this guy.
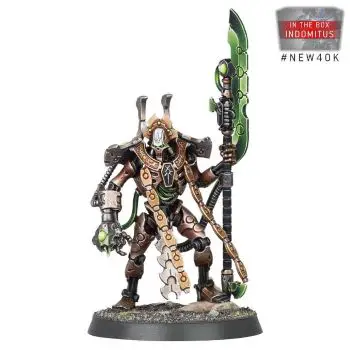
Necron Overlord
In a slight diversion from the order the Command Manual would have you assemble these figures in (the Necron Overlord is the final model the manual asks you to put together, just before you penultimate introduction mission), we now move on to the Necron’s leader.
The Overlord is to the Necrons what the Primaris Captain is the Space Marines: a towering, imposing leader to direct your miniature hordes to and fro in battle. Once again, and much like every other model thus far discussed in this box, he has an impressive sculpt. Drawing on that traditional ghastly metal skeleton look so embodied by the Necrons, the Overlord is draped in detail that conjures into the mind’s eye images of Ancient Egyptian Pharaohs.
He’s also really damn easy to throw together.
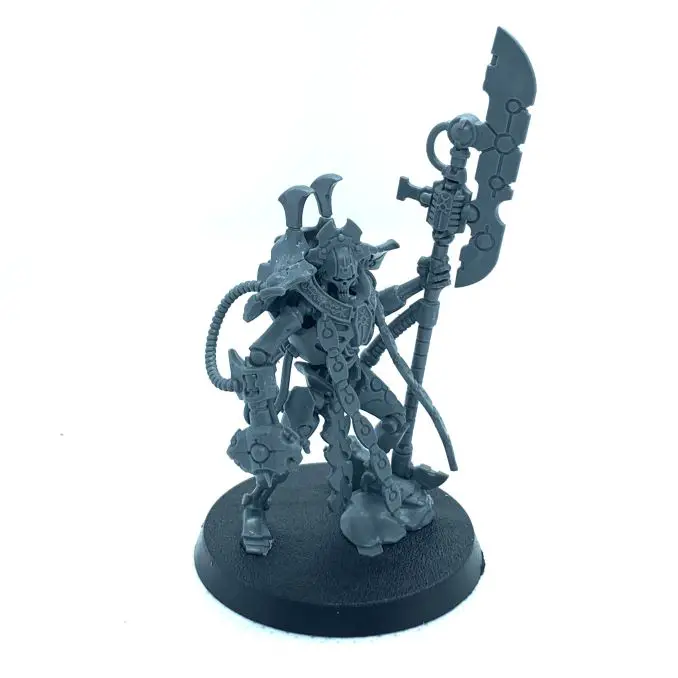
Attaching his head may be a bit of a challenge for someone totally new to modelling, as it’s not entirely clear from the guide how to go about doing this.
Of course, the book simply has the head component – which is attached to part of a shoulder and upper arm – and an arrow pointing towards the right-hand side of the torso. In truth, this has to be slotted between the neck and shoulder and then rotated slightly to line up correctly. Not difficult to do, just not evident from the instructions.
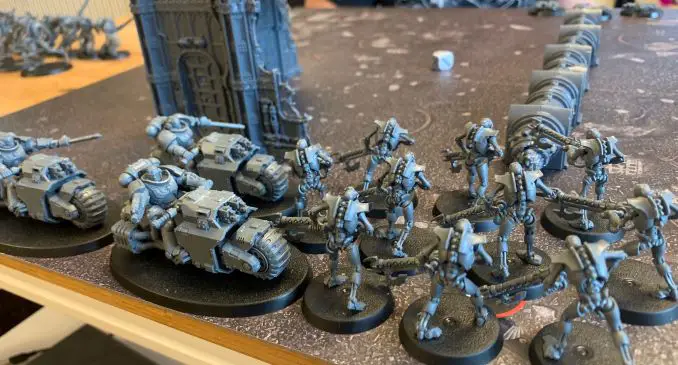
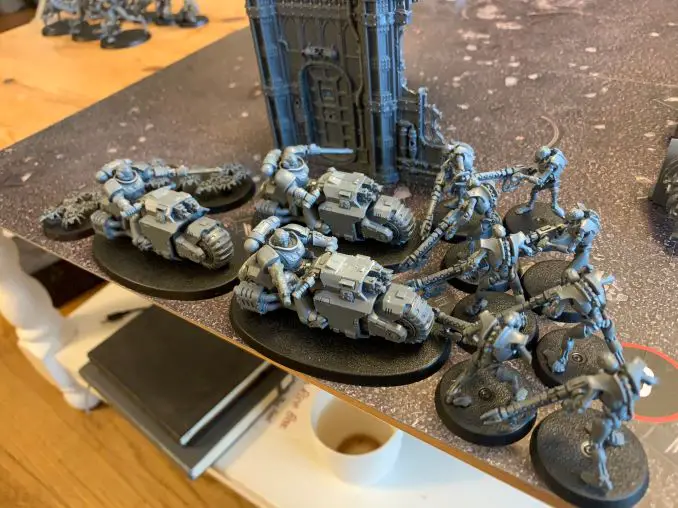
Warhammer 40,000 Starter Set – Sprue E
In the name of keeping these sprues in alphabetical order for this article, I’m now playing fast and loose with the build order that runs hand-in-hand with the missions in the Command Manual. The book wants you to build the Skorpekh Destroyers and a piece of terrain for a particular mission before tackling the Outriders on Sprue E, but to keep these in proper sequence, Sprue E is up next.
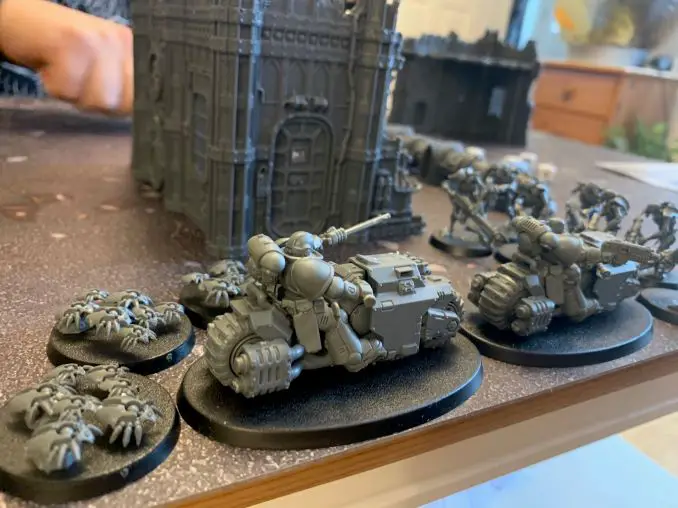
Bikes!
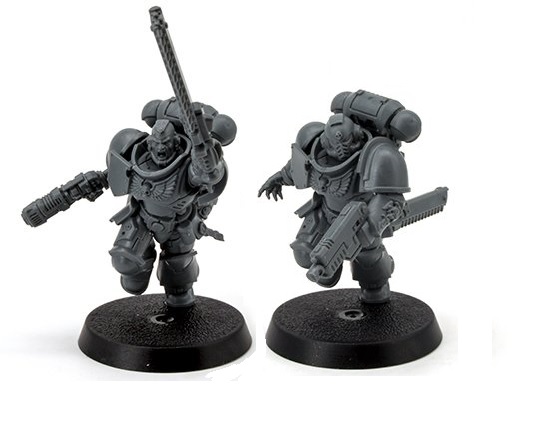
Space Marine Primaris Outriders
I’ve always wondered what use motorcycle-mounted guns would be on a battlefield. Imagine trying to operate a bike, a pair of mounted guns, and wield a chainsword at the same time, all the while making sure to praise the Emperor of Mankind with each filthy Xenos you cut down. Talk about multi-tasking. But after putting these guys together, I get it.
They’re there to look awesome.
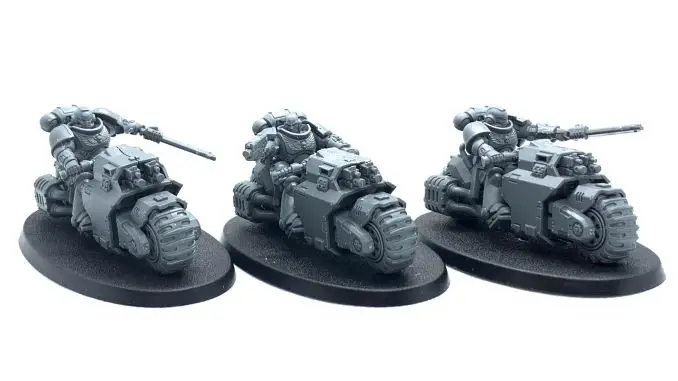
I can see it already: Necron circuits frying as their frontline gaze in awe at the Space Marine Outriders as they desperately try to compute how they could ever possibly hope to look as formidable.
Fresh from one of the larger sprues in the box come three bike-mounted badasses. You get no options with these guys: its two guys in helmets waving chainswords about, and a dude brandishing a bolter with his head uncovered. But these guys look so nice that I don’t care.
Of all the models in the box, these are the ones you’ll need to work for. Fused to their sprue gates like iron soldered to iron, cutting these guys from the sprue was a task, and getting rid of all those mould lines and little nodules of leftover plastic was hard work. It was a good job the vast majority of the cuts that needed to be made to the sprue to get these guys don’t require too much delicacy.
However, you’ll be left with a small gap running down the middle of each bike, which might be irksome for you. Luckily, there’s already at least one brilliant guide on how to fill these in available, so it’s not like you even have to go far to find out how to fill in those hairline cracks in the sculpts.
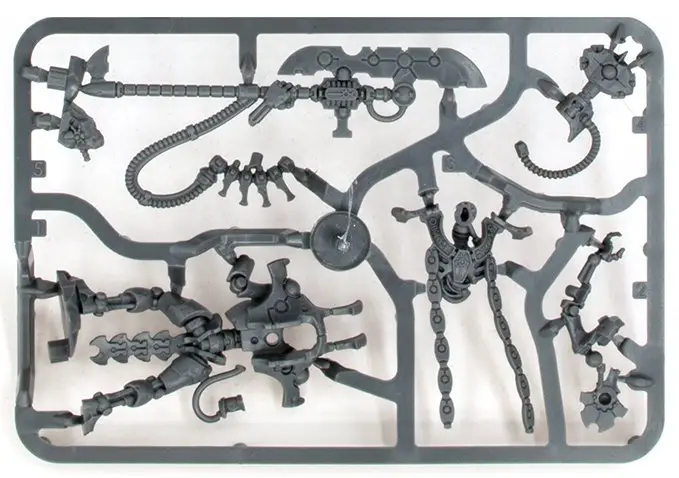
Warhammer 40,000 Starter Set – Sprue F
The Command Manual will ask you to build the Skorpekh Destroyers and Plasmacyte strung up between the edges of this sprue before tackling the Outriders.
Ultimately, the order you decide to put these menacing robot death machines together in matters little – it’s up to you.
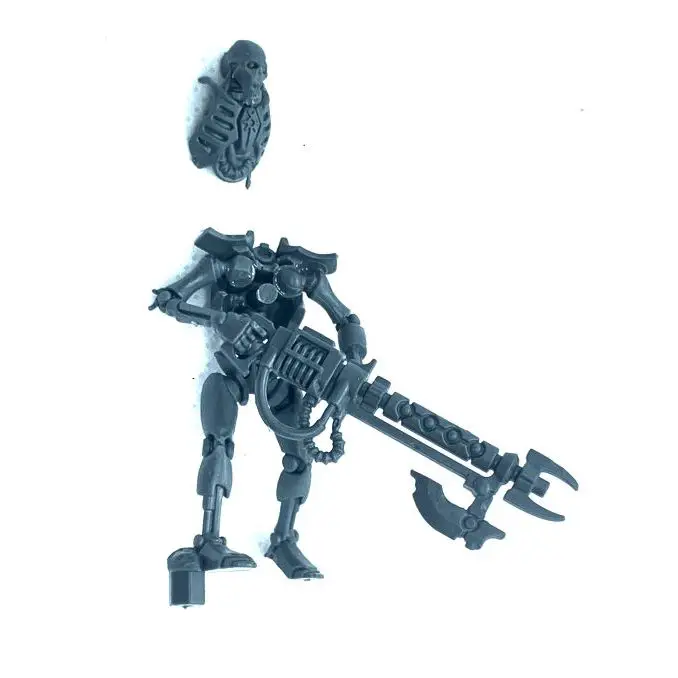
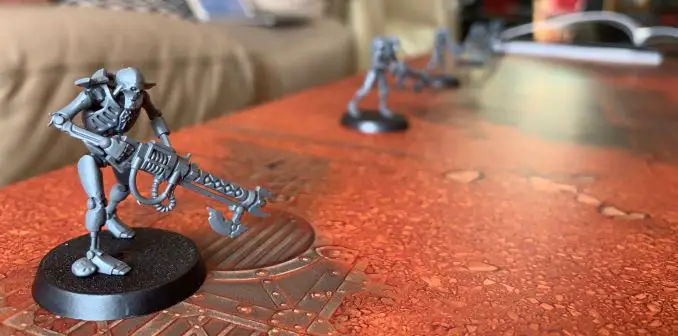
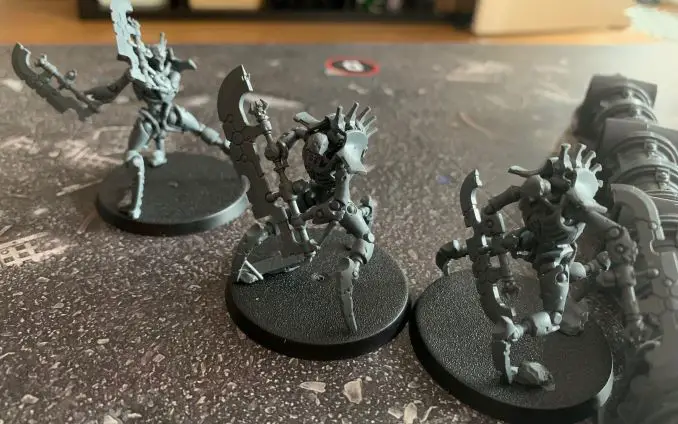
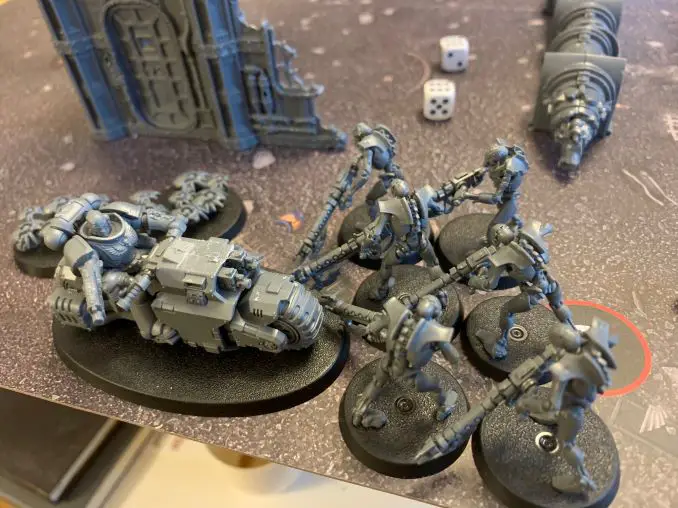
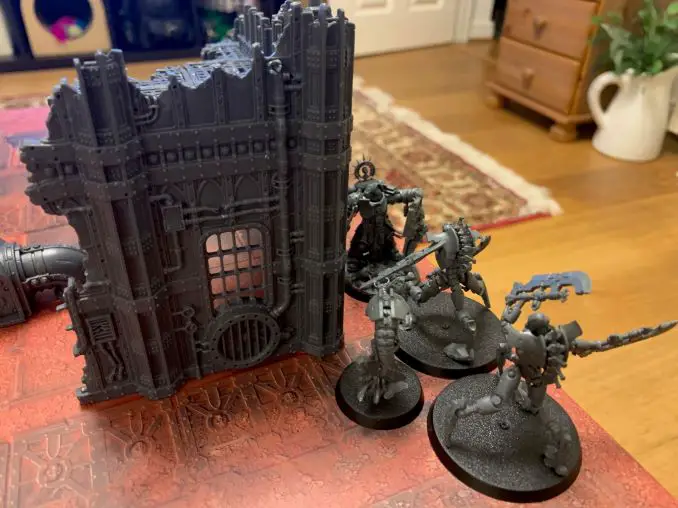
Necron Skorpekh Destroyers
The Skorpekh Destroyers are one of those units that left geeks everywhere drooling. They’re tyrannical, blade-wielding tripods, scuttling to and fro across the battlefield, ravaging your foe’s battleline and leaving arcing webs of blood and gore in their wake.
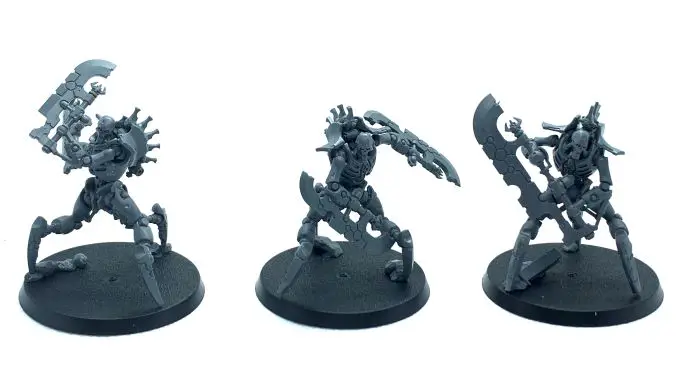
But as awesome as these guys look, the Skorpekh Destroyers are a real nuisance to put together – and the reason for this comes down to two component that they all share: their heads, and their spines/hips.
On all three models, each one has a spine/hips component that is attached to the model via a hole that is pushed onto a peg inside the model’s torso. In the assembly guide it really is not clear which way round this needs to be attached to the miniature, and because each spine is not straight, if you manage to attach this to your model the wrong way round and then try and attach its legs, they will not line up with the holes on the base.
If you do manage to put the spine/hips component on the wrong way round, like I did on one of these guys, a tell-tale sign that you might have got the part the wrong way round is that when you try and attach the front-facing chest/head to the rest of the model, the two halves of the torso will not touch – so be aware.
As for the heads, each model’s noggin will need to be twisted around its body and shoulder to get it to sit in the right place – another thing that isn’t obvious from the guide that a beginner may trip up on. Remember: be gentle and patient with your plastic, and you’ll get there.
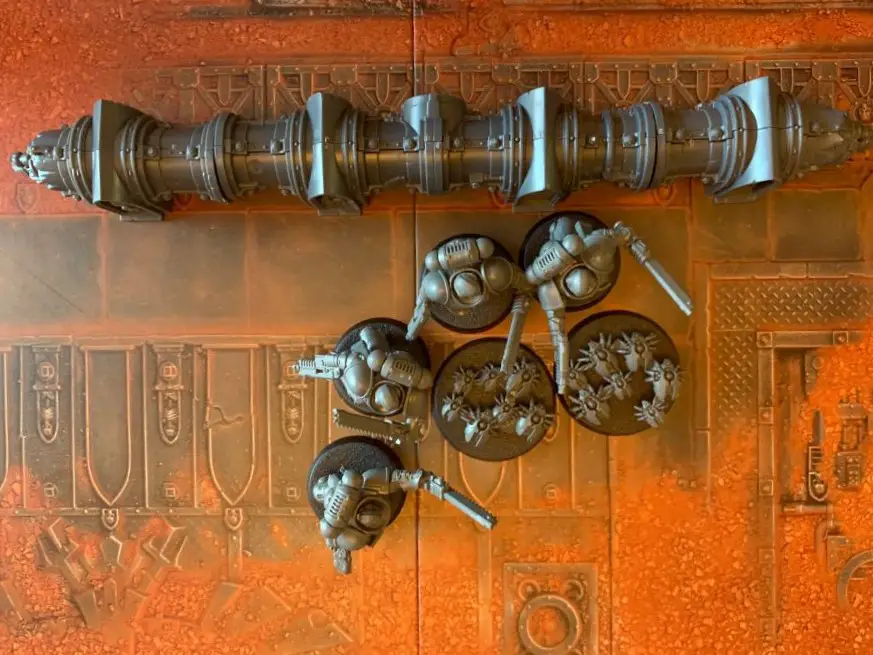
Necron Plasmacyte
Much like the the Canoptek Scarabs, the Plasmacyte is a breeze to assemble. Made up of four parts (a left-hand side, a right-hand side, an armour plate that goes over the top of the figure, and, of course, its base), this gangly little robotic fellow goes together with as much ease as his scuttling kin on Sprue B.
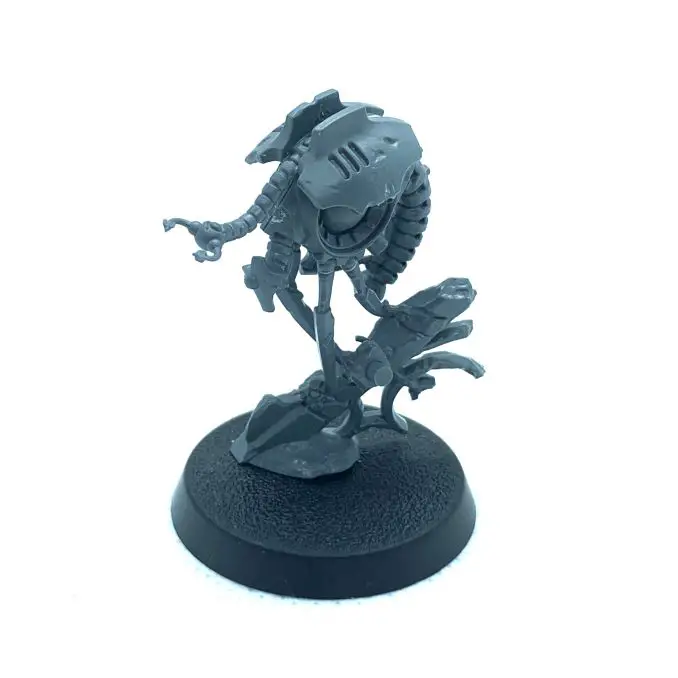
It’s not much to look at, though, and there’s a little gap under its alien space probe-y thing that I assume is supposed to be its face (FauxHammer, the big nerd, tells me this is actually called a proboscis, so we all learned something today). There are also a couple of mould-lines you’ll need to deal with, but nothing you haven’t already faced by this point in the box.
That the model is anchored to a bit of built-in scenery is nice. I’m a sucker for anything that makes a model look a little bit more integrated into its environment as it really helps bring the figure to life – and with the Plasmacyte, which isn’t the most interesting figure to look at , even the addition of a shaft of debris helps add some life to an otherwise fairly plain model.
And with that, that’s all the miniatures assembled!
So, compared to Indomitus, the Warhammer 40,000 Command Edition is down the Space Marine Judicar, Primaris Chaplain, the Primaris Ancient, the Blade Guard Veterans, Eradicators, and the Necron Canoptek Reanimator, Cryptothralls, Plasmancer and Skorpekh Lord.
This is a bit of a shame, as these are some of the stand-out models from Indomitus. It would have been nice to have, say, a Judicar and a Canoptek Reanimator, or the Chaplain and the Plasmancer, just for a little extra spice.
But hey, I guess that’s the price to pay for missing out on Indomitus.
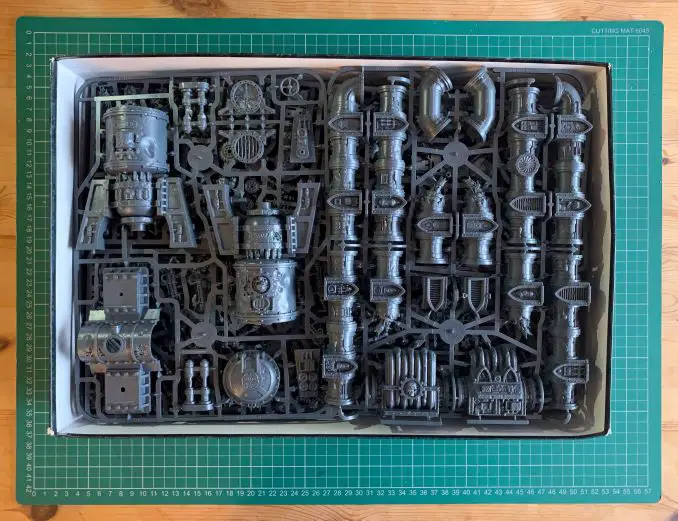
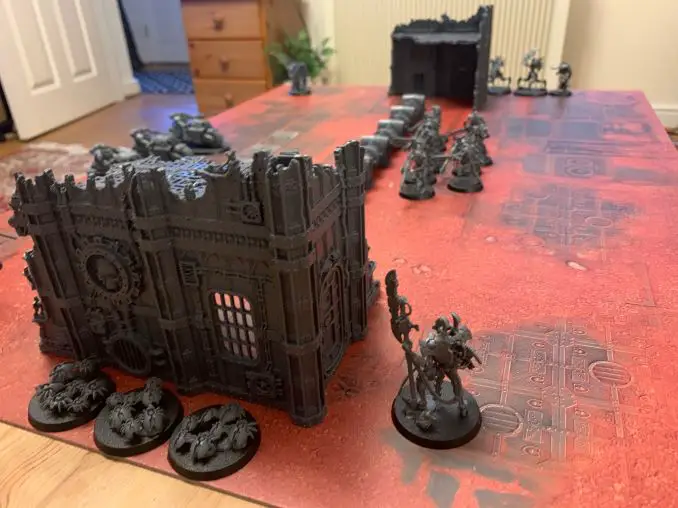
Warhammer 40,000 Command Edition Starter Set Review – Terrain
One of the features that is designed to set the Warhammer 40,000 Command Edition apart from the other products in this range – and its mighty predecessor – is the inclusion of a number of push-fit terrain pieces. Whilst purchasers of the Recruit and Elite Editions have to make do scrapping over a, uh, foldable cardboard box, owners of the Command Edition can have their tiny soldiers wage war over some substantial and detailed bits of terrain.
Designed to bring your first few battles in the 41st millennium to life by quickly creating an intricate diorama of destruction, these pieces of terrain are so easy to put together, they barely even need instructions. If you’re super new to the hobby and super unconfident about cutting up and assembling your first miniatures, you may even want to start your first foray into building and assembly here, as you’re very unlikely to break anything on any of these sprues given how solid all the components are.
They’re also very easy to get off the sprue given both how large the individual parts are and that there are lots of flat edges for the terrain components to be gated along. The push-fit parts work well as well and feel as if they are holding firmly – though, of course, you may want to glue them anyway if you prefer.
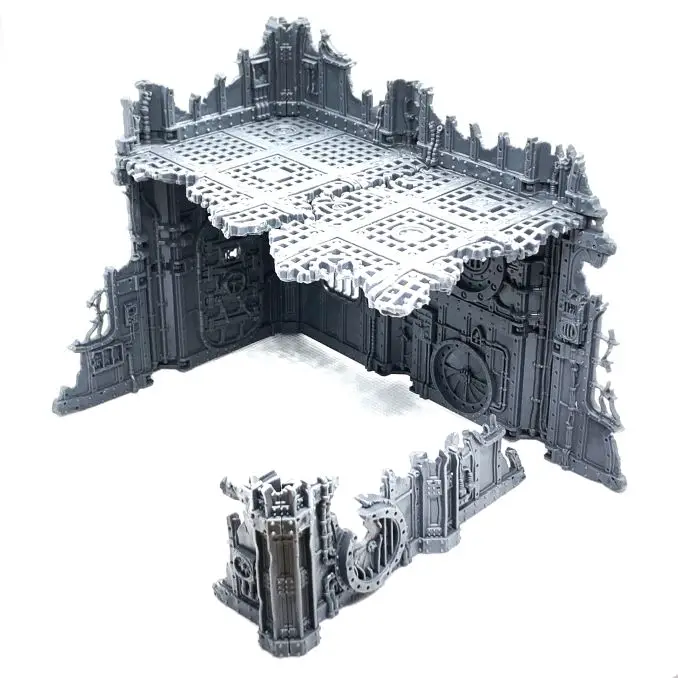
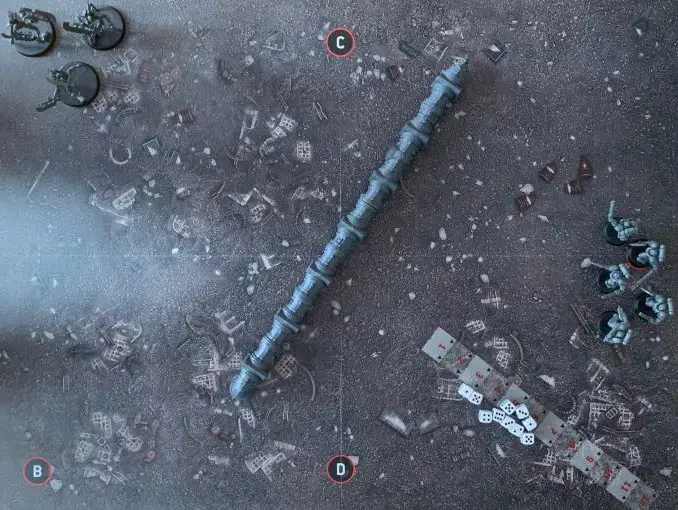
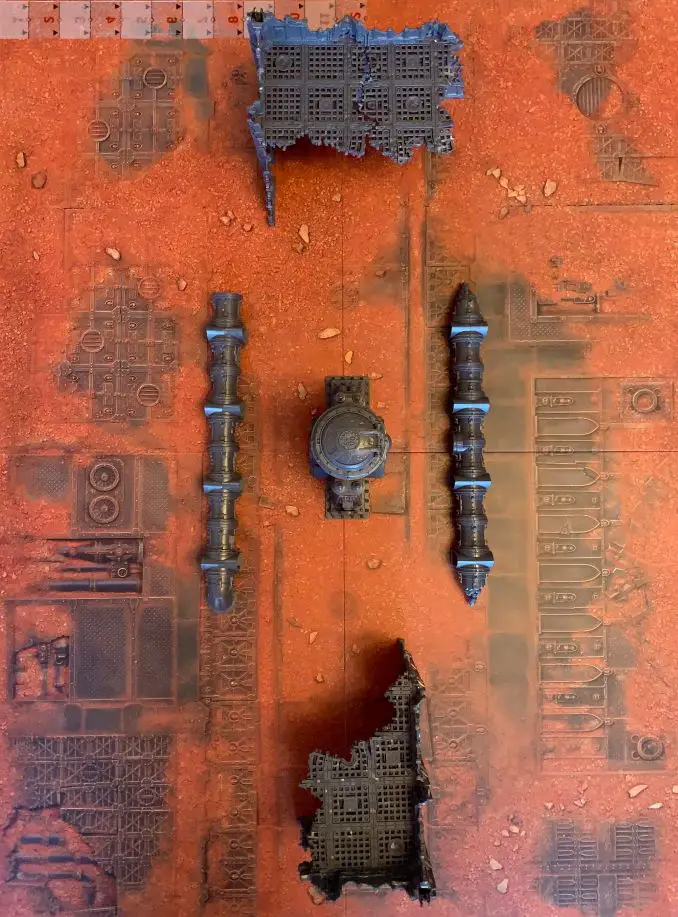
There are 12 pieces of terrain included in this set, scattered across four sprues:
- 2 x large walls with upper floors
- 2 x low walls
- 1 x Thermo-Exchanger Shrine (what water towers would look like if they had the same design team as Wolfenstein: The New Order)
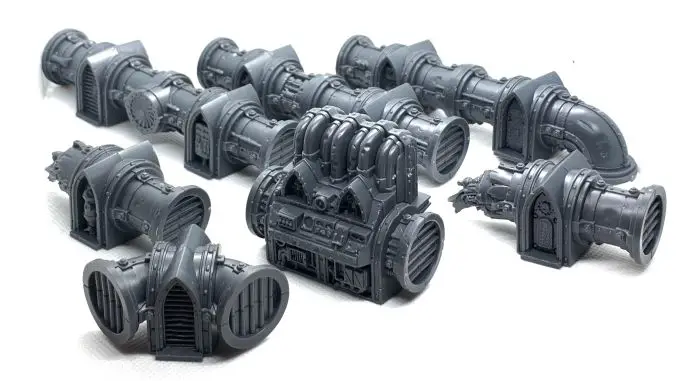
- 7 x fuel pipes of various lengths
Warhammer 40,000 Starter set – Terrain Sprue A
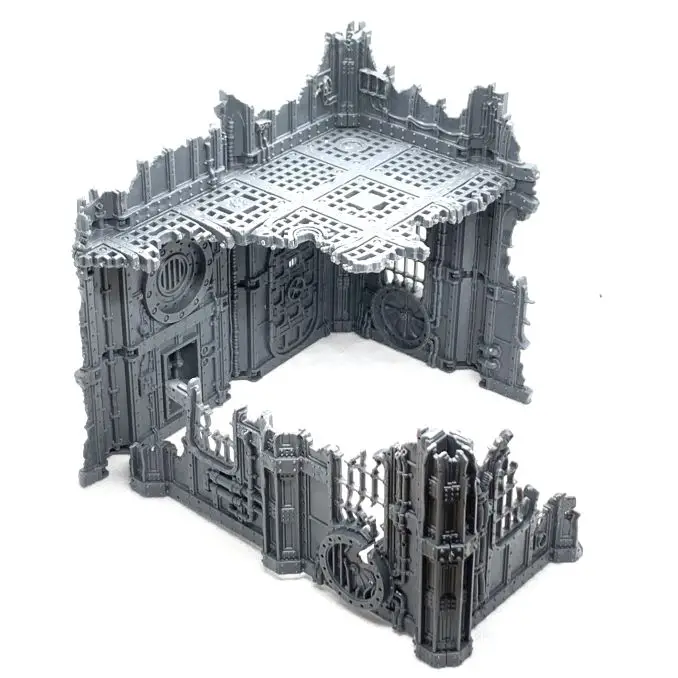
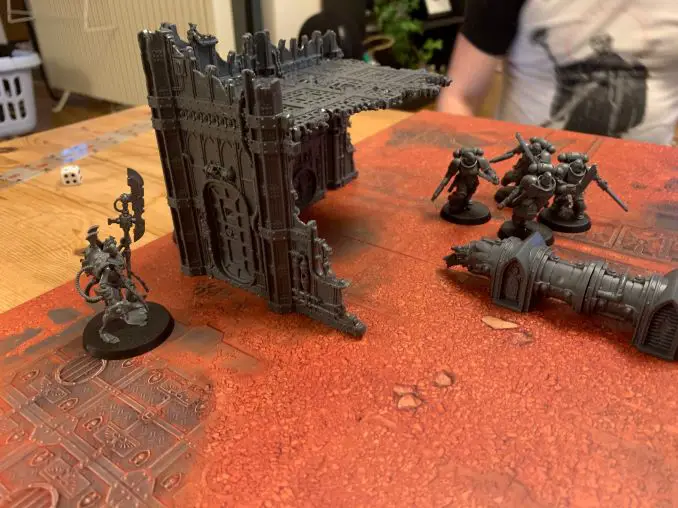
Terrain Sprue A gives you a handful of large, solid push-fit parts to create a set of two ruins: one large wall with a small section of ruined first-floor flooring for your soldiers to rain down fire from, and a smaller, lower wall behind which they can crouch.
These are so easy to put together, I barely even looked at the construction guide (though one is available on pages 60-61 of the Command Manual).
Warhammer 40,000 Starter set – Terrain Sprue B
Much like Terrain Sprue A, Terrain Sprue B also gives you everything you need to create another set of ruins. Similar to the terrain that can be built with Sprue A, with Sprue B you can create another large wall with a slightly larger section of ruined first-floor flooring, and an another smaller, lower wall.
Once again, putting them together is intuitive, though a guide is available in the Command Manual (pages 60-61).
Warhammer 40,000 Starter set – Terrain Sprue C
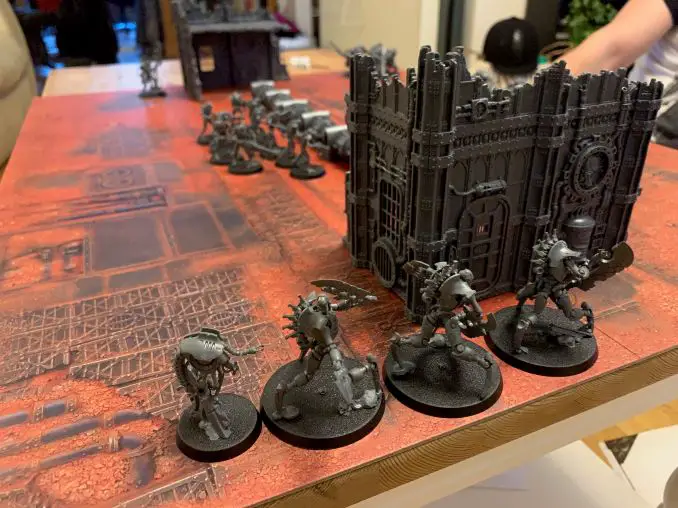
Terrain Sprue C builds assembles Thermo-Exchanger Shrine, whatever one of those is. Compared to the other terrain in the box, this is the piece that really stands out, simply because it’s so different to everything else.
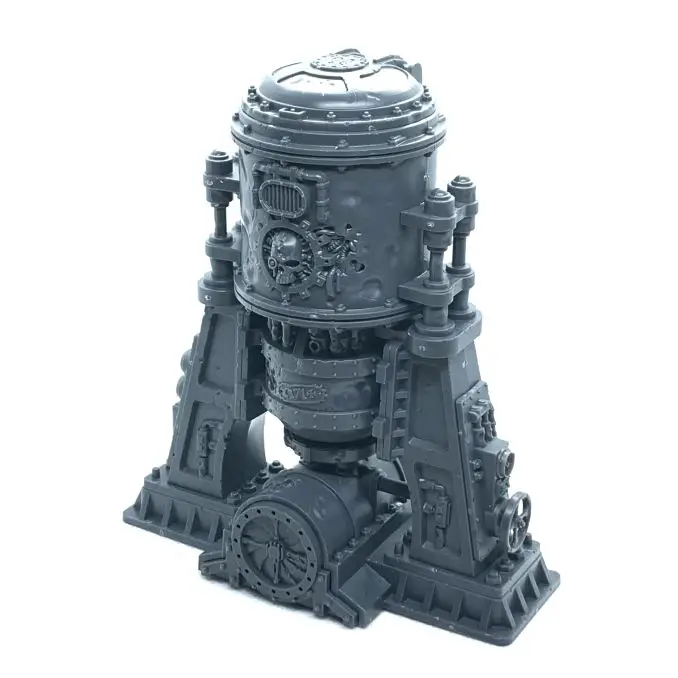
It’d look great in the middle of a battlefield as a command point or objective to have your soldiers of the far future do battle over. It’s slightly more complicated to build than the other bits of terrain in the set, but that’s simply because there are more parts, and some smaller bits (the guide is on page 67 of the Command Manual).
Warhammer 40,000 Starter set – Terrain Sprue D
Finally, Terrain Sprue D gives you everything you need to create a number of fuel pipes. Each is made of two mirrored halves, so assembling is simply a case of finding the two patching bits and pushing them together (though the instruction to build these can be found on page 55 of the Command Manual).
The terrain pieces themselves set the grimdark 40K tone for the uninitiated, and are covered in details that really help bring them to life. From ghastly servitor skull carvings, signs of battle-damage and text inscriptions to wires, and near-steampunk levels of cables, sockets and valves, these bits of scenery will help you quickly and easily set the table can be set for the carnage in the 41st millennium.
Whilst they may not be the most visually impressive or imposing bits of terrain Games Workshop have ever produced, these are nonetheless some decent bits of battlefield kit that will really help bring your first games of 40K to life, and help teach the beginner the basics about cover, climbing, and battlefield obstacles – and surely, given that this is pitched at total beginners, that is what’s important here.
It’ is, however, worth noting that the pipes and Thermo-Exchange Shrine work together with existing modular pipe-based terrain like the Plasma Conduits.
Please Note: This site uses affiliate links. Our Affiliate Partners are shown below
(Affiliate links will result in compensation to the site on qualifying purchases)
Click this link & buy your hobby stuff from Element Games for the UK & Europe to support FauxHammer.com – Use Code “FAUX2768” at the checkout for double reward points.
Our Affiliates / Hobby Stores
- UK: Element Games, The Outpost, Wayland Games, Mighty Lancer, Goblin Gaming, Forbidden Planet, Model Scenery Supplies, eBay, Amazon
- US/Canada: MTechCave, GameKastle, eBay (US), eBay (CA), Amazon
- Germany: Taschengelddieb
- Europe: eBay (DE), eBay (FR), eBay (ES), eBay (IT), Amazon
- Australia: eBay, Amazon
- Global: RedGrass Games, Warcolours
- 3D Printers: Phrozen 3D, Elegoo, Anycubic
FauxHammer – Latest Video on YouTube
Warhammer 40,000 Command Edition Starter Set Review – Playtesting
Before reading any further, if you’re not interested in the game and only the miniatures, as I’ve mentioned elsewhere in the article, you might want to look at picking up the Elite Edition of the new starter sets as there’s less game-based stuff included there, and it’ll save you some cash – though these missions do still feature in the Elite Manual should you change your mind at a later date.
I am a total novice to Warhammer 40,000. The last time I played a game, I was about ten years old and standing in a tiny Games Workshop (not that there’s any other kind) in my home town, commanding a group of Space Marines against my father – who was playing some Xenos race I’ve long since forgotten – under the watchful eye of an in-house geek who was giving me the basics on how to play.
This was back shortly after the release of Fourth Edition, and sixteen years ago I was too young to really understand what was going on – though I had fun and tried to get a few of my Warhammer-collecting friends to do battle with my T’au with varying levels of success. One friend was so incensed that my T’au infantry’s weapons had a 30″ range he promptly unrolled the three-metre measuring tape we had and declared that to make things fairer his Space Marines’ bolters should have a range equidistant to the fully-unravelled tape measure.
But a lot of time and editions have passed since 2004. Now, in 2020 and with the dawning of Ninth, a new set of rules and new ways to play has been created. As the primary function of this box is to get people playing Warhammer 40,000 Ninth Edition, I think it only fair that we review every possible aspect of it.
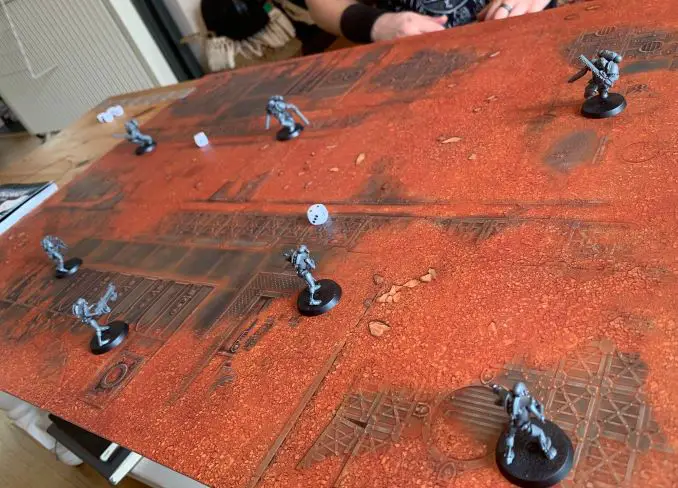
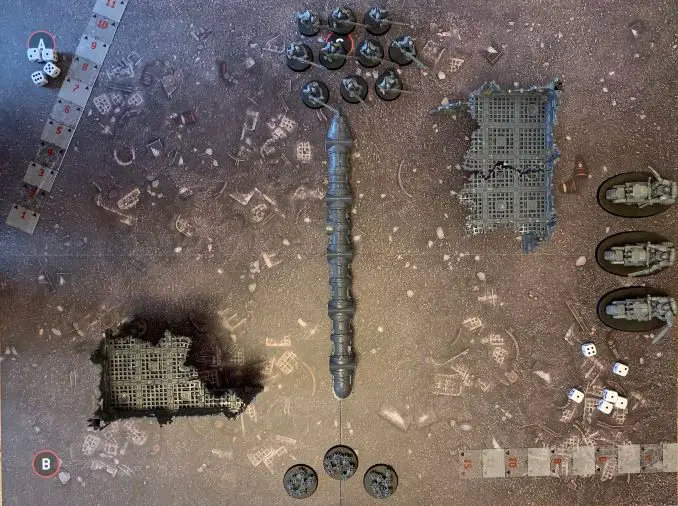
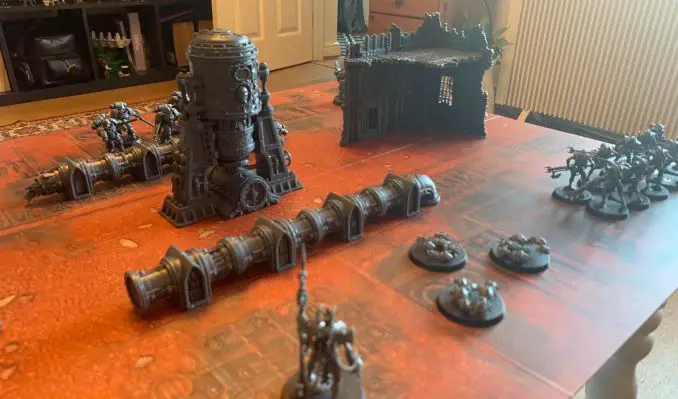
The Command Manual contains six easy-to-play missions designed to slowly and gently introduce players to the game and all its rules. Thus, I set up the gaming board, the (shamefully unpainted) terrain and figures, the Command Manual and the the rulebook in front of the two biggest 40K noobs I know: myself and my girlfriend, Lizzie.
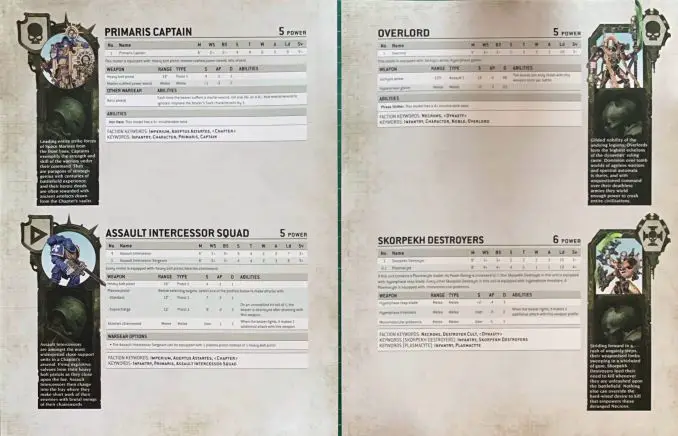
The set comes with two double-sided datasheets which contain all the statistical information you need to start playing with the units in the box. They’re easy enough to follow if used in conjunction with the Command Manual, which explains all the abbreviations and how the numbers work together. Each unit detailed on the datasheets also comes equipped with a little paragraph of narrative fluff to tie the units to the wider fictional universe.
They’re concise enough for a beginner to get their head around, and with each of us equipped with a datasheet and the Command Manual open, we were ready to begin.
Thus began the battles between Roburte Guillethwaite’s Space Marines and the Necrons of the Lizzekh Dynasty.
Warhammer 40,000 Command Edition Starter Set Review – Battle Report Introduction
Across the pages of the Command Manual are spread six training-wheels missions, each aimed to be a stepping-stone on the way to grasping the mechanics of Ninth Edition.
With each mission, new rules and features are slowly introduced so that by Mission 6, the opposing players are able to have a go at battering each other’s sides into submissions in a proper game of Warhammer 40,000.
- Mission 1 focuses on the first two phases of every turn: Moving and Shooting
- Mission 2 is all about phases three and four: Charge and Fight, so introduces close-quarters combat
- Mission 3 focuses on moving over and around terrain
- Mission 4 introduces the Morale phase to combat, seeing which of your units turn tail and flee
- Mission 5 brings in invulnerable saves and other features to help you better understand your powerful character heroes
- Mission 6 puts everything you’ve learned to the test.
Now, experienced players (or anyone who has bought this set and glanced at the contents in The Rules, for that matter) will notice there are actually two phases missing from this list: a Command phase, which comes at the very beginning of each turn, and the Psychic phase which should be inserted between Movement and Shooting phases. These are not included in these missions as none of the units available in this set have any abilities that can be used in these phases.
So, to properly put these through their paces, and to try and convince some readers with gorgeously-painted armies that have never been used to grind a foe into dust to give playing Ninth Edition a go, what follows is a battle report for each of the missions.
These battle reports are retellings the events of each mission as they unfolded on the tabletop as Lizzie and I were playing, but written in a more narrative and exciting way to keep you all hooked and rooting for your favourite team – the Space Marines of Roburte Guilleman and the Lizzekh Dynasty Necrons (just imagine a hairy Robute Guilleman who hasn’t shaved in three weeks and some goth Necrons with killer red lipstick and razor-sharp eyeliner).
They’re also designed to show you that 40K can be easy and fun even for the totally inexperienced. Before these games of Ninth Edition, the cumulative tabletop gaming experience Lizzie and I had between us consisted of a handful of Magic the Gathering: Arena of the Plainswalkers games, a few sessions of Dungeons and Dragons, and a couple of Dungeon Quest campaigns. That’s it. So, if we can do it – and have a great time doing so – then you most definitely can too.
If I haven’t convinced you, you can always skip the playtesting section by clicking on this link and jumping to the next section. See you there!
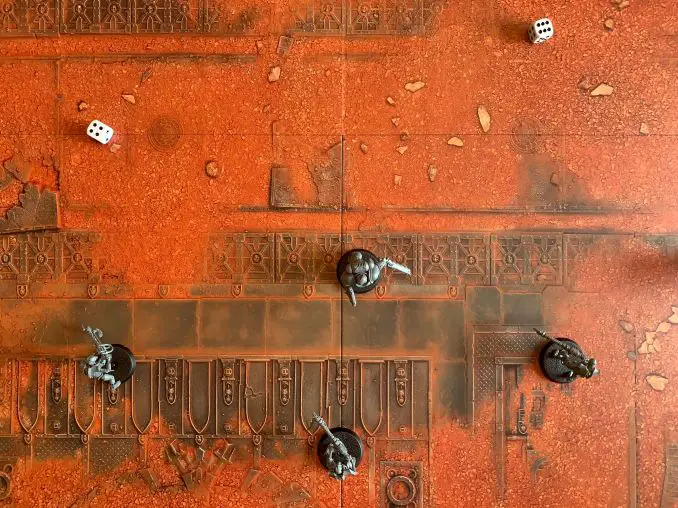
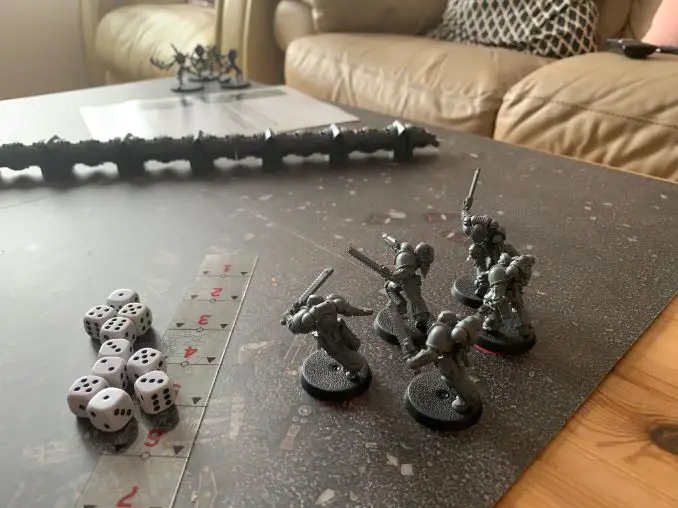
Mission 1: First Contact
“Whilst scouting enemy territory, an Assault Intercessor Squad is ambushed by Necron Warriors. Without hesitation the Space Marines ready themselves to fight through the ambush and regroup with the rest of their brothers.“
Warhammer 40,000 Command Manual (Page 44)
The first mission in the six-part beginner’s series is a straightforward affair: three Assault Intercessors square off against five Necron Warriors across an empty game board. The Assault Intercessors have to get to the edge of the board the Necrons are guarding. The Necrons have to stop them. The mission is about he bare basics: moving and shooting, and that’s all the Command Manual lets you do.
It’s basically the classic English high-school lunchtime game British Bulldog.
Now, depending on how crappy the state school you went to was, this playground game will have involved varying levels of violence and long-term trauma. For me, pitting three chainsaw-wielding Space Marines against a cohort of angry gauss-gun-toting Necrons brings back some fond memories – and playing this way means I’m less likely to get in trouble with my head of year for accidentally knocking another student out.
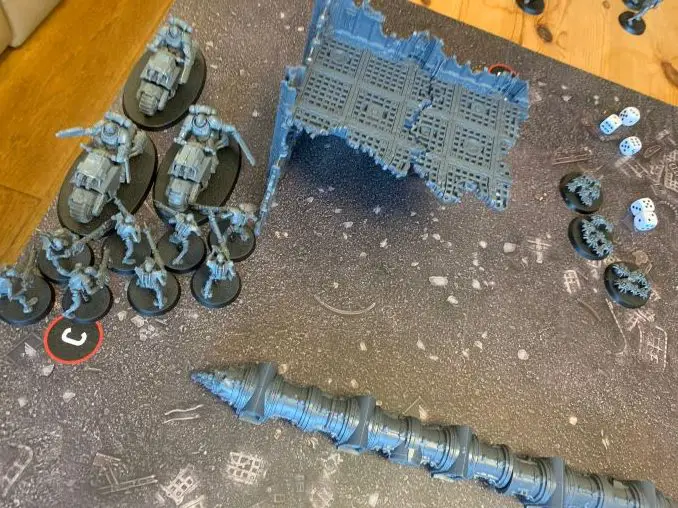
So, we deploy our units as directed by the manual: three Assault Intercessors on one side of the board and five Necron Warriors on the other. And just like that, battle begins.
Necron Turn 1
As per the Manual, the Lizzekh Dynasty Necrons went first. Moving two of their number forwards a few inches as per their datasheet, the Necrons dropped a barrage of gauss flayer fire down on the three ambushed Space Marines moments later. With 24″ range, the Marines had nowhere to run.
The dice favoured the Necrons, and in the first turn alone the Intercessors on the left and right flanks of the advancing Space Marine line were dropped to one wound each.
Space Marine Turn 1
The Assault Intercessors’ luck did not improve in their turn. Each picking his gap in the Necron line, the Intercessors rushed forwards, firing their bolt pistols – but not even one shot connected with the Necrons on the near horizon.
Necron Turn 2
Galvanised by their early success, the Necrons dug in and rained down another barrage of fire on the Space Marines.
This time, though, they weren’t so lucky, and whilst a few shots connected, the Space Marines’ save (Sv) value of 3+ kept them standing.
Space Marine Turn 2
As before, with gauss fire falling around them, the Assault Intercessors continued their steady charge towards the Necron line, all moving their maximum of 6″ across the field.
Now within touching distance of their goal, the Space Marines opened fire with renewed vigour, and one of the Necrons blocking the right flank of the Space Marine advance was slain.
Necron Turn 3
Any sense of triumph for the Space Marines was short-lived, as moments after slaying his foe, the hero intercessor was gunned down by the indomitable and steadfast Necron line.
Sensing the tide was turning in their favour, the Necrons unleashed another barrage of fire on the already wounded Space Marine on the left flank of the Intercessors’ advance. Armour of the Imperium is the finest in all the galaxies, though, and those shots that connected ricocheted off with no further injuries being inflicted.
Space Marine Turn 3
Unwilling to risk any further casualties, the outnumbered Assault Intercessors made a break for it. Taking advantage of the Advance mechanic, the remaining Intercessors barrelled through the Necron line with D6 rolls added to their usual movement statistics of 6″ and escaped the ambush.
A close victory for the Space Marines and a near defeat for the Necrons leaves the score 1-0 to the Space Marines.
Mission 1: Summary
The game was quick, each turn only taking a few seconds thanks to the few figures on the board. The movement and shooting mechanics explained in the first mission are easy to grasp and explained in a straightforward manner. Nothing is overwhelming. A stellar start.
Mission 2: Against the Swarm
“When the sound of battle can be heard in the distance, a Primaris Captain rushes to the aid of his brothers. He soon discovers a Canoptek Scarab Swarm lying between him and the Assault Intercessor Squad. Without hesitation, he raises his sword and begins to charge into the fray – this battle will be determined by the cut and thrust of close combat.”
Warhammer 40,000 Command Manual (page 49)
The second mission introduces not only that beautiful Primaris Captain model to the tabletop, but also the Fight phase – gruelling melee combat. This time, the objective is straightforward: annihilate your foe until only one of you is left standing.
Necron Turn 1
With the Necrons going first, it was the soldiers of the Lizzekh Dynasty that got the chance to introduce the two new phases being taught in this mission: Charge and Attack. Scuttling their maximum 10” across the board and then rolling a whopping 12 for their charge, the three Canoptek Scarab Swarms closed in on the Primaris Captain, mandibles gnashing.

And scratch and bite they did, managing to get under the Captain’s armour and inflict a single wound to the Space marine leader. But, as per the rules of the Fight phase, the Captain could retaliate and dealt a crushing three wounds to the swarm that had injured him.
Space Marine Turn 1
Unleashing the righteous fury of Holy Terra upon the hates Xenos, the Primaris Captain used his Attack phase to destroy the Scarab Swarm he had previously injured.
In spite of their best and most savage efforts, the dice did not favour the remaining Scarab Swarms and they failed to further reduce the Primaris Captain’s wounds.
Necron Turn 2
Now locked in frantic close-quarters combat, the Scarab Swarms gnashed and gnawed away at the Primaris Captain, but to no avail. Far tougher and clad in superior armour to the Necron scarabs, they once again failed to wound the Captain any further.
The Primaris Captain lashed out at the Canoptek Scarabs again with his master-crafted power sword, slaying another of the Swarms and leaving only one left standing.
Space Marine Turn 2
Bolstered by a near victory, the Primaris Captain attacked again, bringing his power sword arcing through the Scarab Swarm, but to little effect. Whilst the remaining Swarm took a single wound, they fought back hard, landing multiple hits on the Primaris Captain that were saved at the last moment by his armour.
Necron Turn 3
Still ripping away at the Captain, the Scarabs refused to give up their assault. In spite of landing two hits on the Captain, once again his armour saved him from further injury.
The Captain, however, had greater luck. Swinging his sword once more, he inflicted a further injury to the Scarab Swarm, reducing it to only two Wounds.
Space Marine Turn 3
By this point, victory for the Primaris Captain seemed assured. Raising his blade one final time to strike at his robotic foe, the valiant Space Marine slashed with devastating force and accuracy at the remaining Canoptek Scarabs, inflicting the final two wounds needed to destroy them outright.
2-0 to Roburte Guillethwaite’s Space Marines, there’s still time for the Necrons of the Lizzekh Dynasty to make a comeback, with four missions remaining.
Mission 2: Summary
The introduction to melee combat was not as entertaining or as exciting as the previous mission, as the battle is reduced to the two players simply rolling their Attack, Hit, Wound and Save dice off against one another over and over and over again until one of the two inflicts the necessary wounds to fell the other. Plus, the sides didn’t feel very balanced. From the get-go, although the Primaris Captain is outnumbered, the Canoptek Scarabs never seemed to stand much of a chance.
Mission 3: Agents of Annihilation
“A group of Skorpekh Destroyers has entered the fray with orders to eradicate the Space Marines completely. One Assault Intercessor Squad has been ordered to hold out upon a defensible position, buying the Space Marines time to launch a devastating counter-attack.”
Warhammer 40,000 Command Manual (Page 56)
Now with a fuel pipe running across the middle of the battlefield, the Necrons of the Lizzekh Dynasty and Roburte Guillethwaite’s are locked in a race against time. The battle lasts eight turns – four each. The Necrons have to annihilate the Space Marines, and the Space Marines have to survive until time is up. With the addition of a fuel pipe down the middle of the battlefield, this mission is designed to teach you about moving over and around terrain, armour penetration, and multiple damage.
Necron Turn 1
As melee-only units, the Skorpekh Destroyers have to move into range of the Intercessors before they can begin attacking them.
Scuttling forwards on their metal legs, instead of heading straight for the pipe, the Necron units of the Lizzekh Dynasty instead opt to head around it.
Space Marine Turn 1
The five Assault Intercessors move forward tentatively, only so a few of their number are in range to snap off a few pot-shots at the Destroyers making their way around the fuel pipe – they may need to flee battle if needs be.
Of the two in range – a sergeant and one of his men – only the sergeant manages to land a hit and apply a single wound to the devastating hyperphase reap-blade. With a -4 AP characteristic, this weapon will mean that any saving throw the +3 Save Intercessors will be moot. This guy needs to be picked off as quickly as possible.
Necron Turn 2
Grim, determined, and totally unfazed by the shooting of the Space Marines in their previous turn, the tripedal Skorpekh Destroyers close in further on the Space Marines. They make no attacks, but now they’re closer than ever.
Space Marine Turn 2
The Space Marines take a few tenuous steps away from the Destroyers now rounding the fuel pipe and raise their pistols to fire again. This time, a volley of bolt-shot comes ripping forth from four of the five Intercessors’ weapons.

All shots miss their targets. With only one wound inflicted to the Necron Skorpekh Destroyers, the Space Marines desperately need to play for time – but the skittering warmongers are now only a few paces away from the plucky Terrans.
Necron Turn 3
With one last move, the Skorpekh Destroyers are brought in charge range of the Assault Intercessors. With a Charge roll of 7, all three of the many-limbed Necrons come battering into the Space Marine unit. The sergeant and his two men at the front of the unit are immediately engaged.
The sergeant does not last long enough to even cry out. With maximum Hit and Wound rolls inflicted on the doomed sergeant, salvation is impossible and he falls before the cleave of the Destroyer’s devastating dual hyperphase threshers.
Though the sergeant does not live long enough to see it, the man adjacent to him is cleft in twain with a single swing of the devastating hyperphase reap-blade, reducing the Assault Intercessors from 5 to 3.
The final Space Marine engaged in melee range tries to fight back, but his blows are too weak to pierce the Skorpekh Destroyer’s armour.
Space Marine Turn 3
By this point, it’s hopeless. The Intercessors, though brave and valiant, are hopelessly outmatched by the towering Skorpekh Destroyers. Too close to try to flee, and even with time almost up, there is nothing they can do other than go down fighting. Locked in a futile and devastating melee combat, the doomed Intercessors snap off a few hopeless shots with their pistols before laying into their metallic foes with their chainswords.
Even their last charge is pathetic. Their shots ricochet harmlessly off the Destroyers, and their chainsword attacks fail to even break their armour. The Skorpekh Destroyers’ superior strength and weapons put pay to the remaining Intercessors with brutal, practiced efficiency, the -4 AP statistic on the lead Destroyer’s hyperphase reap-blade denying his targets the dignity of a saving throw.
As the final Intercessor falls, the Skorpekh Destroyers stand victorious, drenched in the blood of their victims.
Mission 3: Summary
Much like the Necron Canoptek Scarab Swarms in the previous mission, the Space Marines Assault Intercessors never really stood a chance. As soon as the Destroyers got within melee range, there was no hope for them. The guide does a good job of walking you through the bonuses and penalties applied by certain weapons – though, in this instance, they were all in the Necrons’ favour, and the Assault Intercessors were hacked to bloody ribbons.
2-1. The Necrons are making a comeback.
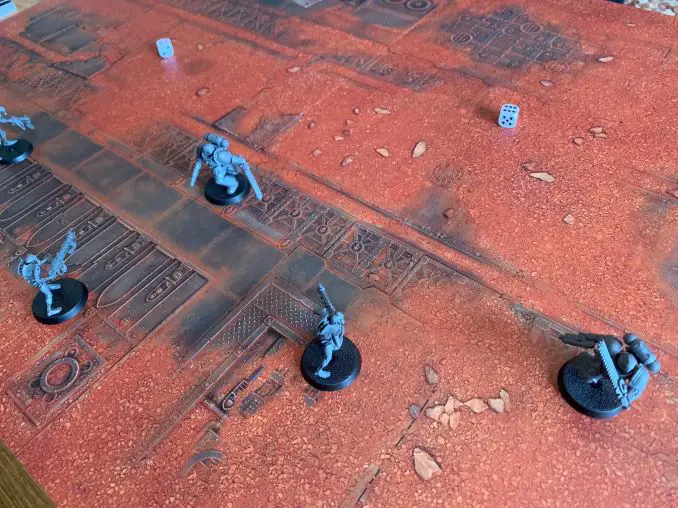
Mission 4: Rapid Engagement
“Having regrouped, the Space Marines have called in reinforcements to aid them in the coming battles against the Necrons. An Outrider Squad has been dispatched as an immediate response with orders to engage the foe, but not be held down in a protracted battle.”
Warhammer 40,000 Command Manual (page 62)
Another race against time, this time the Space Marine Outriders have to last eight turns – four to each faction again – whilst Necron Warriors and Scarab Swarms attempt to rip them from their bikes. With lots of models and alternative terrain on the board, Mission 4 introduces new terrain rules and the Morale phase and its accompanying attrition tests.
This mission introduces the morale phase: every time a unit suffers a loss in a turn, it has to pass a check to see whether or not a further model flees the field in fear.
Space Marine Turn 1
In spite of being hellishly outnumbered by more than four to one, the Primaris Outriders began the battle confidently. Swinging their bikes around to face the Necron Warriors, they unleashed a deadly salvo with their bike-mounted twin bolt rifles.

Though some of the shots connected, some lucky saves from the Necrons prevented them suffering any losses. Unperturbed, the Outriders revved their engines and charged, tyres screaming, into melee range. Brandishing their chainswords, the Outriders and the Necrons piled into one another, and two Necrons were cut down.
Unfeeling men of metal (with a Leadership stat of 10+), the Necrons were unperturbed by their losses and readied themselves to fight on.
Necron Turn 1
Disaster! The Outriders had miscalculated how quickly the Canoptek Scarab Swarms would be able to close on them.
Scuttling their maximum and then initating a charge with a roll of 11, the minute metal monsters came swarming through the debris of the ruined building. The Scarabs cut off the Outriders’ only route of escape, pinning them between the Necron Warriors, the ruins of the building, and the edge of the gaming board!
The indomitable Necron warriors leapt upon one of the three bikers, successfully wounding him twice. A further two wounds came from the Scarabs swarming at the bikers’ rears, and the first of the Primaris Outriders fell to snapping metallic mandibles.
The bikers retaliate, lashing out with chainswords again, felling another Necron Warrior. Galvanised by their sergeant and his 8+ Leadership statistic, the remaining two Outriders remained steadfast and kept fighting, whilst the Necrons marched onwards, unfazed by the slaughter.
Space Marine Turn 2
Jumping straight to the Fight phase, the Primaris Outriders managed to cut down another Necron Warrior, but it was soon evident at their current rate they would not kill enough to escape death themselves.
When the Necrons fought back, the Scarab Swarms fell upon the remaining Outrider, rolling three 6s to hit and guaranteeing three wounds on the Outrider. Followed by another 3 successful wound rolls, the already wounded Outrider could not hope to save himself from such onslaught and fell.
Both sides remained grim and resolute, passing the morale phase again, though any hope of survival for the Outrider Sergeant was fast growing faint.
Necron Turn 2
A hail of Necron attacks fell from the Warriors blocking the way forward, but the Outrider Sergeant’s tough armour saved him from any wounds. The three swarms of Canoptek Scarabs, on the other hand, are far too quick for him, and manage to inflict one wound on the Sergeant.
The Sergeant retaliates with three wounds on one of the Scarab Swarms and, although it was not enough to destroy it outright, the Swarm was severely crippled.
Space Marine Turn 3
It was now or never for the Sergeant. His men dead around him, their bikes and corpses crawling with Canoptek Scarabs, if he was going to escape, it had to be soon. Trying to cut his way through the scarabs, the Sergeant cut down the wounded swarm, but sufered a further wound from the Necron forces.
As ever, the unstoppable Necron hordes were unaffected by their losses, and formed up for another attack.
Necron Turn 3
The warriors fell on the Sergeant, doing him another wound and leaving him on his last legs. In a final, valiant display of defiance and courage, the Outrider Sergeant brandished his chainsword aloft once more and cut down two of the remaining Necron Warriors.
But it was not enough. The Scarab Swarms overran him with yet more devastating gauranteed wound rolls of 6 as they rolled to hit, followed by even more as they rolled to wound. Unable to save himself from the tide of aggression, the Sergeant was dragged from his bike to die beside the rest of his comrades.
Another Necron victory, and comfortably within the time as well.
Mission 4: Summary
This mission was an unprecedented disaster for the Space Marine Outriders. The Space Marines were overconfident and engaged the Necron Warriors at melee range too quickly. Once they were sandwiched between the Necron Warriors, the Scarab Swarms, and with the building and the edge of the board further trapping them, they were doomed. They should have taken advantage of the range on their guns, their high movement statistic, and the fact the Canoptek Scarab Swarms could only attack at melee range, all the while using the cover of the ruins to their advantage.
Morale checks are easy enough to get your head around – it’s just a few extra throws of the dice at the end of your each turn. There’s really not much to it.
With only two missions remaining, the Necrons of the Lizzekh Dynasty have levelled the score to two all.
Mission 5: Counter-Attack
“The Primaris Captain has regrouped and marshalled his troops. With the Outrider Squad engaging targets on the move, and a brave Assault Intercessor Squad holding the Skorpekh Destroyers’ advance, he selects his best men to charge into the heart of the Necron force and the cunning enemy commander is finally revealed.”
Warhammer 40,000 Command Manual (page 68)
Now with their Overlord on the field, the Necrons of the Lizzekh Dynasty have but one objective: the destruction of the Primaris Captain. The Space Marines have a similar goal: defeating their enemy Overlord.
This time, the Command Manual instructs you to place your units within your deployment zones, alternating turns. Now with “characters” on the field in the form of the Primaris Captain and the Necron Overlord, this mission introduces new rules regarding targeting and invulnerable saves.
Space Marine Turn 1
Once the two foes’ units had been deployed, it was time for battle to begin. The Space Marine Assault Intercessors were within diving distance of the cover of a fuel pipe, and the Primaris Captain partially obscured by a ruin. The Necrons went for a similar strategy.
With combat beginning, the Space Marines rushed forwards, the Assault Intercessors diving into the cover of the nearby fuel pipe, whilst the Primaris Captain bolted rushed into the cover offered by some nearby ruins, out of sight of the horde of Necron Warriors just a few paces away.
From the safety of their cover, the Assault Intercessors opened fire on the Necron Warriors close to their Captain. Whilst the bolters of the Assault Intercessors inflicted no damage to the Necron Warriors, the plasma pistol of the sergeant killed one of the fearless metal warriors.
Necron Turn 1
Under the fire of the Assault Intercessors, the Necrons slowly moved towards the cover of their nearby fuel pipe, though a number of them remained out of cover in order to ensure they could all shoot at the Intercessors, who were partially blocked from view by the Thermo-Exchanger Shrine. The Necron Warriors unleashed a hail of gauss fire that hammered into the Marines’ cover, whilst their Overlord watched on, biding his time.
Suddenly, appearing on the Intercessors’ flank were three swarms of Canoptek Scarabs. Able fly and move through units unimpeded, they closed on the Intercessors quickly, and then broke into a charge.
Razor-sharp mandibles shredded the Intercessors, with three 6s rolled on the hit phase equating to three guaranteed wounds, and then a further three wounds inflicted on the wound phase, the Space Marines could only save themselves from half the wounds, and one of their men fell.
Retaliating, the Intercesors piled into the fray and slew one of the Scarab Swarms outright and wounded another before the end of the Necron turn.
Space Marine Turn 2
The Primaris Captain makes his move. Stepping out from behind the cover of the ruins, he advanced on the Necron Warrior’s left flank, snapping off a shot with his bolt pistol. Though the shot bounced harmlessly off a Necron Warrior’s armour, the Captain broke into a charge, raising his master-crafted power sword aloft.
The Primaris Intercessors had similar success with their short-range pistols, which unlike larger weapons can be fired in the Shooting phase if the unit is engaged in close-quarters combat. Their shots whistled harmlessly through the Scarab Swarms, as they revved their chainswords to begin their next attack.
The Intercessors managed to scratch a few wounds into the Scarab Swarms, but not enough to kill any of them. Meanwhile, the Primaris Captain barrelled into the Necron flank, his mighty sword swinging. One Warrior fell, then another, and another, and one more. Still, though, the men of metal remained resolute and did not flee. When they struck back, however, their attacks could not get past the Primaris Captain’s mighty shield.
Necron Turn 2#
It’s now that the Necron Overlord makes his move. Turning his glowing eyes to face the Primaris Captain, surrounded by the corpses of slain Necron Warriors, he prepared his once-per-battle move: Tachyon Arrow (which is obviously just like Yondu’s Yaka Arrow from Guardians of the Galaxy, so I’m picturing the devilish metallic dude whistling away).
Successfully rolling both to hit and then again to wound, the Tachyon Arrow has a damage value of 1D6 – and a devastating -4 to all saving throws, rendering any Sv throw for a Space Marine utterly moot.
The Dark Eldrich God of the Lizzekh Dynasty scooped up the single die and shook it amongst the billions of stars that sparked across the cosmos of the 41st millennium. Then, she let it plunge down like a falling asteroid onto the gaming board.
Boom.
Boom.
Six.
With only six wounds to his name, the Tachyon Arrow scythed through the Primaris Captain’s armour, through his body, and out of the other side, killing him instantly and securing another victory for the Necrons.
With only one mission remaining, the Necrons pull ahead with an overall score of 3-2.
Well, that was over quickly.
Mission 5: Summary
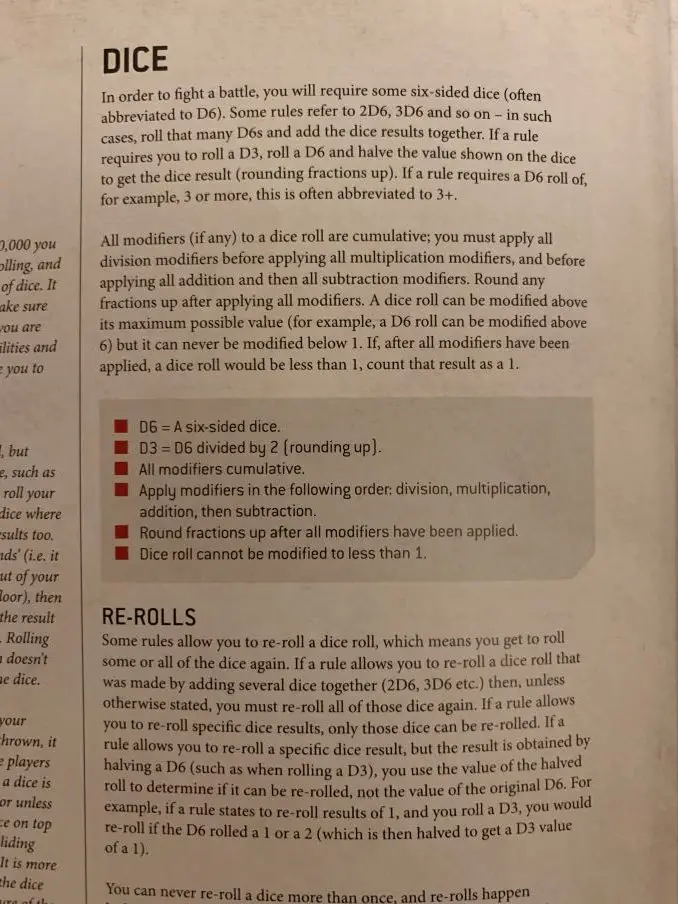
Whilst frantically flicking through the Command Manual and the Rules to see if there was any way to save my Primaris Captain from being one-shotted, I noticed his relic shield, which allows him to ignore any Mortal Wounds he suffers on a D6 roll. There is no mention of Mortal Wounds in the Command Manual, so I had to turn to The Rules.
Mortal Wounds are explained on page 32 of The Rules, under an Advanced Rules heading. Certain attacks – examples of which are not supplied in The Rules – inflict Mortal Wounds which do not need to be rolled for.
From my understanding, then, the Primaris Captain’s relic shield seems to be a totally pointless inclusion for the Command Edition, as no Necron unit is equipped with any kind of weapon that deals Mortal Wounds, so the shield can’t actually protect against anything.
Mission 6: Final Confrontation
“Critical blows have been dealt to both sides in the conflict so far. The time for strategising, however, has come to an end. Your leaders must galvanise your warriors for the final confrontation.”
Warhammer 40,000 Command Manual (page 70)
This is it, the final showdown. Every unit is deployed on the tabletop in one last fight to the death. The last player with any units left alive will be declared the victor. Will it be the Necrons of the Lizzekh Dynasty or Roburte Guillethwaite’s Space Marines?
This is the final mission, and is designed to put to the test everything you’ve learned so far. As with the previous battle, deployment is up to players, so we took it in turn to place our units on the field before rolling a D6 to see who would go first.
Having both rolled sixes the first time, the Necrons of the Lizzekh Dynasty clinched a five over the Guillethwaite’s four. With battle-lines drawn up, the Necrons went first.
Necron Turn 1
The Necrons wasted no time in moving to attack the Space Marines. The Necron Warriors dashed for the cover of the fuel pipe running down the centre of the battlefield, whilst the Canoptek Scarab Swarms flew into the cover of the narrow alleyway at the side of one building, the Overlord moving into cover behind them.
On the other side of the battlefield, the Skorpekh Destroyers moved into a similar position, hoping to catch the Space marines in a devastating pincer trapped between Scarabs and Overlord on one flank, Destroyers on the other, all the while the Warriors laid down barrage upon barrage of deadly gauss flayer fire.
Once in cover, the Necron Warriors readied their guns and unleashed a deadly volley of fire on the Intercessors, killing one and wounding another. In a sudden change of tactics, the Scarabs attempted to charge the Bikers, the Space Marine unit best-placed to cut down the Warriors, but their charge failed.
On the other side of the battlefield, the Destroyers attempt to charge the Primaris Captain, but similarly do not roll high enough on 2D6 to cover the necessary ground to engage the Captain, and stay in the cover of the narrow alleyway in single-file formation.
Space Marine Turn 1
All too aware that they risk being surrounded and cut down, the Marines moved forward. The Intercessors, blasting their pistols all the while, advance towards the Necron warriors, though the -1 cover penalty their shots took meant none found their mark.
The Primaris Outrdiers, though, put pedal to the metal and flew across the battlefield, tearing across the fuel pipes and swinging their bikes around to blast the Necron Warriors in their flanks with the twin-mounted bolt rifles. Without the advantage of cover, four Necron Warriors fell.
Not far away, the Primaris Captain hoisted up his shield and raised his pistol, determined to trap the Destroyers in their narrow alleyway where they could not surround and overwhelm him. Though his shot missed, he drew his master-crafted power sword and charged.
On the other side of the battle, hearing their captain’s war-cry, the Assault Intercessors broke into a charge of their own and came crashing into the Necron Warrior’s left flank whilst the Primaris outriders came crashing into their right. Chainswords screaming, the Outriders and Intercessors hacked down a further three Necron Warriors, reducing their number to only five.
Meanwhile, the sound of chainswords on ethereal steel reaching his ears, the Primaris Captain brought his sword hacking into the first Skorpekh Destroyer, armed with the devastating hyperphase reap-blade. Hatred of Xenos burning in his heart, the Primaris Captain dealt a crushing three wounds to the Skorpekh Destroyer who, thanks to the -3 Armour Piercing (AP) statistic on the Captain’s sword, was unable to save and was destroyed.
The Destroyers moved up to avenge their fallen comrade and dealt two wounds to the Primaris Captain, whilst the ailing Necron Warriors in the middle of the field failed to wound any of their attackers.
Having suffered such heavy losses, the Necron Warriors attempted to pass a D6 Morale Check to keep fighting. Having lost five warriors in the previous turn, the Warriors had to add 5 to their D6 roll. Because they were reduced to half strength, they also had to add a 1 to this roll – which came out as a 5. With a Leadership (Ld) stat of 10 and a cumulative roll of 11, the Necrons failed the check and one of their number fled the battlefield.
Because they had failed their Morale check, the Necron Warriors then had to take an Attrition check. One die was rolled for each of the four remaining Necrons, and for every 1, another unit fled. With one die landing as a 1, another Warrior fled and the unit was reduced to three.
Necron Turn 2
The remaining Necron units responded quickly to the charge made by the chainsword-wielding intercessors and Outriders. The Scarabs took flight and came thudding into the Intercessors’ backs, the Overlord charging with them.
With the Movement and Charge phases complete, the deadly close-quarters fighting begun. Battling on the Necron’s right flank, the Skorpekh Destroyers, still trapped single-file in the alley at the edge of the battlefield, successfully did another two wounds to the Primaris Captain, who began with a total of 6. Whilst in the middle of the field, with the help of the swarming Scarabs, the Overlord killed one Intercessor and wounded another, whilst the remaining Necron Warriors failed to fight back.
Retaliating in their half of the Fight phase, the Assault Intercessors dealt two wounds to the towering Overlord, whilst beside them, the Outriders cut down the last of the Necron Warriors.
Space Marine Turn 2
With the way forward now clear of Warriors, the Primaris Outriders were no longer in engagement range of any enemies so could fire their big guns again. Their weapons sounding with the pistols of the Intercessors – which, given their size, can be fired at the closest target when in engagement range – though the Necrons’ hard carapaces spared them from further injury. Even when their chainswords sung again, no further wounds were inflicted.
Meanwhile, still facing the Skorpekh Destroyers alone, the Primaris Captain successfully infliced one wound on the next Skorpekh Destroyer with his heavy bolt pistol before drawing his blade once again and inflicting two further wounds, killing the second Destroyer.
Retaliating during their half of the Fight phase, the final Destroyer successfully hit and wounded the Captain three times, though two wounds were saved. Now with only one wound remaining, and with an uninjured Destroyer and Plasmacyte before him still, the Captain gritted his teeth and readied himself for death.
Meanwhile, in the bloody melee at the centre of the battlefield, the Necron Overlord’s hyperphase glaive, with its D3 wounds (roll a D6, half the number and round it up), successfully hit one of the outriders for 3 wounds, opening him up to the onslaught of a waiting Scarab Swarm, that dealt the final wound required to kill the Outrider. Not finished, the swarming Scarabs then did a further wound to another Outrider.
Resolute at the key tipping-point of battle, the Space Marines held their ground in spite of their losses and passed their Morale phase. With the Intercessors and Outriders having taken losses, the Overlord wounded yet the Scarab Swarms unhurt in the centre of the field, the battle would be won or lost in the alleyway where the Primaris Captain, with only one wound remaining, was still facing off against a Destroyer and its Plasmacyte.
Necron Turn 3
Unable – and unwilling – to move, the Necrons renewed their vicious melee assault. The overlord, holding his hyperphase glaive aloft, dealt a further two wounds to the Outrider solider, reducing him to one remaining wound. Sensing an easy kill, the Scarabs swarmed the injured Outrider: the first and second failed to hit, but the third, which made two wounds, had both saved. The Outrider and their Sergeant fought on.
In the alley, the Skorpekh Destroyer’s whirling hyperphase threshers fell on the Primaris Captain, but the Captain’s shield and armour held against the powerful blows. Retaliating in the Space Marine half of the Fight phase, the Primaris Captain successfully landed two more wounds on the Destroyer, reducing it to 1, whilst in the centre of the field the Intercessors managed to deal a further two wounds to the Overlord, reducing him to 1 as well, whilst the Outriders did absolutely nothing following perhaps the worst dice roll of my life.
Space Marine Turn 3
Close-quarters weapons drawn, the Outriders managed to deal a single wound to the otherwise uninjured Scarab Swarms, whilst their Intercessor battle-brothers failed to wound the Overlord with their own guns.
In the alleyway, though, the primaris Captain whipped out his bolt pistol and landed a final, devastating shot on the remaining Skorpekh Destroyer, killing it outright. Now, only the single-wound Plasmacyte stood between him and his comrades in the middle of the field. Lifting his blade to strike it and inflicting 1 wound, the Plasmacyte successfully passed its save, and remained before the grievously injured Primaris Captain, blocking his path to his comrades.
Chainswords singing, the Outriders dealt another two wounds to the four-wound Scarab Swarm, reducing the injured unit to 1 wound – though the remaining pair still held all their wounds. beside them, though, with cries of rage on their lips, the last of the Intercessors leapt upon the wounded Overlord.
With four wounds hit, three becoming wounds, and only one saved, the Necron Overlord was finally felled by the bloodied and battered Intercessors, his hyperphase warglaive falling from his metallic fingers seconds before he phase-shifted out of existence.
The last remaining Necron units fought back in their part of the Fight phase, though they achieved little. All three Scarab units failed to land any hits on the Outriders, as did the Plasmacyte accosting the Primaris Captain.
Necron Turn 4
In the middle of the field, the Scarabs continued to fight. Falling on the Assault Intercessors with their metallic mandibles, the three units of chitinous robots managed to land two wounds on the Intercessors, killing another of their number. Meanwhile, the Plasmacyte readied itself to strike the Primaris Captain – but using the last of his energy, the Captain raised his shield and saved himself from the single wound the Plasmacyte almost inflicted.
With the Fight phase passing back over to the Space Marines, it was now or never.
Unloading the last of the ammunition in their bolt pistols, the Intercessors and Outriders in the centre of the field inflicted one wound to the already wounded Scarab Swarm, then set about themselves with their chainswords. metal, plasma and blood flew as the Intercessors finished the Outrider’s work, dealing enough wounds to annihilate all the remaining Necron Scarabs between them. The battle in the middle of the field was won.
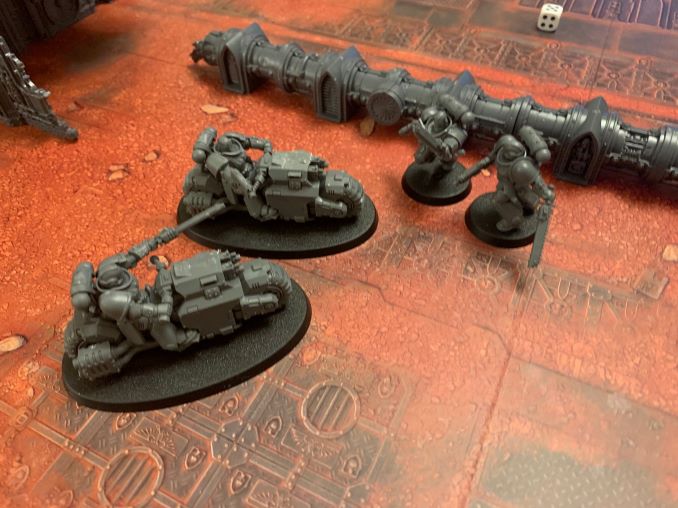
Finally, in the alleyway he had held alone all battle, the Primaris Captain raised his sword one final time. Exhausted from holding the line against three Destroyers and their Plasmacyte, and covered in his own blood, the captain managed to make only one of his 5 attacks a wound – though it was all he needed. With a final, condemning roll of one, the last Plasmacyte fell.
Having defeated the Lizzekh Dynasty’s final stand, the Space Marines of Roburte Guillethwaite force a draw overall. Final score, 3-3.
By far the most exhilarating and well-balanced battle of the Command Manual, Mission 6 is the perfect way to sum up everything you’ve learned so far – and finally flex your tactical muscles.
Playtesting: Thoughts and Round-Up
Balance is a funny thing in this set.
Given that the board is only 30″ by 22.4″, there’s not much room for an enormous amount of tactical movement, and the physically weaker Necron Warriors have to rely on sheer weight of numbers in close quarters to stand a chance against the beefy Space Marines. In the case of the later missions, with the use of the charge mechanic, the vast majority of the units available were able to move and charge at any other model from just about anywhere they could be deployed, which encourages grinding, close-quarters play.
Although, this isn’t necessarily a bad thing. The Space Marine units, with their chainswords and close-firing pistols, do well in the scrum, and the Skorpekh destroyers are utterly devastating at melee range – which does mean that any hope of victory in Mission Three relies entirely on the spin and fall of the dice.
Even though they don’t have the survivability the Destroyers do (requiring high saves to ignore wounds), the Canoptek Scarab Swarms are really deadly at close range as well – but nothing compares to the strength of the Primaris Captian’s five attacks and -3 AP sword.
He’s a real laugh to play. Watching your magnificent shieldbearing Space Marine locked in combat with three towering Skorpekh Destroyers was exhilarating, meanwhile his counterpart, the Necron Overlord, is just as fantastic a character to play.
His hyperphase warglaive and its unpredictable wounds add some real excitement to the game, and he is a unit to be feared by the Space Marine player. His one-time-use ability is a sweet extra, and really useful for introducing special items to new players, but the fact the Primaris Captain’s relic shield only defends against Mortal Wounds means there is no such advantage to on the Space Marine side. Though in a larger game with additional miniatures this may not be the case, within the confines of the Warhammer 40,000 Command Edition box, it’s a decisively calamitous advantage to the Necrons – as shown in mission five when, on the roll of a 6, the Overlord killed the Captain with a single blow and won the game.
That said, I really did not appreciate just how mighty the Primaris Captain is until I had him hold a narrow alleyway against a unit of Skorpekh Destroyers that had previously annihilated your entire Assault Intercessor unit in little more than a turn.
So yes, balance is odd. By and large, the Space Marine units are far tougher than the Necrons, possessing higher wounds and more attacks, but the sheer weight of numbers of the Necron warriors, coupled with some exciting and fun individual unit abilities, that the Space Marines don’t posses to the same extent gives them more than a fighting chance at holding their own against the Space Marines. It would be nice to be encouraged to partake in more long-range combat – but, mind you, who wants to use a bolt pistol when you’ve got half a dozen chainswords revving away?
Now, the big question: would we play again?
One issue we did encounter, though, was the absence of any wound trackers – and no obvious mention of the best way of wound tracking in the Command Manual. Because I was taking notes on gameplay for this review, we had a succinct, blow-by-blow account we could refer to if we were ever unsure of who had or had not been roughed-up. It’s something to prepare for in future, so you might want to look into getting some wound trackers – though wounds can be tracked easily with a pencil and a piece of paper
The learning curve is steep for the uninitiated, and through the course of the first four or so missions, we often found ourselves coming upon situations not covered in the Command manual – such as Mortal Wounds and Retreat or Disengagement – which required us to interrupt the game to look through the Command Manual, The Rules, and Google. Although this was somewhat expected – the Command Manual can only predict so much – it was still a little jarring to gameplay, but not critically.
The problem with the earlier missions is that they teach you only a few aspects of the game. You’re not really playing. Whilst Missions One and Two felt very geared towards Space Marines and seemed to almost ensure their victories, most of the subsequent missions felt as if they were weighted more towards the Necrons – up until the final confrontation.
Running and shooting in Mission 1 made for a laugh, but the melee practice in Mission 2 was dull, as we both knew the Scarabs were doomed from the outset. Mission 3 was similar – and a bit depressing, really, watching five blokes be mercilessly butchered by three terrifying interdimensional murderbots.
I will admit, I wrecked Mission 4 for everyone by letting my Outriders get hopelessly trapped, whilst Mission 5 was made farcical by circumstance, the Captain being one-shot by the Necron Overlord in the units first move.
But look past that. Missions 1-5 are like swimming lessons. They’re crucial to being able to engage properly. You know, you have to spent a few hours pootling up and down the pool, brightly-coloured foam floats under your every limb, looking like an absolute idiot, before you actually make your first few decent strokes. The missions are exactly the same. Whilst the tutorial missions aren’t riveting, by the time the Space Marines and Necrons clashed in Mission 6, the training wheels were off and true carnage could be unleashed. This was, essentially, the first time we really actually got to play Ninth Edition.
And it was brilliant.
We were able to fully explore our units, the ways we could play, and engage with the battlefield properly without being encumbered by rubber-rings or armbands, and we had an absolutely smashing time because of it – even if all we ultimately did was lock ourselves in two brutal melee bloodbaths and knock lumps out of each other until one side was eradicated.
So yes, without doubt, we would both play again – and having enjoyed the starter set so much, we would highly recommend that all experienced non-playing painters you their beautifully painted 40K armies off their shelves and go out and kick some ass with them.
If you’re hooked, I’d suggest tucking away the gaming board and chucking all your terrain onto your kitchen table or living room floor and taking full advantage of everything in the set. With a larger battlefield and more terrain pieces to play around with, you’ll be able to take full advantage of the shooting and movement phases, and explore the ins and out of moving around and playing with cover.
If you’re keen to bolster your forces for an even larger game, you could always grab yourself a copy of the Recruit Edition for a few bob and net yourself a bunch more Necron Warriors and Assault Intercessors, and also two more unique characters: the Primaris Lieutenant and the Necron Royal Warden.
Warhammer 40,000 Command Edition Starter Set Review – Price and Availability.
As part of the flagship Ninth Edition range, getting yourself a copy of the Warhammer 40,000 Command Edition should be as easy as walking into your local hobby store and picking it up off the shelf (though, in times of Covid-19, I imagine most people will be clicking onto their favourite hobby webstore and buying one there).
However, it is a little on the pricey side, so is the money worth what you get?
In short, yes.
If you are a new or inexperienced wargamer looking to get into all aspects of 40K – that is building, painting, and, very importantly to this set in particular, playing – this set is the Holy Grail. It has everything you could need to begin your journeys into the grim darkness of the far future. It assumes you know nothing about playing, and through the Command Manual gently gives you everything you need to make a good start.
With the Warhammer 40,000: The Rules book also on hand to supplement your first few games, and then further expand your knowledge once you’ve completed the missions in the Command Manual, there really is currently nowhere better to start getting into the hobby.
If, however, you aren’t interested in playing and only want the miniatures, get the Elite Edition. Though it lacks the push-fit terrain, it has the same miniatures and far less of the gameplay literature then you’ll have to find a home for.
Whilst Games Workshop asks for £105/$165/€130? for this product, most independent hobby retailers look to be selling the set for around £85-£90/$110-$120/€95-€100. Mine came from the awesome Mighty Lancer Games, who are selling it for a very reasonable £84, so, as always, it’s worth shopping around to make sure you are getting the best deal.
Check out our links below for exampes of such stores in your country.
Please Note: This site uses affiliate links. Our Affiliate Partners are shown below
(Affiliate links will result in compensation to the site on qualifying purchases)
Click this link & buy your hobby stuff from Element Games for the UK & Europe to support FauxHammer.com – Use Code “FAUX2768” at the checkout for double reward points.
Our Affiliates / Hobby Stores
- UK: Element Games, The Outpost, Wayland Games, Mighty Lancer, Goblin Gaming, Forbidden Planet, Model Scenery Supplies, eBay, Amazon
- US/Canada: MTechCave, GameKastle, eBay (US), eBay (CA), Amazon
- Germany: Taschengelddieb
- Europe: eBay (DE), eBay (FR), eBay (ES), eBay (IT), Amazon
- Australia: eBay, Amazon
- Global: RedGrass Games, Warcolours
- 3D Printers: Phrozen 3D, Elegoo, Anycubic
FauxHammer – Latest Video on YouTube
Warhammer 40,000 Command Edition Starter Set Review – Final Thoughts
| Pros | Cons |
| Excellent models The Command Manual and The Rules are brilliantly written and well thought out Big ol’ card gaming board and awesome terrain (none of that paper stuff here) Perfect for the absolute beginner Has everything you could possibly need to start playing right away | Necrons are a little fiddly to put together Construction guide integrated into the Command manual is a little annoying Not for experienced players/people just after the figures |
The Warhammer 40,000 Command Edition Starter Set his has absolutely everything a brand-new 40K player could possibly need to kick-start their time in the 41st millennium. It is cleverly designed to gradually baptise the uninitiated with all the hobby and gaming knowledge they could possibly need to begin waging war across larger tabletop battlefields. It’s a well thought out, step-by-step introduction to both building and playing that is so eloquently distilled into the Command Manual.
But it’s clever design and such committed pitch at the beginner runs the risk of alienating other parties. If you’re a miniature builder and painter only interested in Ninth for the new figures, you probably won’t want to have to leaf backwards and forwards through the Command Manual to find all the build instructions for each model – I’m certain they’d much rather just have a thin, staple-backed booklet with all the instructions they needed spelled out before them.
At 81 pages in length, the Command Manual only dedicates 15 of its pages to putting your figures together, so for experienced players, the Command Manual is totally unnecessary and will be little more than the most over-written assembly guide they’ve ever seen.
So, if you’re an experienced player, or just want to grab the models available, I’d recommend giving some strong consideration to the Elite and Recruit Editions – because you do not need all the literary fluff or extra gaming bits that come with the Command Edition.
If, however, you’re a brand-spanking new player who has just discovered Warhammer 40,000, or are looking to get into the gaming side of things in earnest, and you just so happen to have a wad of cash burning a hole in your pocket, the Warhammer 40,000 Command Edition is definitely the one for you.
It has absolutely everything you could possibly need: a well-written step-by step guide to get your figures built and your first few missions played, a fatter rulebook to get your teeth into once your first few beginner missions are complete, and enough models, terrain, and even a swish gaming board to make sure your games look fantastic.
It’s always worth considering, too, that if the Command Edition hooks you, and you find yourself desperate for more minis on the cheap, the Recruit Edition may be a good add-on to grab for cheapo bucks.
Sure, it’s not Indomitus, but it’s a damn-good follow-up.
Again, a huge thanks to the amazing Mighty Lancer Games for getting this to me on such short notice. Thank you so much, guys! You are awesome!
Please Note: This site uses affiliate links. Our Affiliate Partners are shown below
(Affiliate links will result in compensation to the site on qualifying purchases)
Click this link & buy your hobby stuff from Element Games for the UK & Europe to support FauxHammer.com – Use Code “FAUX2768” at the checkout for double reward points.
Our Affiliates / Hobby Stores
- UK: Element Games, The Outpost, Wayland Games, Mighty Lancer, Goblin Gaming, Forbidden Planet, Model Scenery Supplies, eBay, Amazon
- US/Canada: MTechCave, GameKastle, eBay (US), eBay (CA), Amazon
- Germany: Taschengelddieb
- Europe: eBay (DE), eBay (FR), eBay (ES), eBay (IT), Amazon
- Australia: eBay, Amazon
- Global: RedGrass Games, Warcolours
- 3D Printers: Phrozen 3D, Elegoo, Anycubic
FauxHammer – Latest Video on YouTube
What did you think of this Review? Please let us know in the comments.
If you like what we’re doing here you could really help encourage more content with a share on any social media platform.
Click the share links at the bottom of this screen (or on the left for computers and tablets)
Want to keep updated with the site? You can subscribe in the sidebar for RSS or by email below
(Sidebar is below the article on Mobile Devices)
Author


Hey Rob, One of the best reviews Ive seen far. I really appreciate the time you spent on it. I have a question, which minis would you recommend to expand the SM/Necrons army in the Command ed? Other than the recruiter box. Thanks for your time
Hi Tom! Thanks for the feedback – knowing that people find what we write useful makes it all worth it :) As far as expanding your armies goes, a couple of buddies of mine who play competitively strongly recommend some transport for both: something like a Rhino or a Ghost Ark. For Necrons, I also know Lokhust Heavy Destroyers are a popular choice, and no Space Marine army is complete with out at least one Dreadnought!
For me, though, my favourite SM/Necron purchase since getting both the Command Edition and an Indomitus box has to be the incredible C’tan Shard of the Void Dragon. This thing is a monster on the field and an unmatched joy to paint.
Really good review mate. Doesn’t the primaris captain have a 4+ invulnerable save though which can always be used regardless of the AP of the weapon?