Siege Studios Essentials Master Painting Course Review
Last Updated on April 23, 2021 by FauxHammer
This review for Siege Studios Essentials Masterclass is directed at people from the UK where the class operates. But for anyone outside of this region who is interested in taking a painting course for miniatures, I outline many of the benefits of courses in this article.
Please Note: This site uses affiliate links. Our Affiliate Partners are shown below
(Affiliate links will result in compensation to the site on qualifying purchases)
Click this link & buy your hobby stuff from Element Games for the UK & Europe to support FauxHammer.com – Use Code “FAUX2768” at the checkout for double reward points.


Our Affiliates / Hobby Stores
- UK: Element Games, The Outpost, Wayland Games, Mighty Lancer, Goblin Gaming, Forbidden Planet, Model Scenery Supplies, eBay, Amazon
- US/Canada: MTechCave, GameKastle, eBay (US), eBay (CA), Amazon
- Germany: Taschengelddieb
- Europe: eBay (DE), eBay (FR), eBay (ES), eBay (IT), Amazon
- Australia: eBay, Amazon
- Global: RedGrass Games, Warcolours
- 3D Printers: Phrozen 3D, Elegoo, Anycubic
FauxHammer – Latest Video on YouTube
I have to be honest up front. Before the course started I was gearing up for a negative review. I was doubting the money I’d spent and started to have some regrets. I’ll go into detail further on, but all of these concerns were alleviated and then some shortly before the course. Once the course was over, I was sad that it was done and wished I’d taken a course years ago.
The Company
The course was run by Siege Studios, a well-known commission painting studio. Whose team have numerous social media followers and are known for producing some of the best commission painted armies in the UK.
You can see more about them on their website or various social media pages.
But they are more than just that, Siege Studios is run by James Otero (who as also the trainer on this course). James is a Golden Demon award-winning painter (with multiple other awards & commendations), and some of you may also know him from one of his other gig’s. He is one of the brains behind Artis Opus. That’s right, James runs both Siege & Artis Opus. Oh, and did I mention he still has time to come on weekend courses to train people to be better painters? You may wonder where this guy gets the time. I certainly do, I’m lucky if I get time to paint a mini a month between my day job, family and blogging. This guy is 24x7x365! and you can tell within an instant of meeting him, he loves what he does.
I love the personal touch given to this course and the pride for the work shows at every turn. Through most of my adult life, I have grown weary of many large corporations, mainly due to the lack of personal pride the workers have in their job. This goes triple when looking at service companies. If I’m paying for a service, I want to know that the provider actually wants to deliver that service, because it’s people like that who give you the most value for your money. Many of us nowadays are even happy to pay extra for that premium level of service. Here I got that premium level of service without an excessive charge. To me, James comes across as a miniature painter first and a business operator second. It’s because of his love for miniature painting which shines through, that makes this company and course the success it is.
So yeah, it turns out, the guy behind Siege Studios is also the guy behind Artis Opus. Looking back, I don’t know how I didn’t make the connection before…
The Course Outline
Full Disclosure: I paid in full for this course, (although I did get a small discount by signing up during a promotional period). But this just to advise that this is is an independent review and FauxHammer is in no way affiliated with Siege Studios on a professional level.
The name should explain itself. The Essentials Master Course is there to cover the essentials of miniature painting. This may sound like it’s aimed at beginners, but it certainly isn’t just for that. After all, I wouldn’t consider myself a beginner at all. Painting on and off over the last two decades I have a solid 5 years miniature painting experience, I’d consider myself a well accomplished and capable miniature painter and yet this course was perfect for my current skill level.
I started painting back in the ’90s and learned to paint from White Dwarf magazine, chats with GW staff or general trial & error. Even with the years of experience back then, I didn’t know things which are obvious now. Such as painting in layers, shading or even using a palette instead of using my paint straight from the pot. Nowadays we have the internet, and Duncan Rhodes does a good job of showing you how to use the Citadel Paint system to get good results. Many other Miniature Painters out there will show you more advanced techniques like layering, glazing and OSL. These are all great resources for many people out there, especially those who have the time to dedicate to trial and error when learning these techniques. But for me (a lesson which was echoed on this course) my time is the most valuable commodity. Between family commitments, a day job and running a blog, I get very little time to actually sit and paint. For me, this course was intended as an accelerant in my skill level. I got that and now looking back, I wish I had done it much much earlier.
The course agenda advised we would cover the following;
- Airbrushing Basics
- Wet Palette
- Power Weapons
- Decals
- Weathering
- Faces
- Gems, Glass, Screens & Lenses
Each of these modules (and some other unexpected ones) consisted of theory, demonstration and in the most part, hand’s on practise with regular one-to-one feedback from the trainer.
It wasn’t just the act of covering these topics that added value, there are guides all over the internet for each of them. But it’s the skills I learned from these guided practices and feedback which I can now apply to so much more than just the example objects painted on the course. I’ll cover this more in the walkthrough.
Course Prep
I bought the course ticket over the Christmas period and waited just under four months to go on it. Two weeks before the course I received my Student Pack which had all the details I could need, Agenda, Paints & Equipment Checklist, Directions including Bus and Train details. It also advised bringing certain equipment such as our own Lighting, Airbrushes. Brushes & Specific Paints
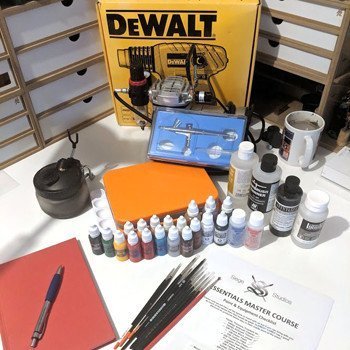
I had most of the paints (primarily Games Workshop) already, so It only cost me an extra £10 for the new paints I didn’t have. Although I never ended up using these, this was only because I decided to use orange for the front plate of a Rhino tank instead of the demonstrated blue.
The paint list did, however, contain Cadian Flesh twice (which I learned on the course, actually lead to at least one of the course members buying two bottles). When I saw this duplicate, I emailed Siege to ask about this, and whether it was meant to be a different paint? I didn’t want to go with something missing (turns out it was probably Agrax Earthshade which we used quite a bit of, yet it was not listed).
I also wanted to advise Siege (as they asked us to) that I have an airbrush, but it’s a cheap Chinese brush and asked whether this would be a problem. Additionally, I wanted to know what brushes they recommended – as I’d just written a guide showing the Best Brushes for Miniature Painters.
I didn’t actually get a response from them, even after chasing up 3 times over 2 weeks. This was the point where I was having some serious doubts about the course. I looked online for any way to call them, but they don’t have a public phone number for the company. A couple of days before the course, I emailed again, Tweeted, Instagrammed, Facebook Messaged and then sat down and re-read my paperwork. Only to find that there was a contact number right on it, Doh!
One quick call and I got James Otero directly, the man himself who runs Siege and Artis Opus, also answered the phone to lowly old me. A 5-minute chat with James cleared up all concerns. Their email address is used mainly for their commission painting work and unsurprisingly they are in high demand. Whilst on the phone he asked a colleague to check over the course paperwork and fix it. Told me my airbrush was fine for the practises we would do. And, unsurprisingly, in regard to recommended brushes, he, of course, suggested Artis Opus. But this was in no way self-promotional, he openly stated that any brushes with a sharp point will be fine.
I was reinvigorated, geared up and ready to paint better than I ever have before.
Please Note: This site uses affiliate links. Our Affiliate Partners are shown below
(Affiliate links will result in compensation to the site on qualifying purchases)
Click this link & buy your hobby stuff from Element Games for the UK & Europe to support FauxHammer.com – Use Code “FAUX2768” at the checkout for double reward points.
Our Affiliates / Hobby Stores
- UK: Element Games, The Outpost, Wayland Games, Mighty Lancer, Goblin Gaming, Forbidden Planet, Model Scenery Supplies, eBay, Amazon
- US/Canada: MTechCave, GameKastle, eBay (US), eBay (CA), Amazon
- Germany: Taschengelddieb
- Europe: eBay (DE), eBay (FR), eBay (ES), eBay (IT), Amazon
- Australia: eBay, Amazon
- Global: RedGrass Games, Warcolours
- 3D Printers: Phrozen 3D, Elegoo, Anycubic
FauxHammer – Latest Video on YouTube
Course Walkthrough – Day 1
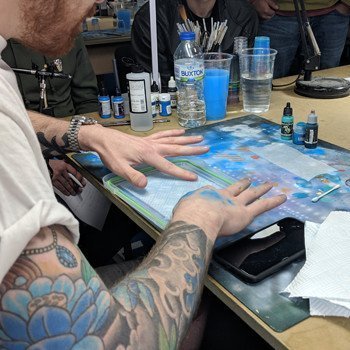
The course was held at Element Games North West Gaming Centre. Many people in the UK know Element Games as one of the main places to pick up a myriad of supplies for their gaming hobbies. We were safely tucked in a back corner. Although this was during an Age of Sigmar tournament weekend and when Magic The Gathering just released the Dominaria expansion. So it was busy in there, both days. To be honest, it didn’t bother me, but some of the other painters were distracted when listening to the games results. Especially when someone was playing a favourite faction.
For anyone who doesn’t know about Element Games, Check them out using the link below.
Please Note: This site uses affiliate links. Our Affiliate Partners are shown below
(Affiliate links will result in compensation to the site on qualifying purchases)
Click this link & buy your hobby stuff from Element Games for the UK & Europe to support FauxHammer.com – Use Code “FAUX2768” at the checkout for double reward points.
Our Affiliates / Hobby Stores
- UK: Element Games, The Outpost, Wayland Games, Mighty Lancer, Goblin Gaming, Forbidden Planet, Model Scenery Supplies, eBay, Amazon
- US/Canada: MTechCave, GameKastle, eBay (US), eBay (CA), Amazon
- Germany: Taschengelddieb
- Europe: eBay (DE), eBay (FR), eBay (ES), eBay (IT), Amazon
- Australia: eBay, Amazon
- Global: RedGrass Games, Warcolours
- 3D Printers: Phrozen 3D, Elegoo, Anycubic
FauxHammer – Latest Video on YouTube
Airbrushing Basics
The first lesson of the course covered airbrushing. This was much more than just showing what an airbrush is. We also learned how and when to use such a tool. This also covered the airbrush configuration and maintenance of the brush and compressor. Based on what I had previously learned, from following various online guides, my airbrush was set up very differently to how we were shown on the course. On the course, the settings were clearly justified.
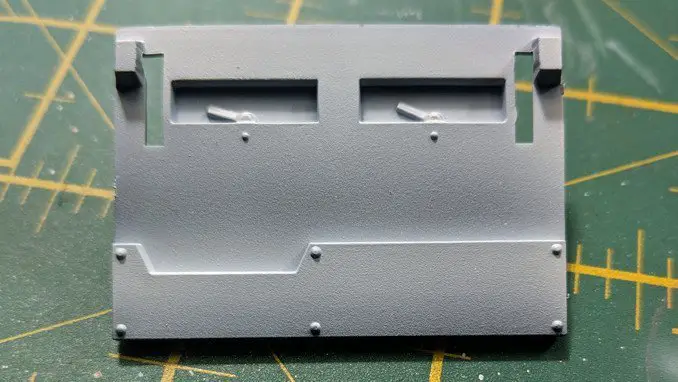
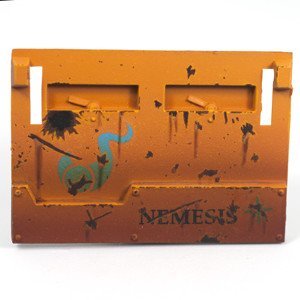
After the theory and a demonstration, we (approximately 13 of us) were set to the task of applying gradient fades to a front plate or door panel from a Rhino. All of us had different airbrushes and compressors, but from what we had learned, could now configure them easily.
I took my cheap Chinese airbrush which cost me £12.99 on eBay (which is in sore need of replacing) and set to it. Initially applying a White fade to the black primed front panel. Then applying the colour of my choice. I chose Orange because the Fauxhammer Logo is Orange, I wanted it to stand out and I had some orange paint. The course paperwork advised of the paints to bring which gave us some options to play with. But delegates can bring colours for their own armies if they wish, as others had done.
As we practise, James the trainer walked around to give feedback and pointers. The feedback was clear and if there were issues with you or your tools he would tell you straight so that you knew exactly what and how to improve.
In my case, it was clear that my Chinese Airbrush was not performing very well. this caused my spray to be more of a long oval than circular but the blend came out ok of a first try. (it was nice to know it was the brush at fault, not me) I’ve had a good couple of years out of this brush, so I think it’s definitely time for an upgrade.
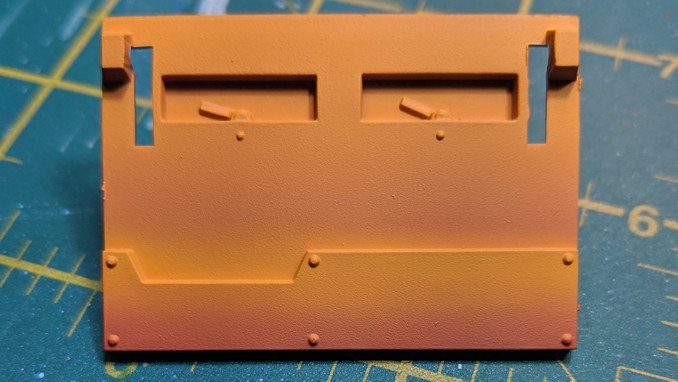
Generally, I was happy with my first attempt. I now know how to fade in colours, and yes this was applied to a flat surface, but we also discussed in detail how to apply this to miniatures as well.
I didn’t get a picture of everyone’s work at this point bit I’ll show the group’s work on this in the Decal’s section.
Wet Palette
The wet palette was a part of this guide where I reconfirmed a few things I already knew, but I also learned some others. I’ve been using wet palettes for over 3 years now, both my own DIY job and the Redgrass Games Everlasting wet-palette. But I’ve never had as much out of a wet palette as I had over this weekend.
This is another example of what you can learn on a course vs what you can learn by watching youtube videos or reading blogs. Nothing I had seen online was inherently wrong, but, as I expected, it’s the intricate details which those guides don’t say that matter. A few tweaks and tips that James taught us in our one-to-one time, really showed the difference you can get out of a wet palette and just how far you can go with one.
One of two key takeaways from learning about wet palettes was learning when not to use one. I had never occurred to me that since I ‘upgraded’ to a wet palette there would ever be a reason to go back. But actually, there are many cases where a dry-palate becomes more useful. Looking back now, the applications are actually rather ‘face-palm’ obvious.
The other thing I learned here, was possibly the most valuable lesson on the course. How to thin paints. I now understand how a paint should behave to make different consistencies. The clear differences between a layer, a wash and a glaze. Something I’ve really struggled to learn from watching YouTube videos. Especially as many people tend to use some of these terms interchangeably and others use some use different terms altogether. I’m not saying the terms used by Siege Studios are the “correct” terms, because I don’t really know. But I know what they mean to me and now, how to make them.
Power Weapons
Honestly, this was the part of the course I was least looking forward to. I’m not a fan of power weapons any more than I’m a fan of painting gemstones. I just don’t like the style of coloured power swords, they just look too cartoony in my humble opinion.
I couldn’t have been anymore wrong, this was the part of the course I learned the most from.
Leading directly from learning how to create different paint consistencies. here we learned how & where to apply them. Whilst the power sword example was a nice simple way to learn this technique. This essentially covered the entire brush painting process, nestled up into one neat little package. I can now apply this technique to any surface on any model and with some practise can start to master it. Whereas before I was just guessing my way through. See my attempts at glaze shading on space wolves for an example of how well I did on my own. I now know the right way to do it. and to think of all the hours I wasted on fruitless practice and more. All the rest I’ve wasted since that Space Wolf where I’ve been doing it the wrong way.
The week before the course, I decided to try out the techniques that were in the course pack so I had some direct comparisons for after. I’ll cover these in the results section.
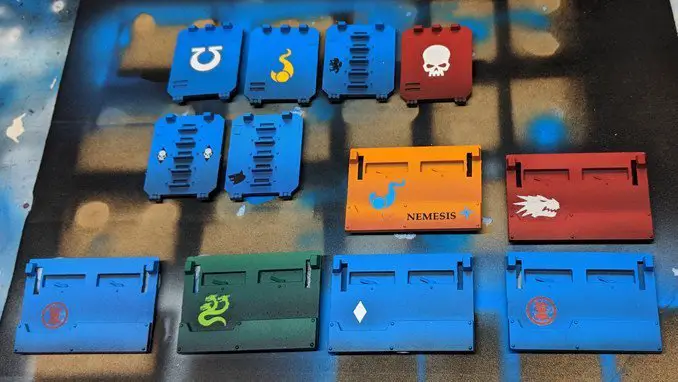
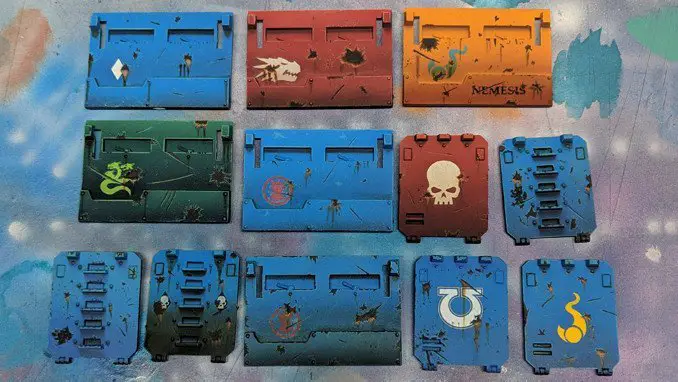
It’s worth noting here that the painters on this course were of varying levels and experience. I’d say I was on the higher end of the experience ladder in time served. Another guy had only been painting for about 2-3 months. When it comes to the level of quality of painting for the group, I’d say I was middling at best. To show just how suited this course is to painters at these myriad experience & skill levels, take a look at the pic below and see if you can tell who the worst painter was and who the best was?
It’s simply not possible, we all achieved amazing results because of this tutorial.
FYI, mine is the green one on the bottom right
Decals
Just to mention here, the image below (whilst decals have been applied) also shows everyone’s success with the airbrushing and fading tutorial we started with.
The decals tutorial was the lowlight of the course for me, the tutorial itself was perfect, but I already owned and used the products we practised with. so I didn’t see much value here for me personally. But if you struggle with decal transfers, this is a good introduction. However, it was due to my arrogance in this that I ended up going overkill with the transfers, applying more than anyone else. In doing so, I started to lift layers of paint off my work. Luckily we were doing a weathering tutorial next. So I could cover it up.
What I really would have preferred here would have been some examples, demonstration and/or hands-on with applying decals to curved surfaces. As I’m still yet to apply an ultramarines insignia to a shoulder pad without closing the gap at the top or an imperial fists logo without folding the outer circle
Please Note: This site uses affiliate links. Our Affiliate Partners are shown below
(Affiliate links will result in compensation to the site on qualifying purchases)
Click this link & buy your hobby stuff from Element Games for the UK & Europe to support FauxHammer.com – Use Code “FAUX2768” at the checkout for double reward points.
Our Affiliates / Hobby Stores
- UK: Element Games, The Outpost, Wayland Games, Mighty Lancer, Goblin Gaming, Forbidden Planet, Model Scenery Supplies, eBay, Amazon
- US/Canada: MTechCave, GameKastle, eBay (US), eBay (CA), Amazon
- Germany: Taschengelddieb
- Europe: eBay (DE), eBay (FR), eBay (ES), eBay (IT), Amazon
- Australia: eBay, Amazon
- Global: RedGrass Games, Warcolours
- 3D Printers: Phrozen 3D, Elegoo, Anycubic
FauxHammer – Latest Video on YouTube
Course Walkthrough – Day 2
Weathering
Just look at these! When I saw the promo pics for this course, it showcased images like these – which I assumed were painted by the Siege Studio’s pros. But actually, we’ve managed to create comparable results in just a day. Remember, some of the guys on this course were true beginners.
This was the part I was most looking forward to, as someone who gets Warhammer Conquest every month I have a growing horde of unpainted Nurgle miniatures all in need of some serious weathering and damage. I was so excited to learn something new here, and boy did I. by the end of this tutorial I needed a break, my head was so full as was the 18th page of my notebook.
I previously only used weathering to cover up mistakes. Even then, I kind of made it up. Here we learned how to make realistic battle damage and how to make it look random. It’s really hard to intentionally make something look random. We also learned how to create realistic scratches along with applying highlights to this damage. My favourite parts were applying the rust effects before we weathered this up further with a sooty and dusty look. Now I’ll admit here, I kind of murdered mine with a bit of overkill. I’d made so much battle damage that I was trailing behind the rest of the guys. I got so lost in the technique that I forgot I was just practising it and not trying to make it look the best I possibly could. I also messed up by making the window damage so large, the only repair we could do was turn this into a large hole.
The only thing I wish we had also covered here was pigment powder application, But I think the parts looked incredible without it. That is something I will learn on my own or perhaps on a future course.
Faces
Painting faces and skin has been the bane of my existence up to this point. I’ve stripped the same Khorne Berzerker twice now. For anyone who follows me on Instagram, you’ll see there’s a reason why my Space Marines are mostly wearing helmets. Any decent faces I’ve accomplished have been purely down to luck up to this point.
This tutorial (whilst focused on Caucasian skin tones in the tutorial) showed us how to very easily create excellent looking faces. I’ve already seen online that there are as many ways to paint a face as there are to skin a cat. This way was just one of those many and It’s one I’ll adopt going forward. But tweak the technique to my style as I go.
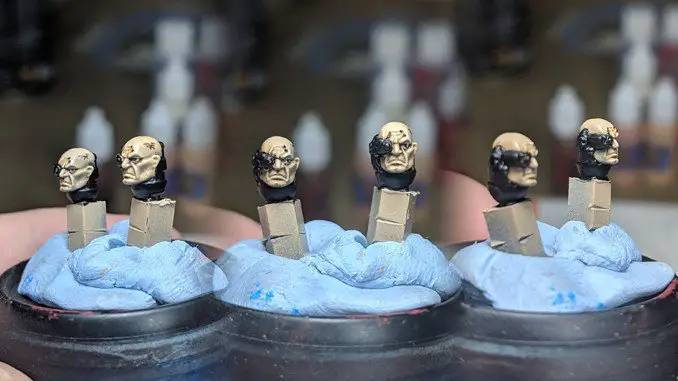
We covered the range of colours we could use to apply this to different racial skin tones with colour suggestions for creating the warmer and cooler hues too. Although we didn’t go as far as Black Salamanders or Pale Blood Angels we did cover painting with black & white in the next (unexpected) module. This, coupled with the theory on warmer and cooler colour tones means we could walk away with the knowledge to create whatever skin tones we needed.
Black & White
This was not actually on the agenda and was entirely theory, but it was a nice surprise included in the second-half of the second day. Throughout the days we had discussed basic colour theory and questions kept coming up about the use of black and white. James had advised us he would talk about this later and this was that later.
With an arts background there was a lot here I already knew and take for granted how much is actually involved for those who have not been taught any of this. It was great for me to have a refresher as my experience with colour theory is about 20 years old now.
Here we talked about the use of black and white in miniature painting and how to highlight and shade both colours. If you are wondering how you can highlight an Apothecary or shade a Deathwatch Space Marine, then this is exactly why you need a course. One of the White Dwarf ‘eavy Metal Masterclass tutorials gave us some of this knowledge before. But it’s one thing reading a snippet in a book and another having it explained to you in detail.
Gems, Glass, Screens & Lenses
Another theory section, my hand was getting cramp at this point as I was easily 25 pages into my book with notes. Here we went into detail on techniques of pretty much all high gloss elements on models. we even had some handy slides (which I stupidly forgot to photograph) explaining how to achieve each technique to show reflections in the glassy surfaces in a consistent manner. This even included painting vials of fluid on miniatures too. I just wish I’d taken those photos so I can remember. Hopefully one of the other guys did and they can share them with me.
Q&A
To finish the day we had a Q&A session with James, which was really a group Ask Me Anything session. We’d covered lots over the previous two days but even still we managed to drag James over the end of the day for an extra hour with a barrage of questions. We covered painting heat burn on metal, cloth & capes, James’s Golden Demon entries, commission painting, competition painting, plasma rifles, tattoos, stippling and even the Artis Opus Series D (because we all desperately wanted to see them). Along with as many other topics as we could squeeze in and get the most value out of the day. Some course members even stayed after I left an hour over the schedule to get James critique on their mini’s. I would have loved to have done this but I didn’t take any. Oh, and my girlfriend was left waiting for me to pick her up in the town centre and I was already late! (if you read this, sorry babe).
The one regret is that I did not remember to ask about metal paints, what brands to use and how to apply them. James had some great examples of metal work such as a Blood Angel with a gold helmet which looked better than most metallic paint’s I’d previously seen.
It was an incredible finish to a great weekend and I can safely say that everyone on the course walked away feeling up-skilled and proud of what they had achieved.
Please Note: This site uses affiliate links. Our Affiliate Partners are shown below
(Affiliate links will result in compensation to the site on qualifying purchases)
Click this link & buy your hobby stuff from Element Games for the UK & Europe to support FauxHammer.com – Use Code “FAUX2768” at the checkout for double reward points.
Our Affiliates / Hobby Stores
- UK: Element Games, The Outpost, Wayland Games, Mighty Lancer, Goblin Gaming, Forbidden Planet, Model Scenery Supplies, eBay, Amazon
- US/Canada: MTechCave, GameKastle, eBay (US), eBay (CA), Amazon
- Germany: Taschengelddieb
- Europe: eBay (DE), eBay (FR), eBay (ES), eBay (IT), Amazon
- Australia: eBay, Amazon
- Global: RedGrass Games, Warcolours
- 3D Printers: Phrozen 3D, Elegoo, Anycubic
FauxHammer – Latest Video on YouTube
Results
Before taking this course, I was sagacious enough to take some pictures from my existing models, showing some of the things we would be painting on the course. Something that would allow me to directly compare my skills before to my skills after. let’s take a look at some of these now.

Power Swords Before Power Swords After

As you can see my old technique was a poor attempt at layering, leading to several lines across the surface of the blade edge. It looks ok from a distance, but close up it has a lot of issues. The new method is much smoother and given more time can be smoother still. there’s a much clearer balance of colour across the whole blade and much smoother blends. It was also much quicker to do this the new way I learned and I used fewer individual colours.
Weathering Before Weathering After
Weathering was another technique I struggled with previously. Ignore the old model having inconsistent direction in the rust runs. The actual issues are clear. The colours used for the rust effects are way too strong. The orange is unrealistic and the pools are too heavy. Now the rust runs are appropriately subtle. Whilst I have gone overkill on the new weathering damage and scratches to practise. It now has more realistic depth thanks to the edge highlighting of the damaged areas. The before image also shows my old blending technique which can also be compared to the power sword blending above.
Faces Before Faces After
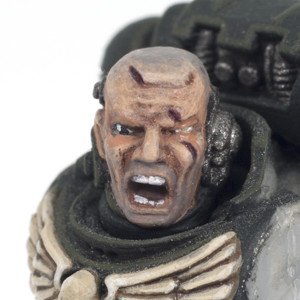
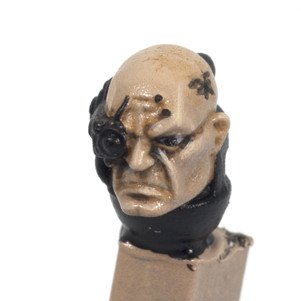
I’ll be honest, I’m still quite proud of the 40k Freddie Mercury wannabe on the left. Previously this was the best face I had ever painted, I’m more than happy with the narrative I added here too. With his blind eye and scar, created when I acidentally slashed him with my hobby knife before priming. This guy looks fine on the tabletop, but up close, he’s a bit more embarrassing due to the poor repairs I’ve made around his eyes and not blended them in. The new model (whilst in need of a matte coat), is a much more subtle approach to painting the face. Yet it adds much more depth to the centre, which correctly draws the viewers eyes to the actual face. It’s also nice to know how to paint eyes without the pupil melting out of the socket. Although, it does help to get a model’s eyes straight when you only have one to paint. Going forward, I’ll probably be creating a blend of these two techniques. That is the beauty of this course, I now have the essentials I needed in order to build and adapt to my own style and preference. So I think it’s safe to say I got exactly what this course set out to give me.
Because we got to take away our painted parts, we have something to look at directly and remember the process we went through. It’s one thing making the pages upon pages of notes, but having the physical reference is something I can use when applying paint to my new minis. I have actually considered using Siege Studios commission service now and asking them to paint something like the easy build Primaris Space Marines, at their Bronze, Silver & Gold levels (maybe in different chapters). As we learned on the course, it’s one thing to compare your models to close up Instagram photos, but another to have physically painted models in front of you. The physical object operates much better as a benchmark piece.
During the course, we also got some insights into the operations at both Siege and Artis Opus and some hints at what they are working on next. I’d love to share details but it would be unfair for me to announce (steal and promote) anything beyond what they have made public themselves. But I want to say that I’m excited about the future of both companies.
After the course, we were all made personal Facebook friends of James and invited to a private Facebook group for course graduates. it’s great to be added to a pot of likeminded individuals whose focus is on improving their painting. In the few days since being added, we’ve already had member posts and supportive discussion regarding some techniques we apply. What is great is that we all have the same baseline of knowledge. It’s far easier to understand people’s approach to painting models when you are all speaking the same language.
Being added to this group makes up for the fact we didn’t get a certificate at the end of the course. I would have liked a certificate. I haven’t had a decent one since I learned to swim 10 metres.
Final Thoughts
| Pros | Cons |
| Covers All Essentials Immediate up-skilling Easy to Follow Techniques Excellent Trainer Access to a Support Community One-to-one Feedback Open Q&A | Incorrect paperwork Had no reply to emails No weathering powder guide Decals on flat surfaces only No Certificate ;) |
We’re spoiled nowadays by our expectations of what companies can deliver. I can’t remember the last time I bought something which wasn’t from a huge chain. The last course I paid for was PRINCE2 which is a project management course. These are run by large training companies with 50-100 or more staff and are regularly audited. This course is not that and simply put, cannot be judged at an equivalent level to anything really.
Sure I had a few gripes, but they were minor. Does a couple of errors on the paperwork matter? Not really. Would I have liked a weathering powder guide? Yes, but the course did not really advertise this other than a minor mention in the paperwork to bring some if you wish. and nobody brought any.
I would have liked to at least have seen a decal applied to a shoulder pad as that is bloody hard! The one thing I would knock this course for, as the lack of contact. I do think that it’s of the utmost importance that customers are replied to. I have seen other customers complain about this issue too. I would, in all honesty, give this course 4.5 stars. As it;’s not quite “perfect”, which is what 5/5 would mean, but because the tool I use to give star ratings on FauxHammer.com doesn’t let me give half a star. I’m gonna round this up to a solid 5, just because the course was just awesome.
In summary; yes, all of the topics we covered on this course are available from multiple sources online. But what you don’t get with these resources is any validation that you’re doing it correctly. That’s something which can sap your time for weeks, months or even years as you stumble about on your own. Learning these techniques quickly is something you can only get with feedback from a person who is better than you. So I’m glad I went to one of the best. now I can spend my time mastering miniature, rather than playing at miniature painting.
The greatest benefit to this course is that I can walk away feeling confident in my techniques and that I can now spend time focusing on painting minis. Getting good results by using the essential techniques I took away from this course. No longer am I wading through guide after guide online hoping something will accelerate me to that next level. I’m now at that next level refining what I have learned. Which I expect should keep me entertained by mini painting for a long while and until I’m ready for some more advanced classes.
The most impressive part of this course in particular, was the delivery of the material. It was as genuine and honest as it needed to be. and I have a strong reason to trust everything I was told. And it was specifically that James didn’t hard sell us on the Artis Opus brushes.
James was appropriately complimentary of all suitable brush brands. As I had recently worked with someone launching a hobby Kickstarter, I initially had the full intention of promoting their product for them. We ended up in an argument because I mentioned a comparable product in my preview of his. He didn’t like that and wanted me to remove all mention of it, even though the products were both miniature holders. This is the sort of underhanded disingenuous approach to competitors which immediately gets my back up about a company. My duty first and foremost is to my readers, and if I think a product is good, bad or comparable to something else. I’ll tell you.
What I liked about James, is that he had all the opportunities under the sun to promote Artis Opus. But it’s because he didn’t try to ram it down anyone’s throat and was respectful of the competitors that make me trust him and believe in the spirit of Siege Studios & Artis Opus as a part of the Miniature Painting community and not someone looking to milk it like a cash cow.
Finally, it was also great to meet like-minded painters, along with 2 others who are also active members of the community runners. One of which had actually already heard of this blog! (that was a happy moment for me) On behalf of my coursemates. Here’s a quick shout out to both Luetin09 & The Plastic Crack Blog. Please check them both out, they are already rather popular…
You can see Luetin’s thoughts on this course by watching the video below.
If you’re a beginner or someone who’s quite well established and you are looking to accelerate your painting abilities. This is certainly a course worth considering. Just be aware that you should be patient with the team as they are incredibly busy. But accept this and stick by them, they’ll see you right in the end. You’ll have a fantastic couple of days and come away able to paint better, faster and be more impressed by your own models than ever before.
Right, now to get my hands on some of those Artis Opus brushes to review for you guys!
Find a course near you by checking the Tuition section of the Siege Studios Website.
Please Note: This site uses affiliate links. Our Affiliate Partners are shown below
(Affiliate links will result in compensation to the site on qualifying purchases)
Click this link & buy your hobby stuff from Element Games for the UK & Europe to support FauxHammer.com – Use Code “FAUX2768” at the checkout for double reward points.
Our Affiliates / Hobby Stores
- UK: Element Games, The Outpost, Wayland Games, Mighty Lancer, Goblin Gaming, Forbidden Planet, Model Scenery Supplies, eBay, Amazon
- US/Canada: MTechCave, GameKastle, eBay (US), eBay (CA), Amazon
- Germany: Taschengelddieb
- Europe: eBay (DE), eBay (FR), eBay (ES), eBay (IT), Amazon
- Australia: eBay, Amazon
- Global: RedGrass Games, Warcolours
- 3D Printers: Phrozen 3D, Elegoo, Anycubic
FauxHammer – Latest Video on YouTube
Follow FauxHammer by subscribing to the site (below). You can also follow on Twitter or Facebook for the latest updates.
What do you think of this review? Would you like us to review other painting courses? Let us know in the comments.