
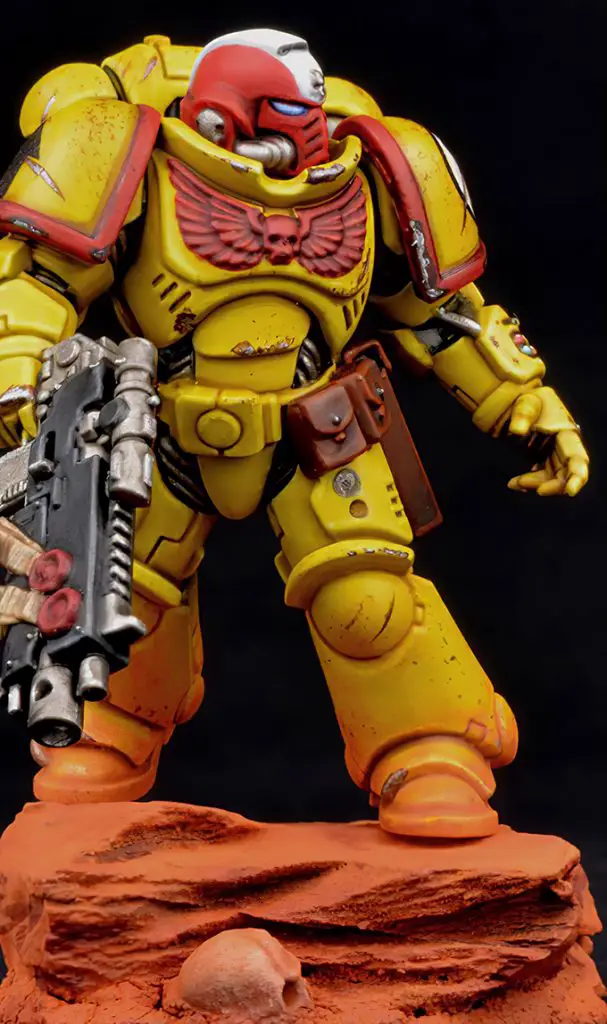
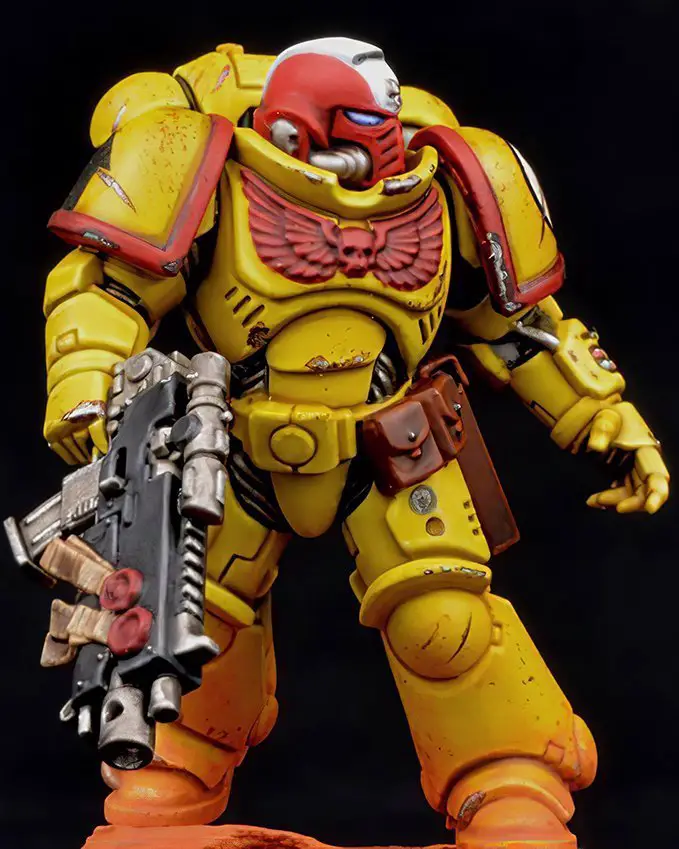
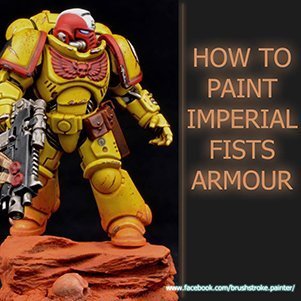
How to paint Imperial Fists Armour – 2019
Last Updated on October 24, 2019 by FauxHammer
Hi everyone, here’s another Brushstroke tutorial. This time we’re looking at how to paint Imperial Fists for a unique way of painting yellow armour.
To See my latest Guides, Find me on Facebook & Instagram
How to paint Imperial Fists Armour – Paints & Tools
Brushes
- Winsor & Newton Series 7 (not the Series 7 ‘Miniature’ Brushes)
Paints
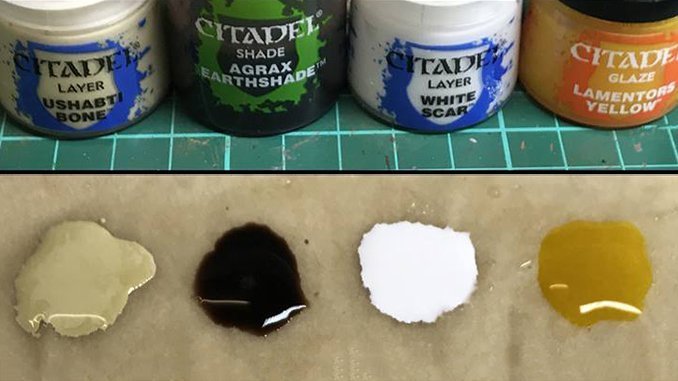
- Ushabti Bone
- Khorne Red
- Mephiston Red
- Eshin Grey
- Mournfang Brown
- White Scar
- Evil Sunz Scarlet
- Wild Rider Red
- Celestra Grey
- Ulthuan Grey
- Kantor Blue
- Blue Horror
- Dawnstone
- Wazdakka Red
- Skrag Brown
- Rhinox Hide
How to paint Imperial Fists Armour – Tutorial
Intro to Glazing
Before jumping into how I painted the Imperial Fists armour, I think it is important to explain how the paint should be applied. When painting yellow, one of the biggest struggles is to achieve a clean, smooth finish.
The best way I’ve found is to layer the paint on as a series of glazes rather than standard paint. All this means really, is thinning the colours right down, until they have the consistency of milk.
When you paint them onto the model you are just looking to wet the surface with them, effectively tinting it. Over repeated applications of the glaze, you build up the colour you want. Unlike washes, where you want them to flow into all the creases and recesses, with glazes you need to be more controlled and not let the paint run.
Instead, just look to apply very thin layers at a time.
To help with the process I recommend using a wet palette.
Step 1 – Apply Primer
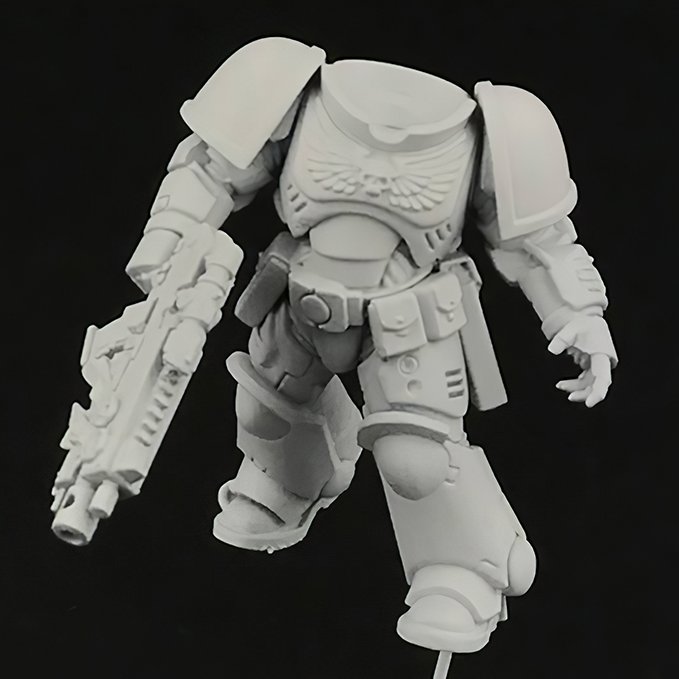
As the paints being used are very thinned down it makes them transparent. Because of this, it makes the choice of primer colour very important, as it can actually be used to our advantage and save a lot of the work for us.
So, in this case, prime the mini white. This will enable a bright finish from fewer layers.
Do take your time when priming to get a smooth finish, as it makes all the difference to the end result.
Step 2 – Paint Base Colours
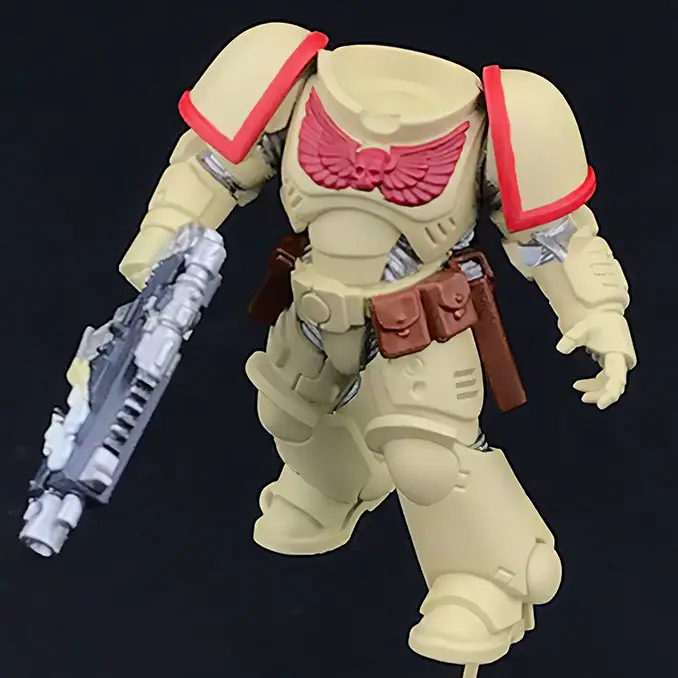
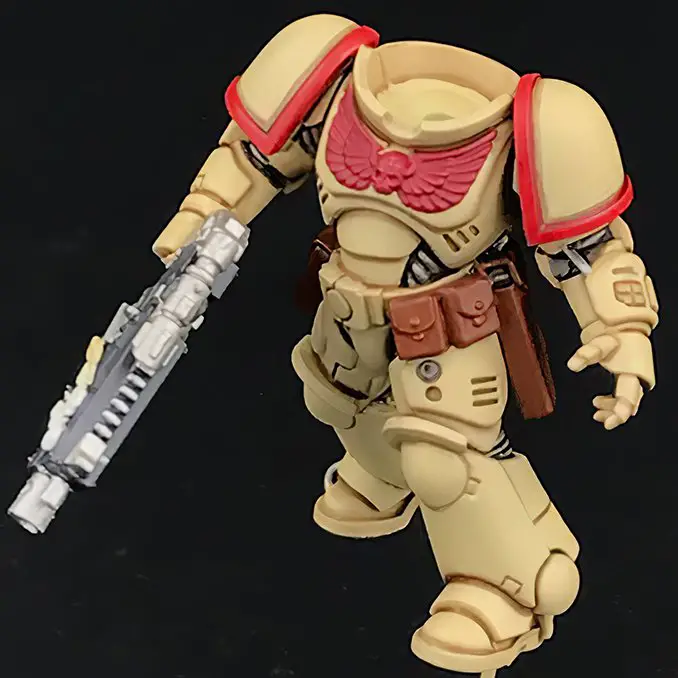
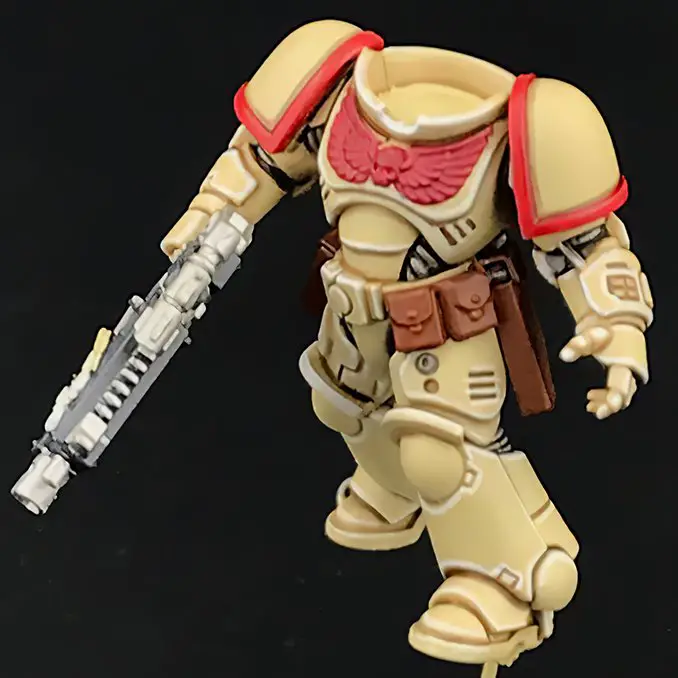
Paint the complete mini in Ushabti Bone. Remember to apply as a glaze, in very thin layers. Because you primed the mini white it should be simple to get solid coverage in just a couple of coats. It is very important to keep this stage as smooth and clean as possible. So, take your time.
Basecoat the chest crest in Khorne Red and the shoulder trims in Mephiston Red.
Basecoat all the joint areas of the armour and the details on the rifle with Ironbreaker. Base the rifle casing in Eshin Grey.
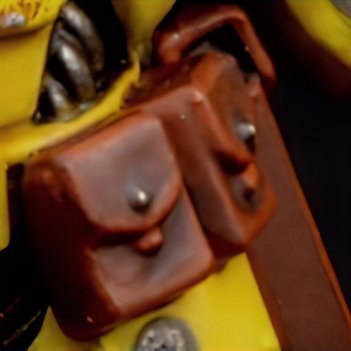
Base all leather areas in Mournfang Brown.
Step 3 – Apply Shading
Apply thinned Agrax Earthshade (50:50 Agrax Earthshade : Lahmian Medium) as a recess shade. This means you just want to run the shade into the grooves and edges of the armour and not all over the model. If you make a mistake, simply let it dry and tidy up with some Ushabti Bone.
For darker shadows, in the deeper grooves, apply two coats of shade.
Shade all the silver joint areas of the armour with NuIn Oil. Take care to keep it off the Ushabti Bone coloured armour. Again, if you make a mistake, just let it dry fully and tidy up with some Ushabti Bone.
Step 4 – Paint Highlights
Edge highlight the Ushabti Bone armour with White Scar.
Keep your paint thinned so it flows smoothly from the brush.
As with earlier stages, if you make a mistake, just correct it with some Ushabti Bone.
Step 5 – Glaze The Armour
This is by far the most fun stage of painting the armour.
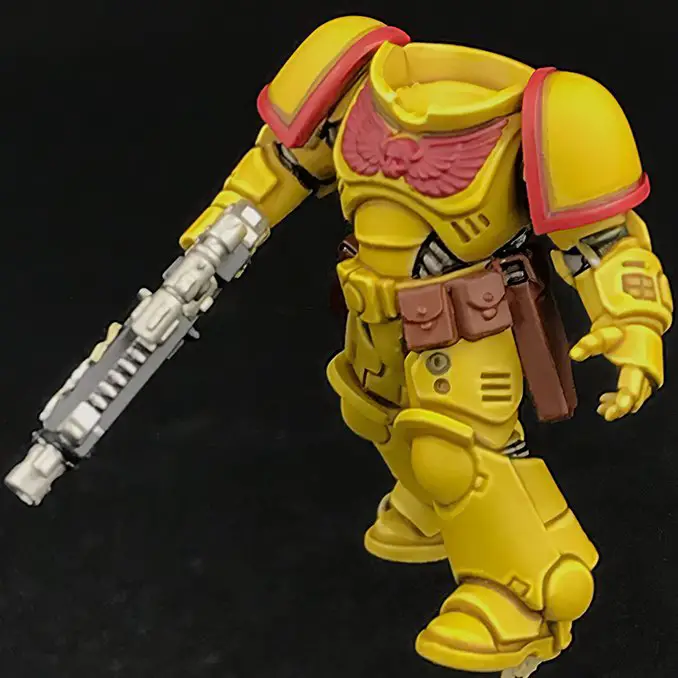
Glaze all the Ushabti and white armour with GW’s Sigismund Yellow Clear Air thinned 1:1 with Lahmian Medium. (note this step used to use Lamenters Yellow glaze but GW no longer make it)
As mentioned in the intro, the aim of glazing is to simply tint the surface and not let it pool in the recesses like a wash.
To get a strong and even colour you will need to apply two coats of the thinned Sigismund Yellow.
I recommend allowing the first coat to dry, then edge highlighting the armour again with white before adding the second coat of Sigismund as it gives a more pronounced edge.
Step 6 – Paint the Details
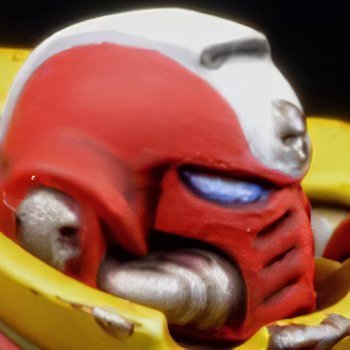

Helmet & Shoulder Trim – base with Mephiston Red. Recess shade with Carroburg Crimson. Highlight with Evil Sunz Scarlet & Wild Rider Red.
Stripe – base with Celestra Grey. Layer with Ulthuan Grey and highlight with white.
Eye lenses – paint the full lens in Kantor Blue, then leaving an edge of blue, paint Blue Horror inside.
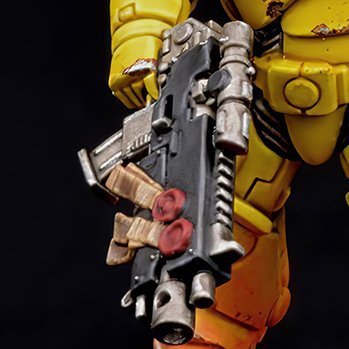
Gun – Highlight metallics with Ironbreaker and casing with Dawnstone.
Chest crest – shade with Carroburg Crimson. Highlight with Wazdakka Red & Wild Rider Red
Purity Seal – base with Khorne Red and Ushabti Bone. Shade with Agrax Earthshade. Highlight with Wazdakka Red and Ushabti Bone. Add lines of writing in Eshin Grey.
Leather – shade with Agrax and highlight with Skrag Brown.
Step 7 – Base & Weathering
WEATHERING
At this point, the marine is finished and you can base it however you like.
You can, however, decide to go on and add some battle damage to your mini by following these steps:
Using a small piece of sponge dab on Rhinox Hide to form a pattern of random dots over the armour panels. Similar to drybrushing, you want to remove almost all the paint from the sponge before dabbing on the mini.
The scratches and chipping is done by painting an area with Rhinox Hide and then painting Ironbreaker on top. Be sure to leave Rhinox showing around the silver to give the impression of worn paint.
You can add as much or little damage as you like.
How to paint Imperial Fists Armour – Complete
Thank You
I hope you find this guide useful.
If you do have any questions or suggestions on how to improve it for others, then please do let me know.
Don’t forget to LIKE and FOLLOW my Instagram & Facebook pages for more painting and basing guides.
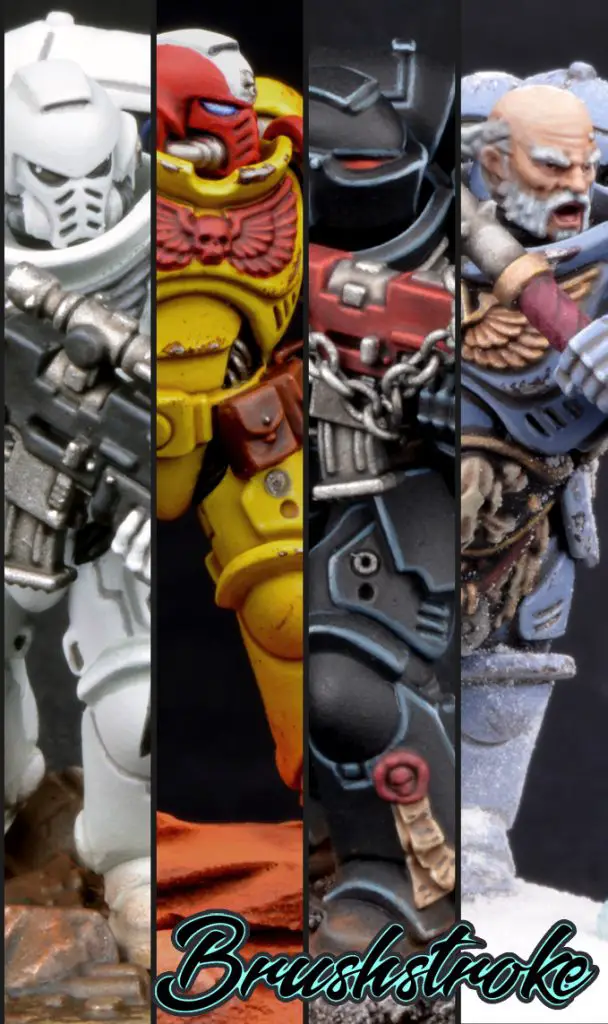
More Tutorials From Brushstroke
Got any questions? Want to see more tutorials like this, or what I’m working on next? Follow me on Instagram by clicking any of the images in this post.
I’m now on YouTube, Subscribe to my channel and see my video guides by clicking here.
See this full tutorial and more, directly on my Instagram & Facebook pages. Don’t forget to LIKE and FOLLOW for more tips and guides.
What did you think of this Tutorial? please let us know in the comments.
If you like what we’re doing here you could really help encourage more content with a share on any social media platform.
Click the share links at the bottom of this screen (or on the left for computers and tablets)
Want to keep updated with the blog? You can subscribe in the sidebar for RSS or by email below
(Sidebar is below the article on Mobile Devices)
Author


Excellent tutorial, my friend! I like the idea of the glazing instead of straight painting on. One question: after you shade with the Agrax, do you glaze over the wash or do you avoid it?
@Spoonman
Thank you.
Yes, you glaze over the agrax shading too. The glaze helps bring everything together to be tones of yellow. Just make sure you dont let it pool like a wash or you’ll spoil the shading the agrax has done