
How to fill Gaps & Seams on Miniatures
Last Updated on August 5, 2020 by FauxHammer
I had no intention of sharing a post today, it was going to be a painting day for me but I have seen just one too many people asking “How do I fill the gaps on Primaris Outriders?”. So to help people with this issue, I figured it’s about time to do a tutorial on how to fill Gaps & Seams on Miniatures.
Please Note: This site uses affiliate links. Our Affiliate Partners are shown below
(Affiliate links will result in compensation to the site on qualifying purchases)
Click this link & buy your hobby stuff from Element Games for the UK & Europe to support FauxHammer.com – Use Code “FAUX2768” at the checkout for double reward points.


Our Affiliates / Hobby Stores
- UK: Element Games, The Outpost, Wayland Games, Mighty Lancer, Goblin Gaming, Forbidden Planet, Model Scenery Supplies, eBay, Amazon
- US/Canada: MTechCave, GameKastle, eBay (US), eBay (CA), Amazon
- Germany: Taschengelddieb
- Europe: eBay (DE), eBay (FR), eBay (ES), eBay (IT), Amazon
- Australia: eBay, Amazon
- Global: RedGrass Games, Warcolours
- 3D Printers: Phrozen 3D, Elegoo, Anycubic
FauxHammer – Latest Video on YouTube
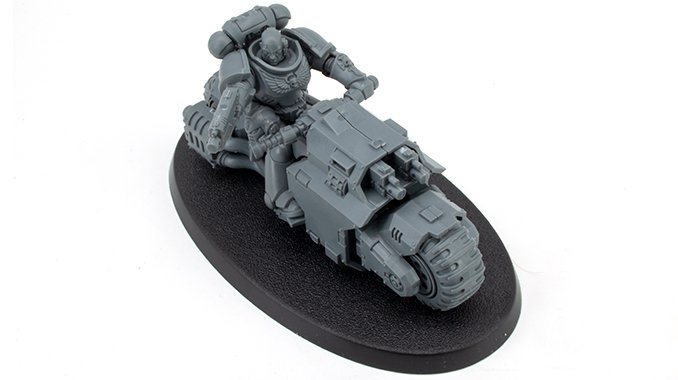
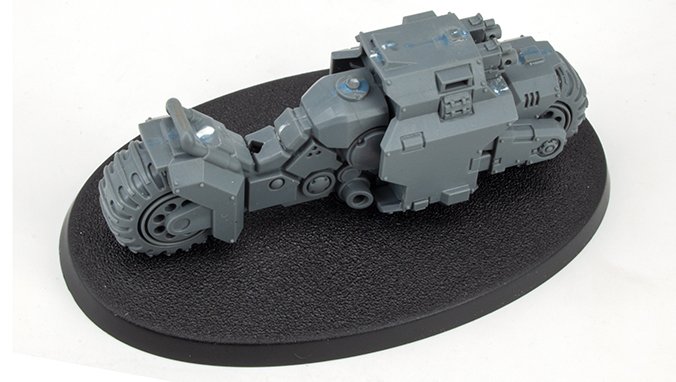
So, just before I begin, this process is used on the Primaris Outrider Bike Squad, but this can be used on all of your miniatures. If you think this is a bit of pain, trust me, it’s much easier on these bikes than it was on the old ones where each Wheel had to be done independantly! That was not fun…
How to fill Gaps & Seams on Miniatures – Tools
So, there are a few ways to do this but let me go over the tools you will need.
Mould Line Remover
Likelyhood is you may have the Citadel Mould Line remover, which is fine for a larger model. In the most part as you are dealing with large, open areas on the bikes specifically.
But for a long time now I have gotten into the habit of using a hobby knife for all mould line removal as the fine point on the blade is perfect for getting into finer details.
My personal preference is the x-acto knife as it is so widely available and the blades are cheap enough – especially if you buy third party blades…
Gap Filler
So, you’re going to need some solutions to fill those gaps in your models, here’s what I recommend
Plastic Glue
I’ll cover this in more detail in the guide below, but you need some plastic glue. This will cover the first stage of the process below by melting the plastic and welding it together.
There are various types of this glue available, I have a ton of the Citadel Glue which works great but I don’t like the applicators in the thin metal nozzle. There’s no precision with it and it keeps gunking up.
I actually use those citadel bottles to refill the glass bottle below.
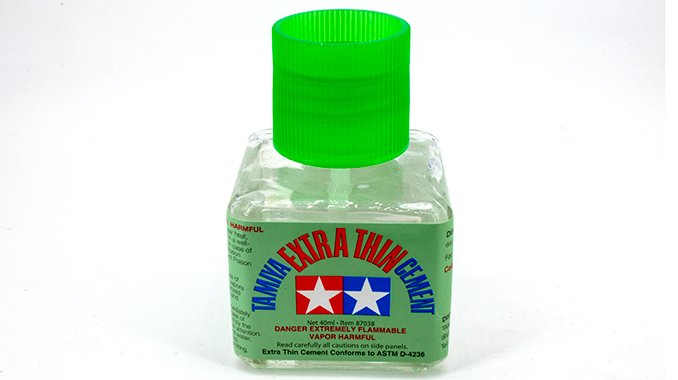
Personal preference this time is Tamiya Extra Thin Cement which lends itself perfectly in this tutorial. – I’ll show you why with the next tool
Sprue-Goo
You can’t buy this stuff, you make it. It’s basically some Tamiya Extra Thin Cement with bits of sprue in it.
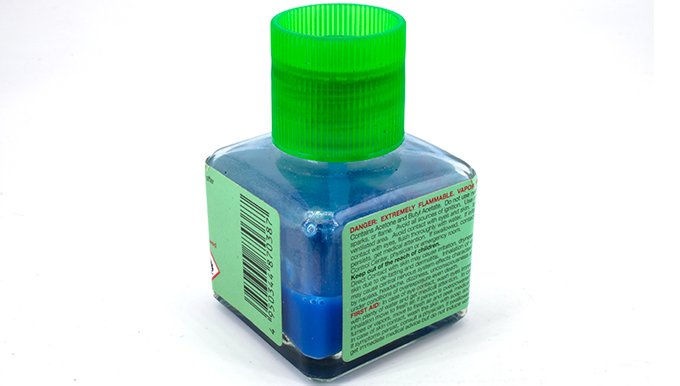
Super easy to make, just cut your sprue up really small (if the bits are too big, they won’t fully melt and will leave chunks in your bottle). Just add a small handful of bits at a time, shake it up and leave it until it melts. You want a thin paste.
With this, you are essentially gap willing with more plastic, so it’s brilliant stuff for this task. It’s just a bit thin and doesn’t fill “deep” gaps too well. read the guide below, you’ll see what I mean.

But the reason I always go for Tamiya Extra Thin is that it’s cheap, readily available almost everywhere and most importantly, it comes with the best applicator for this type of glue
Mr Hobby Dissolved Putty
This is a personal favourite and was recommended to me by Mr David Soper (Sprocket). If you don’t know who David is then you need to check out his work – you’ll soon see why I just take his word on anything.
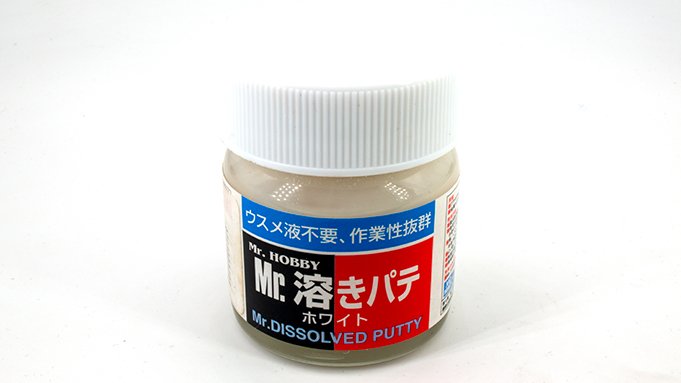
This stuff is great, you apply it with a brush, quite thickly, it reduces down and leaves a surface which is hard wearing and perfect for sanding. It is, however, solvent-based and you need to use synthetic brushes, and alcohol to clean it off them.
Sanding Sticks / Paper
To be fair these are optional, depending on how well you get on with some of the upcoming stages. but if you want that perfectly flat surface, sanding them smooth once you have filled the gaps.
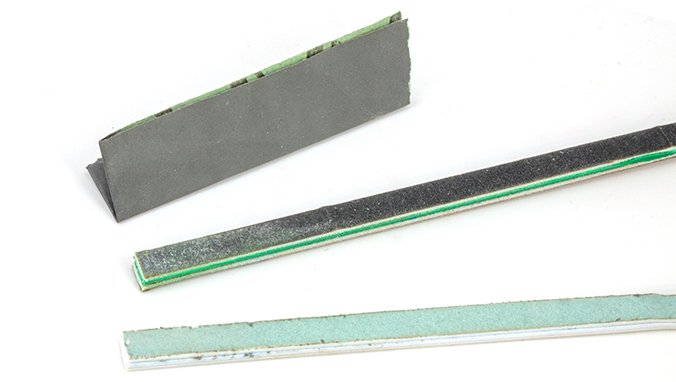
Personal preferences here are the Mini Sanding and polishing sticks from Flory Models in the UK. They are really thin and flexible. Sometimes however the depth of them can prevent you from getting into smaller areas. These are still the best sanding sticks for 99% of the work you do on miniatures. The Polishing stick is great if you want that perfectly smooth seamless finish as these will actually polish the model smoother than the base plastic!
The other item is some high grit sandpaper, like 2000 grit. Just fold it into a corner, wet it a touch and use small circular motions to smooth out an area.
How to fill Gaps & Seams on Miniatures – The Process
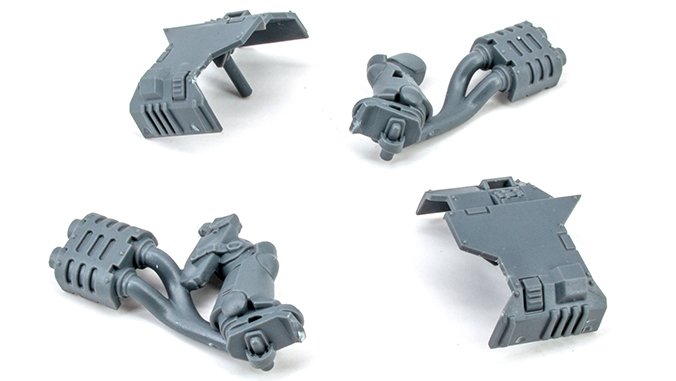
So, now let’s have a look at the stage to gap-fill models. I’ve used the Primaris Outrider Bikes here, but this same process is the same for everything.
Before you begin, cut the parts off the sprue and trim down all the mould lines.
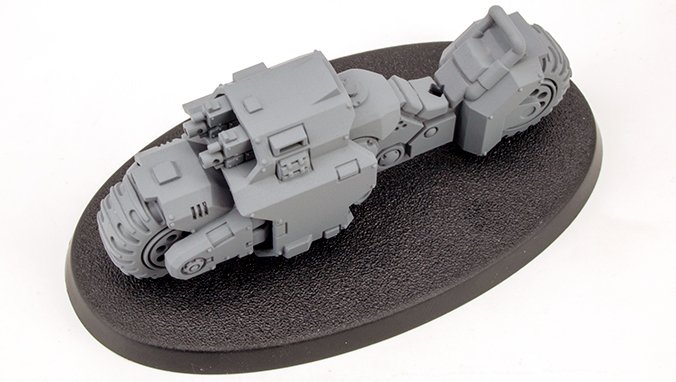
Step 1 – Dry-fit the Parts
Before glueing two parts together, make sure they actually fit flush as you would expect. Below (because they are easy to build) I have built the whole model, which makes it easy to see where the problem areas are.
If there are areas where you can see gaps. pinch them together hard so you can see how well they will fit. if they don’t go together well, pull them apart and see if there are any bits of excess plastic blocking it.
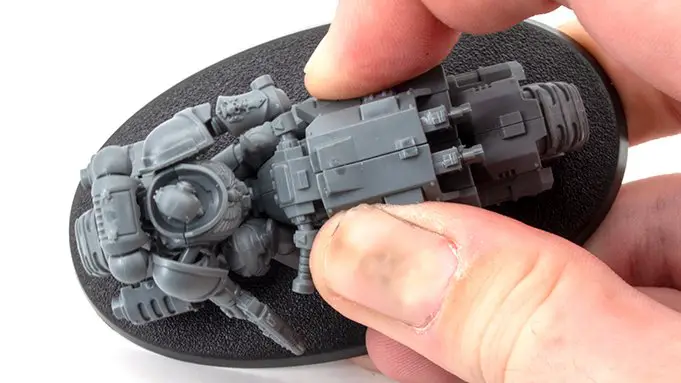
Honestly, in the image above, the gap is fine. But if you need to (which was certainly the case on older push-fit models) trim some of the extra plastic off the stumps and such.
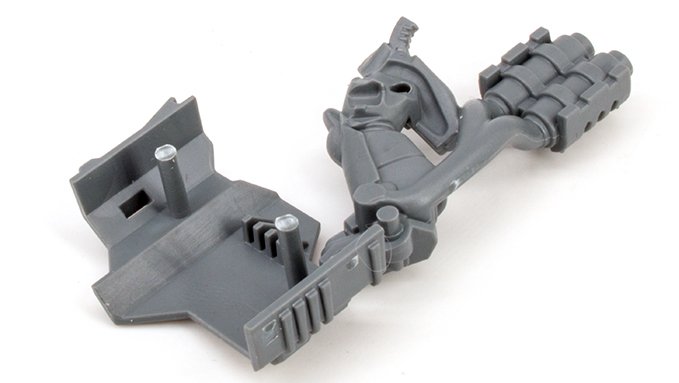
The next bit is optional but a tip for the bikes is to cut off the pedals from the chassis.
This tip lets you build bike and rider (with exhausts) seperately which makes painting both much easier.
I actually got this tip from someone in one of the many Warhammer Facebook Groups. Someone who was kind enough to give me a shout-out for my colour coded Indomitus Sprues. And I’m so sorry but I can’t return the favour as I can’t remember or find who that was. If it was you please let me know and I will update this and put full kudos your way.
Update 05/08/20: It was Oli from Nerdcore Gaming (check out his Instagram)
Once built this leaves a small gap between the pedals and the chassis but honestly, I think it looks better.
Step 2 – Apply Plastic Cement
This is where the Tamiya Extra Thin cement with its brush applicator really shines. Hold the 2 parts together, but leave a slight gap and touch the Tamiya Extra thin Nozzle to the seam.
With capillary action the glue will flow into the gap
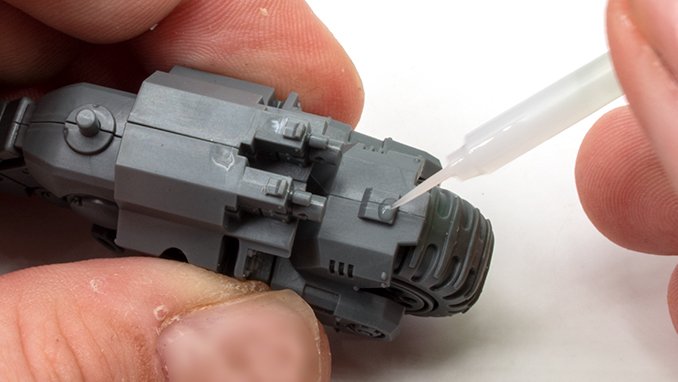
If you have never used this stuff before, practise!
It’s very thin and really flows. If you put too much on, it will easily flow into the wrong places, end up all over your fingers and once this stuff touches plastic it stars to melt it. the last thing you want to do on any model is touch it with gluey fingers.
Trust me you don’t want this, I have done this, it is very bad.
A good place to practise with these bikes is the seam above the chassis where the bolters are. This will be covered with the outer canopy of the bike.
Just one tip, if you do this, you won’t be able to get the handlebars in below the outer canopy of the bike. You can either put this on before. Or do what I did and just snip off the pin which holds them on – that will give you enough clearance to get the handlebars on under the canopy. There’s still a notch which will guide the handlebars into correct alignment.
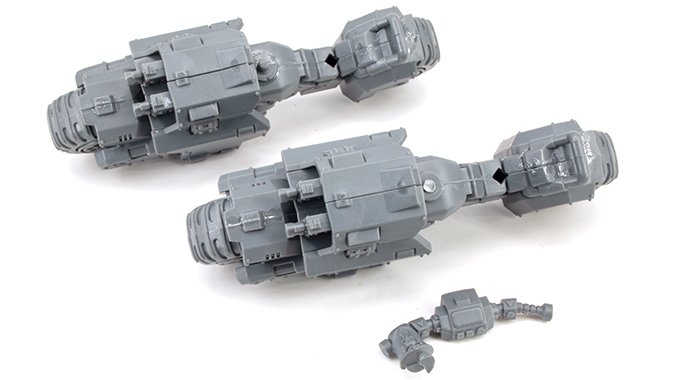
Step 3 – Pinch Together
Maybe best to do this in stages, like the front of the bike, middle, and then the rear. The glue starts to evaporate quite quick so once you start loading it in you have about 30 seconds to squeeze before it’s too late and you won’t get the desired result.
But once the gap is filled with poly-cement pinch the two halves together. If you have filled it with enough glue, you will find that the melted gluey plastic is expunged from the gap
Unfortunately, just like painting, it’s trial and error to get this right. but unlike painting, you have only one chance with this
As you can see in the image below, I had some sucess on one bike, less sucess on the other.
The issue is, you don’t want to overfill the gap with glue because it will flow too far and end up in areas of the model you don’t want. Not enough and it won’t be melted enough to spew out of the gapHonestly, it’s still rare I get this right first time, but there are more steps we can take to sort out the remaining issues.
No matter how successful you are here, let it fully dry before you do anything else. a few hours at least. Overnight at best.
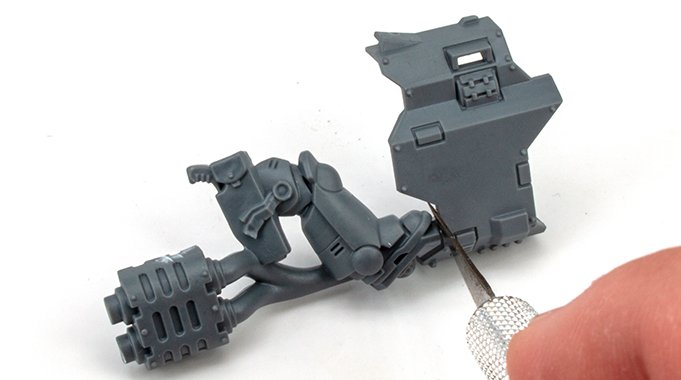
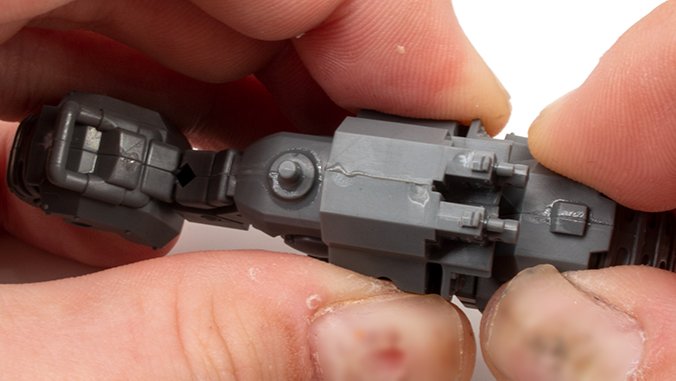
Step 4 – Scrape the Seams
So, we’re back to this, scraping mould lines, but this is good. better a mould line than a gap.
Where you had sufficient glue, you’ll have a bead of plastic you can trim down just like a mould line.
And voilà – assuming you managed to get enough glue in the gaps that the whole seam line was filled with the meted gluey plastic, a quick scrape will give you a perfect join – once you’ve primed it, you’ll never know there was a gap.
If you landed this in one go, briliant!
If like me you still have some minor pits in the join line, you need to do some more filling. So let’s move onto the next step.
Step 5 – Fill the Gaps
This is the point where you may reach for something like Green Stuff or Liquid Green Stuff. Now, there’s nothing wrong with this really. but the former product is better for sculpting as it doesn’t sand back very well
Liquid Green Stuff is decent as it’s water-based, but again, it flakes when it is sanded so it’s ok. it’s just not the best.
So I recomend something like Sprue-Goo or Mr Hobby Dissolved Putty
Both of these can be sanded smooth. Sprue Goo (detailed in the tools section at the top) is great for smaller, shallower gaps. It’s liquid plastic, but like the glue itself, it’s really thin and will need several applications (with drying time between) to build up enough layers to fill the pit.
Mr Hobby Disolved putty is just great. You need to apply a lot more than you would initially expect to a gap and it goes on in globs, but this also reduces down but leaves a hard surface which you can sand or scrape smooth.
Just remember, once you apply either of these things, leave them to dry. Again a few hours at least, overnight at best.
Step 6 – Sand
Using either some fine-grit sandpaper or the Mini Sanding & Polishing sticks from Flory Models. Sand and polish the surfaces smooth.
You will be able to tell if these are smooth, gently run a fingernail along the creases and edges of whatever filling agent you used. If it’s not smooth, you should be able to feel it.
Te likelyihood is, you’ll be able to tell just by looking.
Also – bonus tip – drill your weapon barrels
Step 7 – Primer
So yeah, spray with prmer…
The reason I mentioned this specifically (because it’s obvious that’s what you do next) is because you may find that after priming your model, you still see a gap. don’t worry it happens to the best of us.
If this does happen, just wait for the primer to fully cure (could be up to 48 hours depending on your primer choice). Sand it back a bit and apply some more of your choice gap filler before priming again.
If you don’t sand it before applying more gap filler, then your filler is binding to the paint, not the model. So when it comes to sanding it smooth again, the whole chunk of filler can just fall out.
But that’s it. If you follow all the steps you should have some perfectly smooth gaps.
Have a go yourself and let me know how you get on in the comments.
Please Note: This site uses affiliate links. Our Affiliate Partners are shown below
(Affiliate links will result in compensation to the site on qualifying purchases)
Click this link & buy your hobby stuff from Element Games for the UK & Europe to support FauxHammer.com – Use Code “FAUX2768” at the checkout for double reward points.
Our Affiliates / Hobby Stores
- UK: Element Games, The Outpost, Wayland Games, Mighty Lancer, Goblin Gaming, Forbidden Planet, Model Scenery Supplies, eBay, Amazon
- US/Canada: MTechCave, GameKastle, eBay (US), eBay (CA), Amazon
- Germany: Taschengelddieb
- Europe: eBay (DE), eBay (FR), eBay (ES), eBay (IT), Amazon
- Australia: eBay, Amazon
- Global: RedGrass Games, Warcolours
- 3D Printers: Phrozen 3D, Elegoo, Anycubic
FauxHammer – Latest Video on YouTube
What did you think of this Tutorial? please let us know in the comments.
If you like what we’re doing here you could really help encourage more content with a share on any social media platform.
Click the share links at the bottom of this screen (or on the left for computers and tablets)
Want to keep updated with the blog? You can subscribe in the sidebar for RSS or by email below
(Sidebar is below the article on Mobile Devices)


Cheers for the tips…. I have had mixed success with green stuff/milliput, look forward to trying Tamyia and Me Hobby ??
Haha, that’s awesome! I’ve been making sprue glue for about a year now and it’s great. I’ll have to remember to separate the rider from the panel. That makes it look so much more manageable!
Late reply, but I use an engraving pen (under $10, Harbor Freight), for filing (and starting holes for pinning).
Really? I would love to see this and try it out.
going to try both the glue and putty out but I also watched a youtube video that uses dental repair resin and ca glue. just wondering your thoughts?