EufyMake E1 Review – A Real Look at the 2.5D Resin Printer That Might Actually Change Home UV Printing
Last Updated on May 3, 2026 by FauxHammer
If you’ve been looking at the EufyMake E1, chances are you’ve already seen the polished promo material, the Kickstarter headlines, and a lot of people acting like desktop UV printing has already been solved. It hasn’t. Not completely. But the EufyMake E1 gets alarmingly close in ways that are both exciting and, at times, a little frustrating.
This is a product review, not a hype piece. The machine is clever. In places, genuinely brilliant. It also has limitations, quirks, and some meaningful costs you absolutely want to understand before throwing money at it.
What makes the EufyMake E1 so interesting is that it sits in a strange space between a 2D printer, a UV flatbed printer, and a very limited kind of resin 3D printer. It prints coloured UV-curable resin rather than ordinary ink, cures it almost instantly with a UV lamp in the print head, and can build physical texture in layers. That means it can print flat graphics, raised graphics, gloss effects, texture maps, stickers, and even cylindrical objects with a rotary attachment.
And unlike a lot of hardware in the maker space, the EufyMake E1 has clearly been designed by people who understand that normal humans might want to use it too.
Still, “smart” does not mean “perfect.” So let’s go through what this machine actually does well, where it falls short, what it costs to run, and who it’s really for.
EufyMake E1 – Summary
If you want the short version, here it is: the EufyMake E1 is one of the most impressive pieces of consumer-facing print hardware I’ve seen in a long time. It is easy to use, thoughtfully designed, and already useful enough to be more than a gimmick.
It can print vivid colour onto a wide range of surfaces, build raised textures up to a few millimetres high, handle white underbases for dark or transparent materials, and produce durable custom graphics without demanding that you first earn a degree in industrial print workflows.
That said, this is not a magic box. Consumables are expensive, the real-world height handling is more limited than the marketing might suggest, software still has some beta rough edges, and a few workflows—especially rotary printing—need more polish.
My overall impression is simple:
Brilliant machine
Not perfect machine
Probably the closest any product in this category has come to being both innovative and genuinely usable at home
If you already know you want one, you can check current EufyMake E1 pricing here. But before doing that, read the rest, because the details matter with a machine like this.
Please Note: This site uses affiliate links. Our Affiliate Partners are shown below
(Affiliate links will result in compensation to the site on qualifying purchases)
Click this link & buy your hobby stuff from Element Games for the UK & Europe to support FauxHammer.com – Use Code “FAUX2768” at the checkout for double reward points.


Our Affiliates / Hobby Stores
- UK: Element Games, The Outpost, Wayland Games, Mighty Lancer, Goblin Gaming, Forbidden Planet, Model Scenery Supplies, eBay, Amazon
- US/Canada: MTechCave, GameKastle, eBay (US), eBay (CA), Amazon
- Germany: Taschengelddieb
- Europe: eBay (DE), eBay (FR), eBay (ES), eBay (IT), Amazon
- Australia: eBay, Amazon
- Global: RedGrass Games, Warcolours
- 3D Printers: Phrozen 3D, Elegoo, Anycubic
FauxHammer – Latest Video on YouTube
EufyMake E1 – What It Actually Is
The easiest way to understand the EufyMake E1 is to stop thinking of it as a normal desktop printer. It isn’t one. This thing uses UV-curable coloured resin—marketed as UV ink—which is jetted onto a surface and cured almost instantly by a UV lamp built into the print head.
Because the material cures as it is deposited, the printer can do more than just apply colour. It can build physical height too. That is why the machine is often described as “2.5D.” It is not a conventional 3D printer, but neither is it just a flat image printer. It lives in the awkward and interesting middle ground.
In practice, that means the EufyMake E1 can:
Print full colour graphics onto boards, plates, plastics and other blanks
Use white ink under colour for dark, clear, or translucent materials
Add gloss as a separate finish or texture layer
Create raised images and tactile textures
Print onto cylindrical items with an optional rotary attachment
Create UV DTF-style sticker workflows using transfer sheets and a laminator
That’s a lot of functionality in one box. More importantly, it is functionality that can be useful for hobbyists, custom merch makers, photographers, model makers, and small-scale businesses.
There’s also a very obvious reason this machine has attracted so much attention. Proper UV flatbeds tend to be industrial, bulky, intimidating, and expensive. The EufyMake E1 tries to pull that world down into something that fits on a bench and feels like a consumer product rather than workshop equipment.
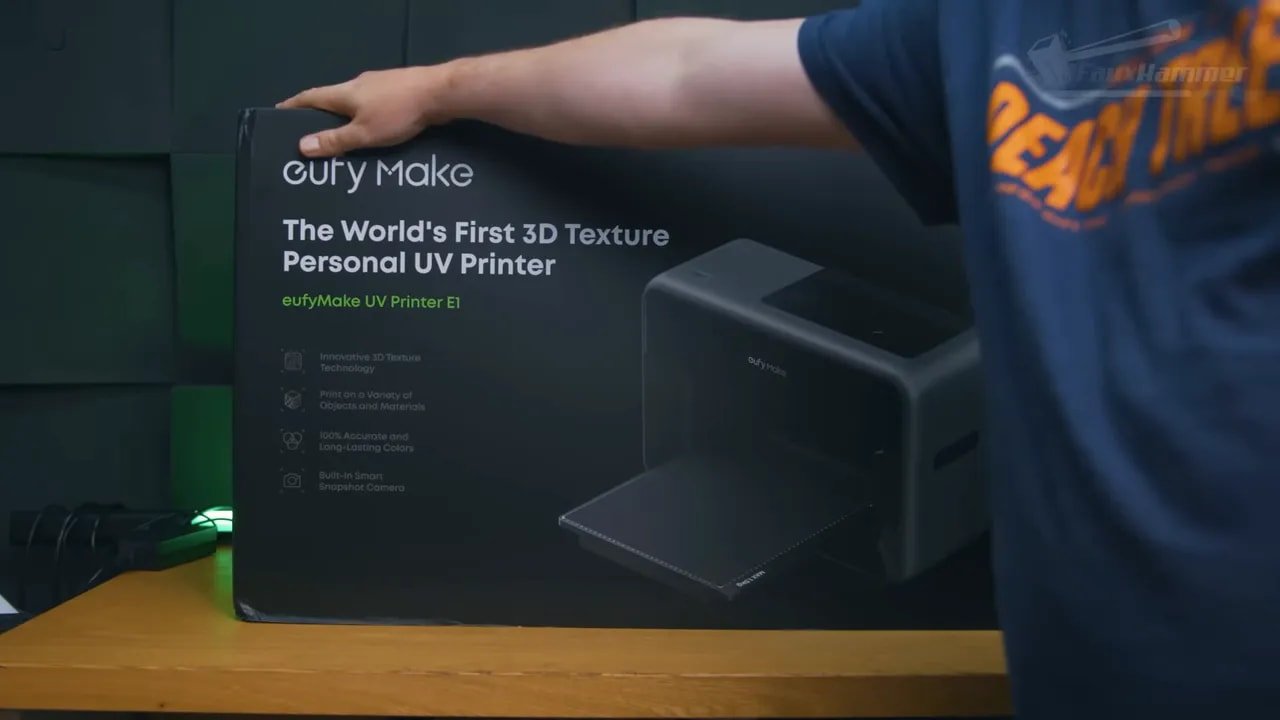
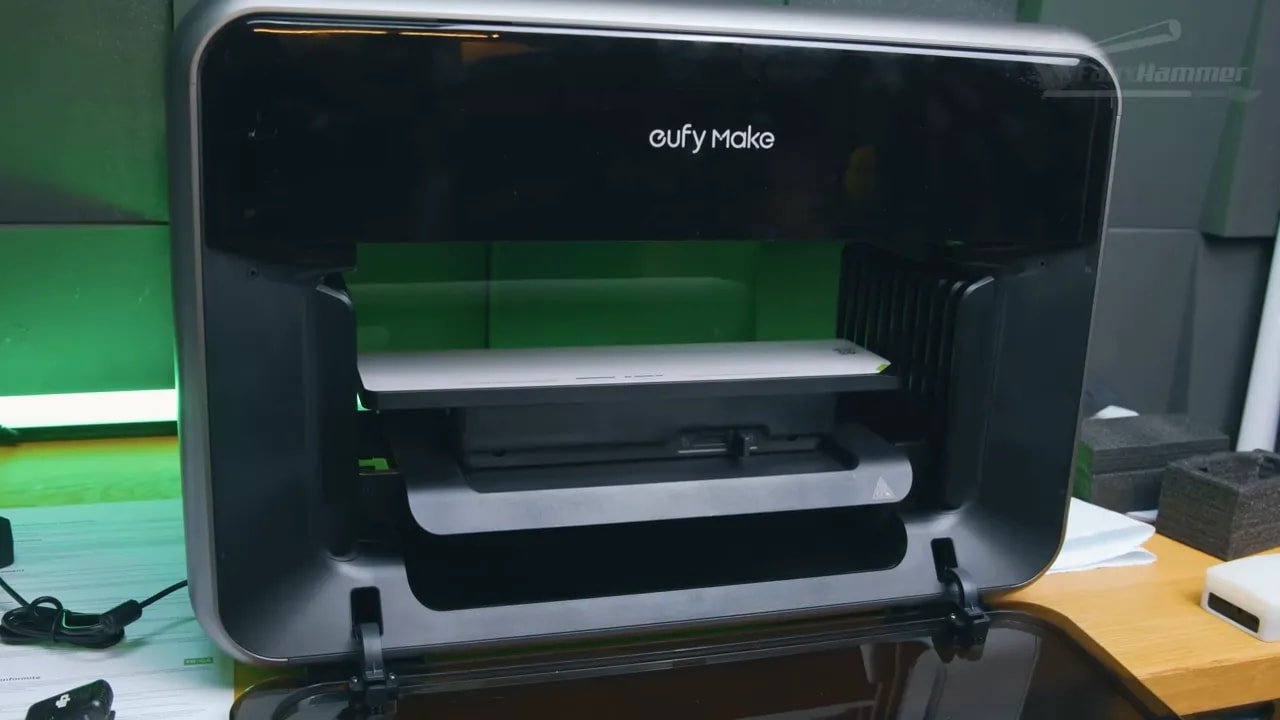
EufyMake E1 – Unboxing, Design and First Impressions
One of the recurring strengths of the old Ankermake machines was that they didn’t feel like half-finished industrial hardware pretending to be consumer tech. They felt deliberate. Premium, even. The EufyMake E1 carries that same design philosophy forward.
The packaging is clean, the setup materials are clearly labelled, and the whole presentation tells you that someone cared about the first impression. That does matter. Especially in this category, where too many products still arrive like they were packed by a warehouse that actively resents you.
The machine itself looks much closer to a 2D printer than a traditional resin printer. It has fold-down magnetic doors front and back, a compact desktop footprint for what it is, and a generally polished appearance that makes it far easier to imagine in an office or home studio than most specialist print gear.
That neat footprint does come with an asterisk. The listed dimensions do not tell the whole story. With the large bed installed, the front-and-back movement needs roughly 73cm of full bench depth to operate properly. So although the unit may look manageable on paper, you need to plan your actual workspace around its travel, not just the shell dimensions.
Ports are minimal: power and ethernet on the lower left side, with built-in Wi-Fi handling the rest. During testing, the wireless connection remained stable, which is exactly what you want in a machine built around remote operation.
The power routine is slightly odd but sensible. You plug it in, wait for a green light, then hold the power button to boot. Shutdown works in reverse, but the machine then spends around 15 minutes completing a proper power-down and clearing its lines. That sounds slow until you remember the material in the lines is UV-curable resin and the entire point is to stop it hardening where it shouldn’t.
If the machine sits idle while powered on, it periodically runs a short maintenance cycle for the same reason. It is one of those details that feels mildly weird at first and then entirely logical once you understand the chemistry involved.
EufyMake E1 – Inks, Beds, Safety and Core Hardware
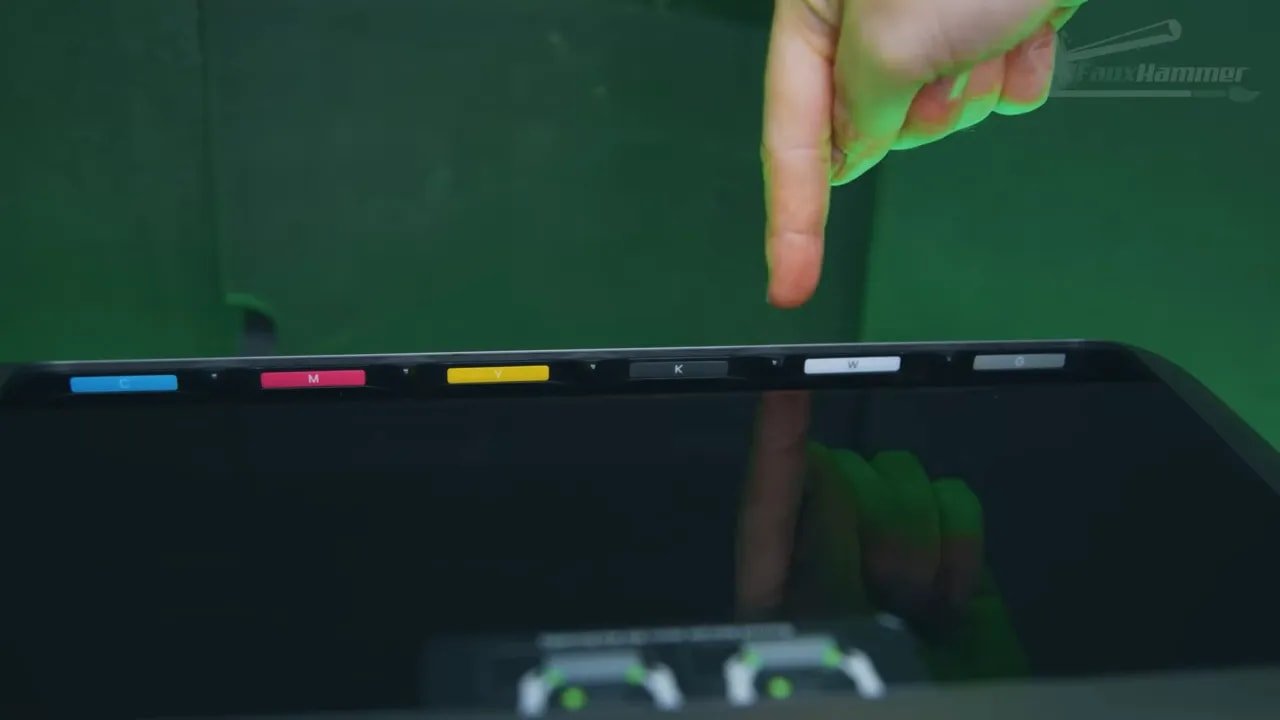
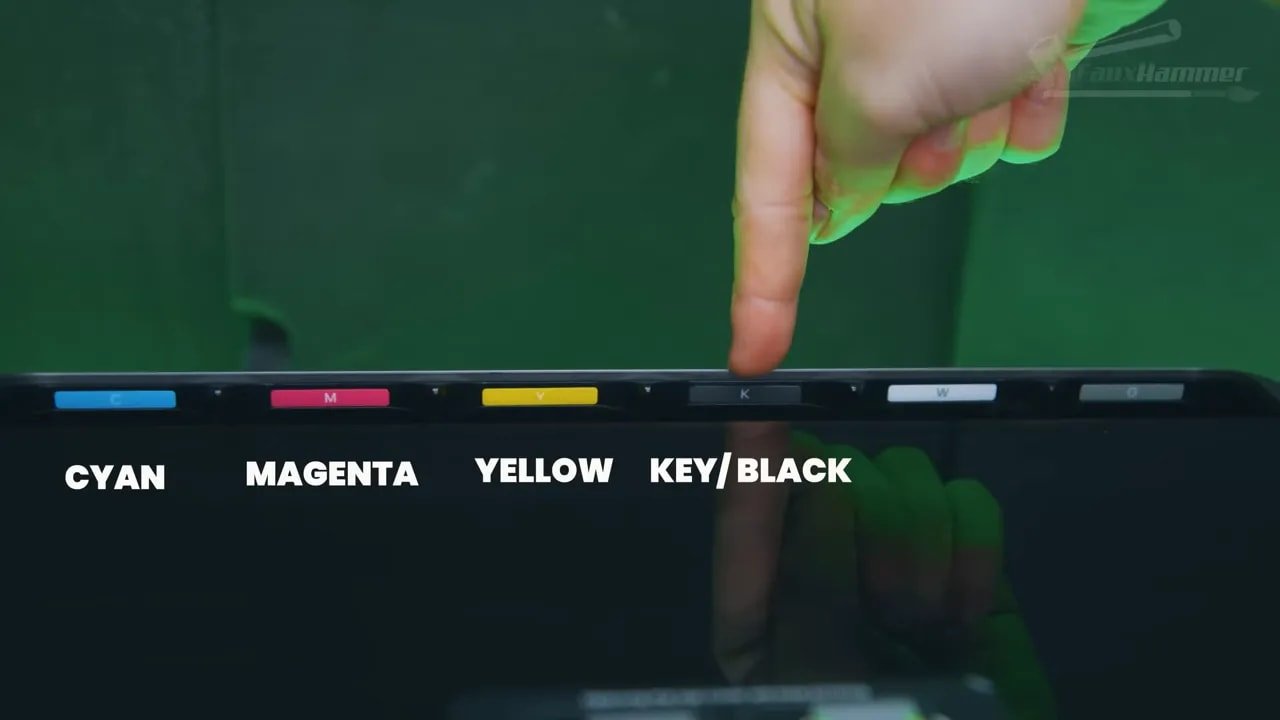
The EufyMake E1 uses six cartridges:
Cyan
Magenta
Yellow
Black
White
Gloss
The white layer is particularly important. On white materials, you may not need it at all. On dark or transparent materials, it can be essential because it acts as an underbase to make colours pop rather than disappear into the substrate.
Gloss is fine as an option, though personally I’d be more excited by a matte material. The good news is that more material types have already been hinted at, which could be one of the most important long-term factors for this platform.
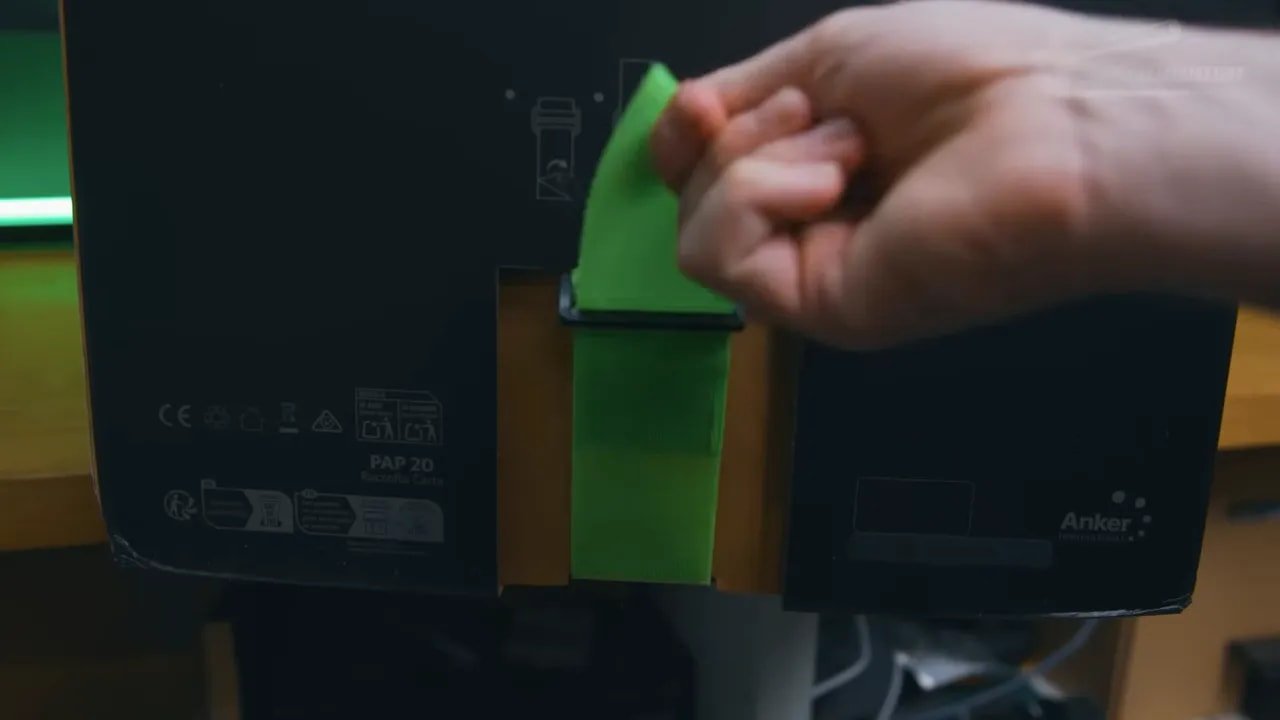
There is also a cleaning cartridge hidden behind a side plate. This flushes the lines with detergent and stores purged material. Since the “ink” is still resin, it is hazardous and should be handled accordingly. Gloves are not optional for maintenance.
Safety deserves a proper mention here. The EufyMake E1 gives off VOCs. It has a built-in carbon filter, but that only helps reduce fumes, not eliminate them. This is not something to run casually in an unventilated room just because the machine looks sleek and domestic. Beneath the polished shell, you are still dealing with resin chemistry.
The printer ships with two beds:
Mini bed: 333 x 88mm
Standard bed: 333 x 418mm
Swapping beds is easy. Unlock, drop in, and the machine recognises the accessory automatically through the connection underneath. That ease of swapping is one of many examples where the EufyMake E1 feels less like workshop equipment and more like an appliance designed around real use.
There is, however, a critical distinction between stated clearance and practical clearance. While the physical distance from bed to print head is around 150mm, real-world object height is far lower. Anything over roughly 60–70mm tall tends to trigger a snapshot failed error and becomes unprintable. So if you’re imagining this as a machine for decorating very tall items on the flatbed, temper that expectation now.
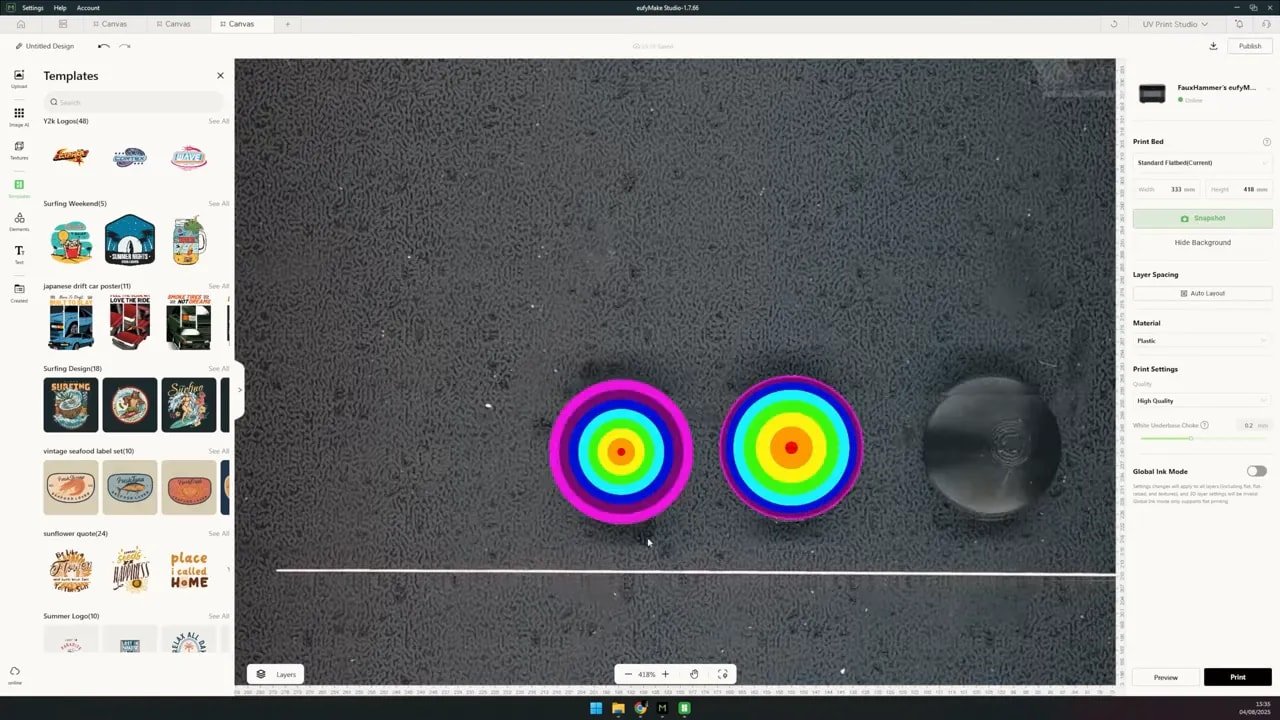
EufyMake E1 – Setup, Software and User Experience
This is where the EufyMake E1 really starts to separate itself from a lot of “maker” hardware. The user experience is excellent.
There is no onboard screen. Everything is controlled through the app on phone, tablet, computer, or through a web version. There is also an offline mode if you do not want the machine connected normally.
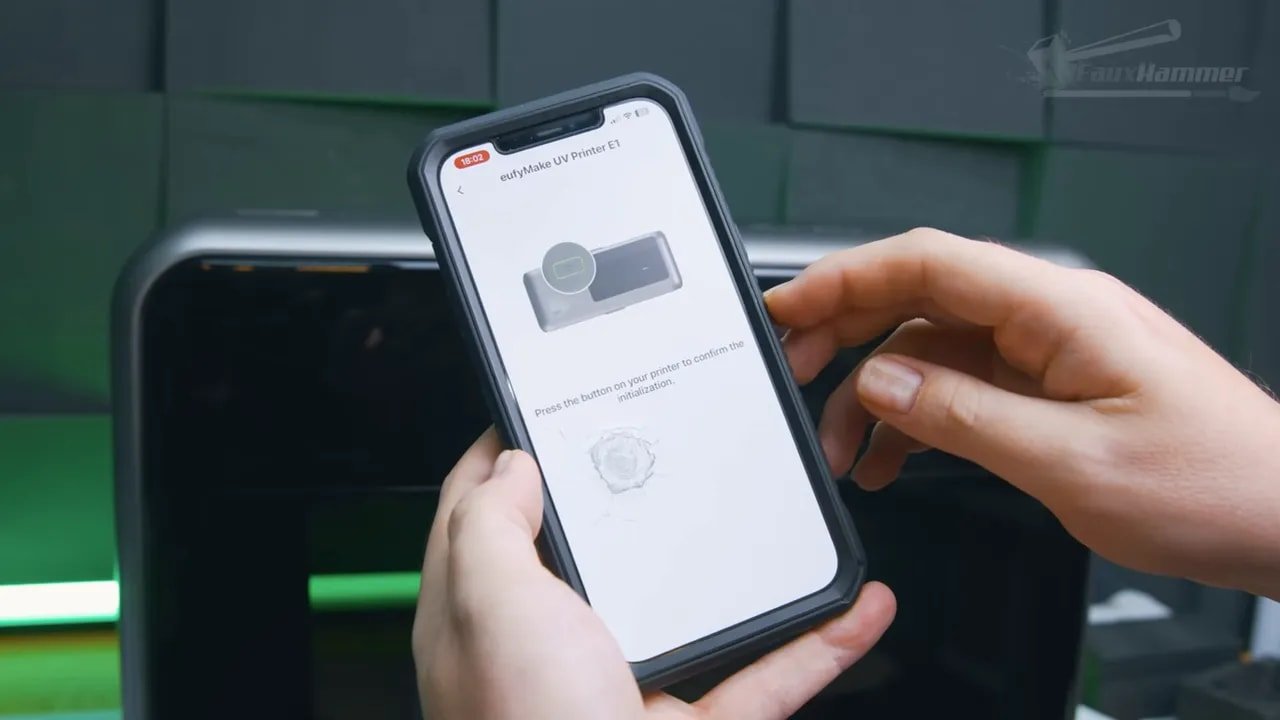
Setup is straightforward: connect to the printer’s hotspot, give it your Wi-Fi details, and you’re in. The same interface carries across devices, which helps keep things consistent rather than making one version feel like the “real” platform and the others like neglected extras.
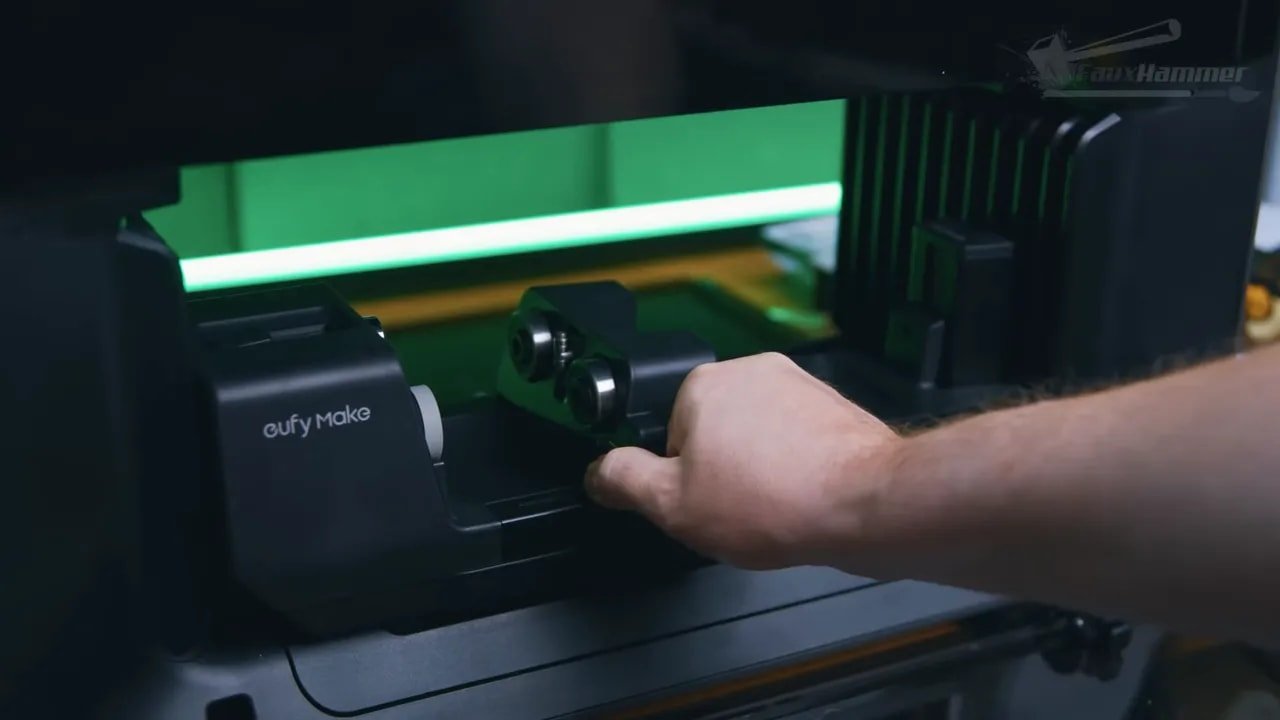
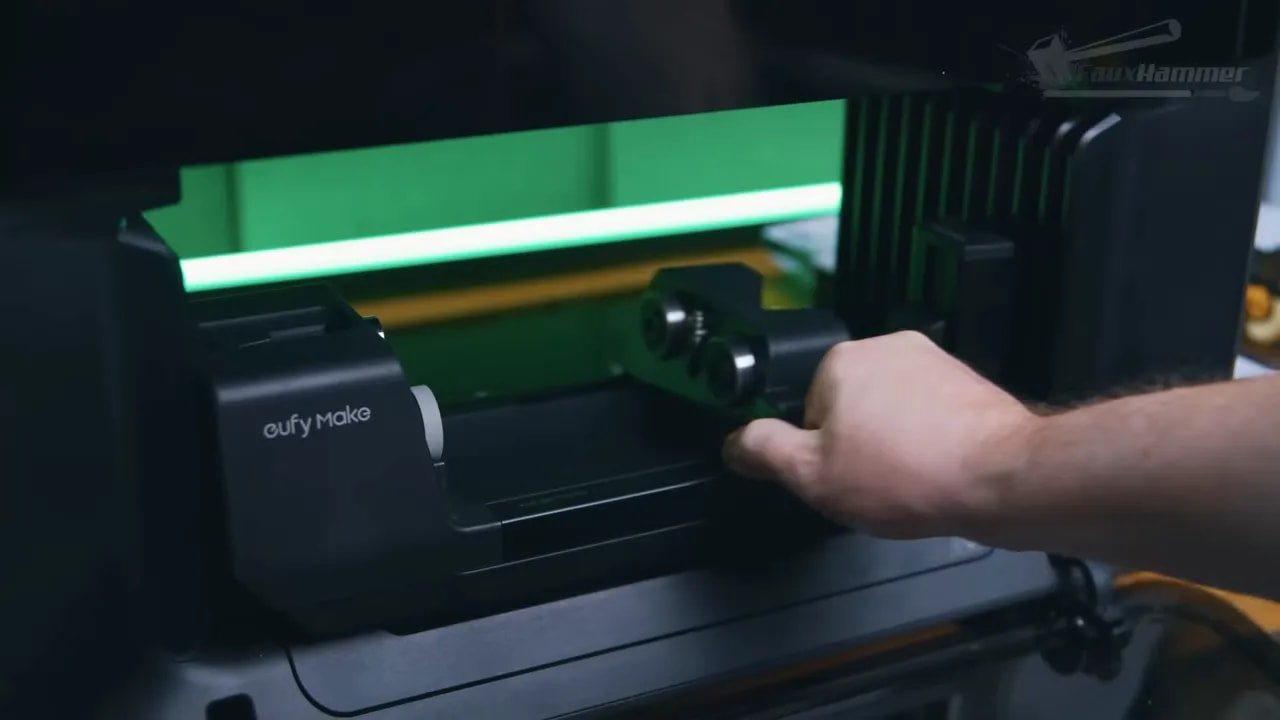
The machine also uses dual lasers to scan the material before each job, keeping the print head at the right working distance from the object’s top surface. That is one of the enabling technologies behind the printer’s ease of use. You are not manually fussing with heights every single time you change material.
The built-in camera is another major quality-of-life feature. It gives you a snapshot of the bed so you can line up your design visually. On the large bed it captures in sections and stitches the images, which keeps the centre more accurate than a single wide-angle shot would. There is still distortion toward the extremes, because that is the nature of fixed cameras, but it is useful and mostly well implemented.
The software itself opens into EufyMake’s “Make It Real” platform, which acts as both a design hub and a project storefront. It already includes curated designs and community-shared files. For people who want to get making quickly rather than build everything from scratch, that lowers the barrier considerably.
Beta software always deserves scepticism, but the software here sounds more impressive than many fully released tools in adjacent print categories. There are bugs and missing niceties, but the overall impression is that this is software built to help you make things, not software you have to wrestle into submission first.
EufyMake E1 – Print Workflow and How It Works Day to Day
The basic workflow on the EufyMake E1 is refreshingly simple:
Place your object on the bed
Take a snapshot
Position your image
Select the material type
Print
That material choice matters because it determines things like adhesion strategy and how many white layers are used before colour. For example, printing on a 3D-printed PLA plate may default to five white layers and one CMYK layer. A different material changes those defaults automatically.
Once you understand the machine better, you can override those settings manually. If your substrate is already white, there is no point wasting white ink beneath it. That sort of control is useful because consumable costs on the EufyMake E1 are very real.
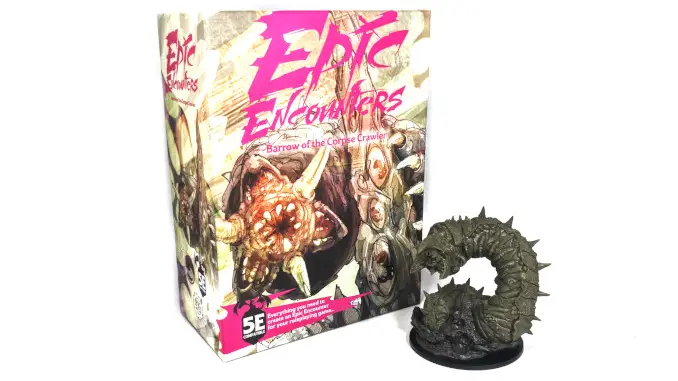
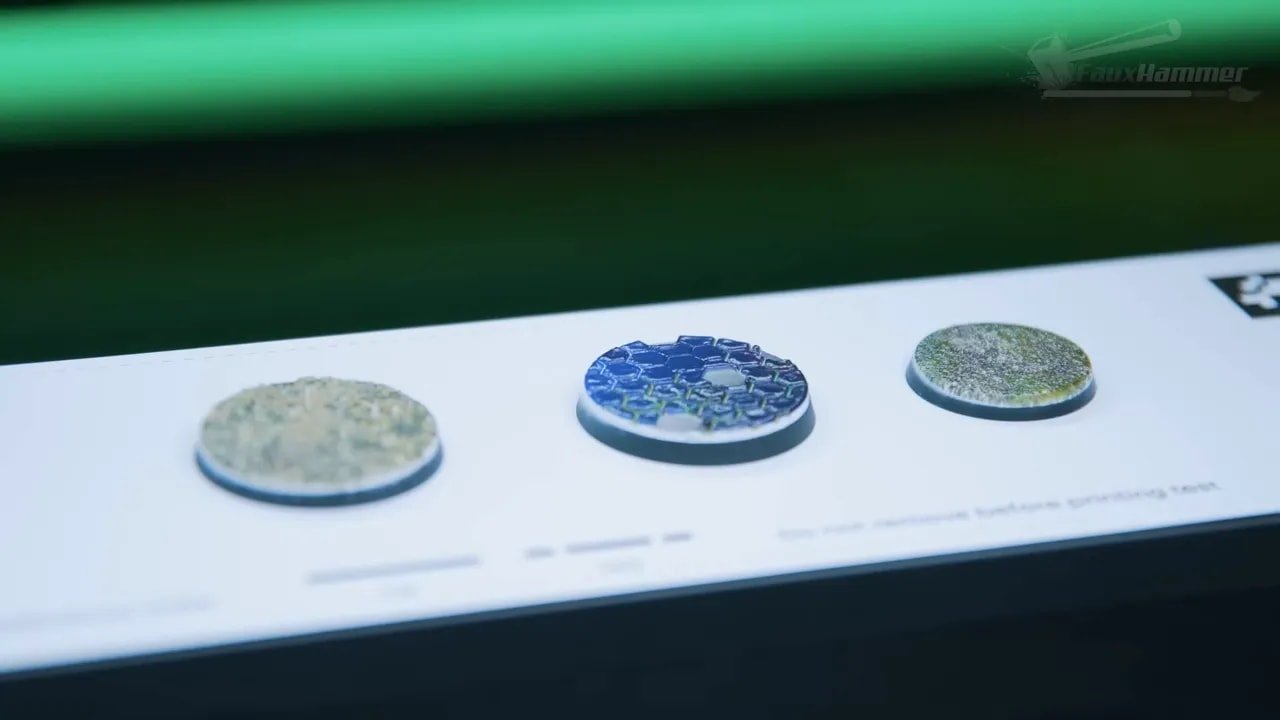
Where the machine shines is in the speed from idea to result. A strong example here was printing textures directly onto Warhammer bases. The workflow was absurdly simple: grab some terrain textures, crop them into circles, run them through the depth map tool, and print them directly onto the bases. It worked first time, with no calibration ritual and no prolonged technical battle.
That is the part that gives the EufyMake E1 its real appeal. Not just the output quality, but the low friction between “I have an idea” and “here is the thing.”
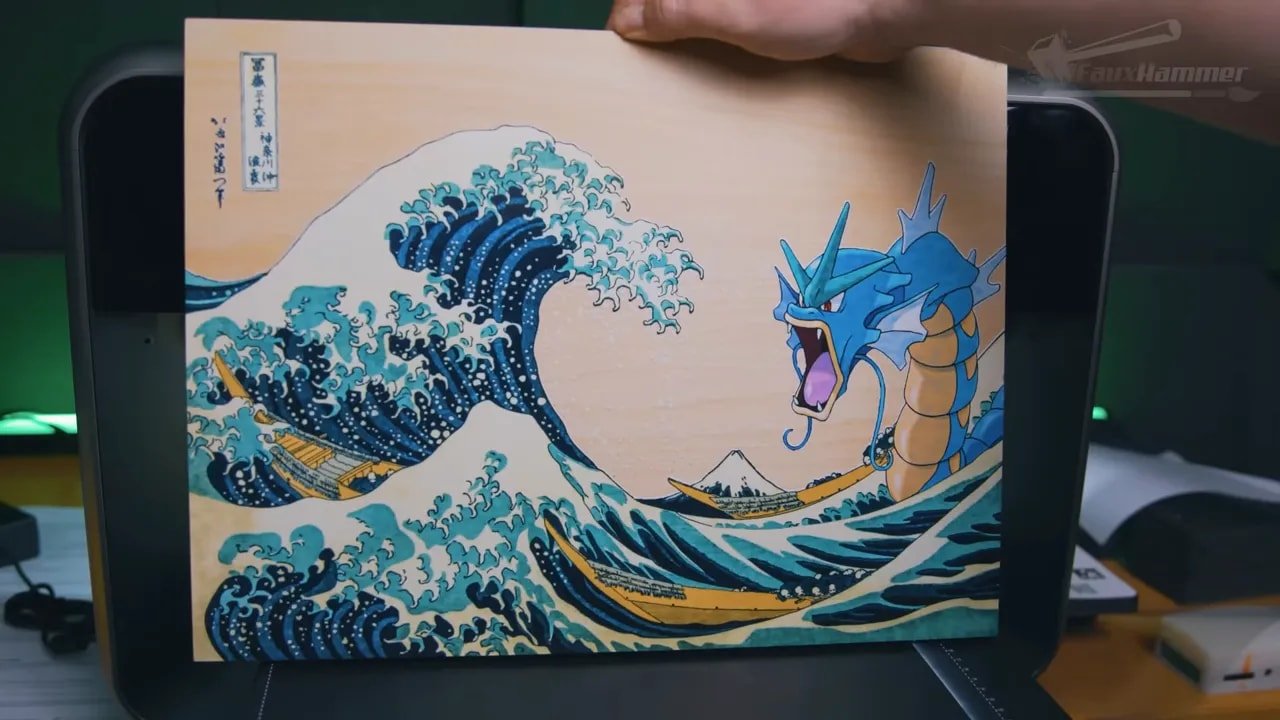
EufyMake E1 – Print Quality, Resolution and Colour Performance
The machine claims 1440 DPI, which works out to roughly an 18-micron dot size. On paper, that sounds comparable to the pixel size of very high-resolution resin printers. In practice, just as with resin printers, theoretical resolution is not the same as practical result.
Because the print head applies material from a small distance above the surface, droplets can spread slightly before landing. So you should not expect mathematically perfect single-dot checkerboard reproduction at the absolute theoretical limit.
Still, normal-use print quality looks excellent.
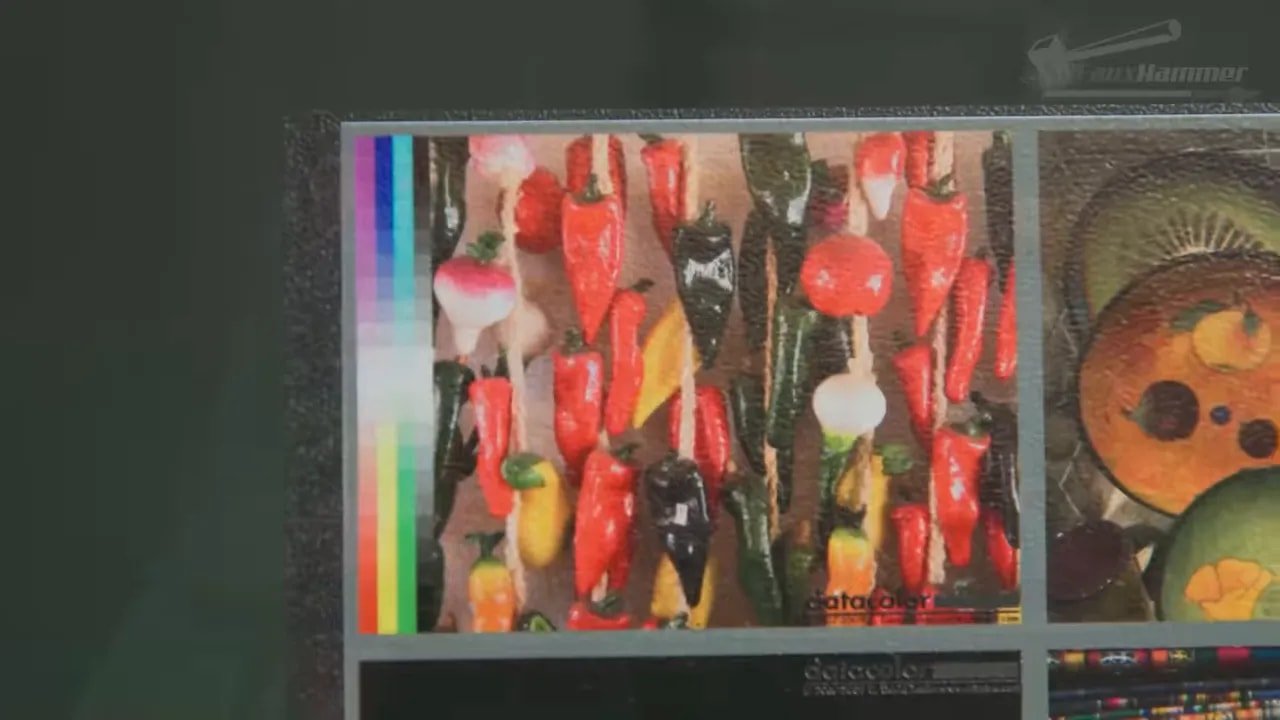
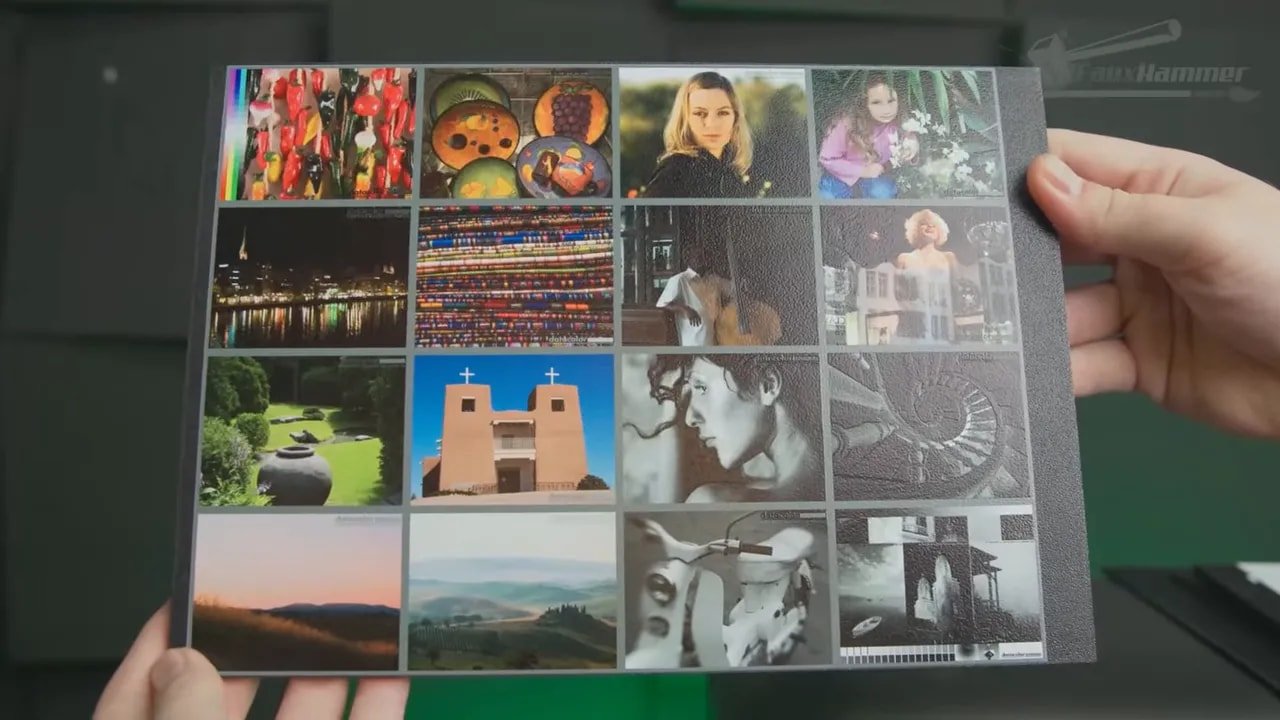
To test it properly, a classic printer test image from Northlight Images was used, covering gradients, fine detail, solids, grayscale and colour transitions in one shot. If you want to test your own workflow against a known standard, the Northlight printer test images are a good place to start.
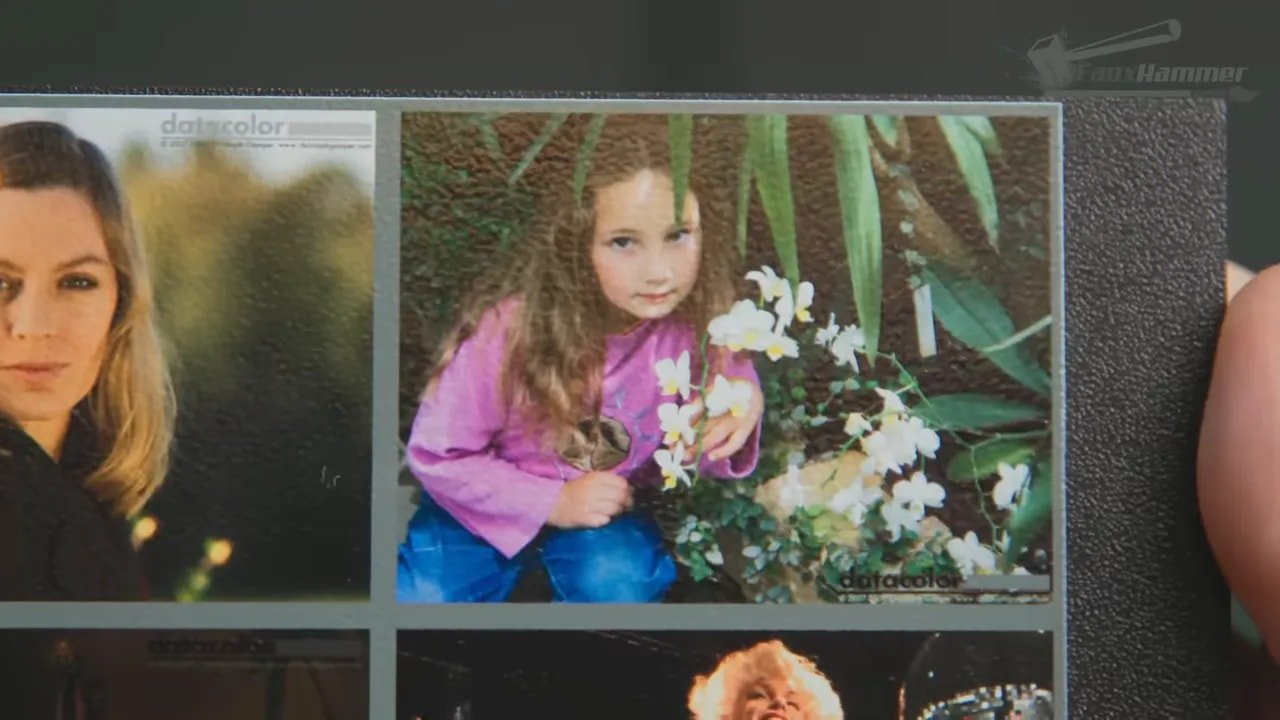
A custom test card was also used for line widths, small text, gradients and colour charting. The broad takeaway was that the EufyMake E1 handles real-world image output very well, even if it does not fully realise its theoretical micro-detail limit under magnification.

There is one caveat for more colour-managed print users: the machine relies on a custom CMYK profile and does not currently allow editing of ICC profiles. So if your workflow depends on tightly managed professional colour pipelines, this is not yet a fully open print environment.

For most hobby and small-business use, that limitation may not matter. For more advanced 2D print professionals, it might.
EufyMake E1 – White Ink, Transparency and Layer Combinations
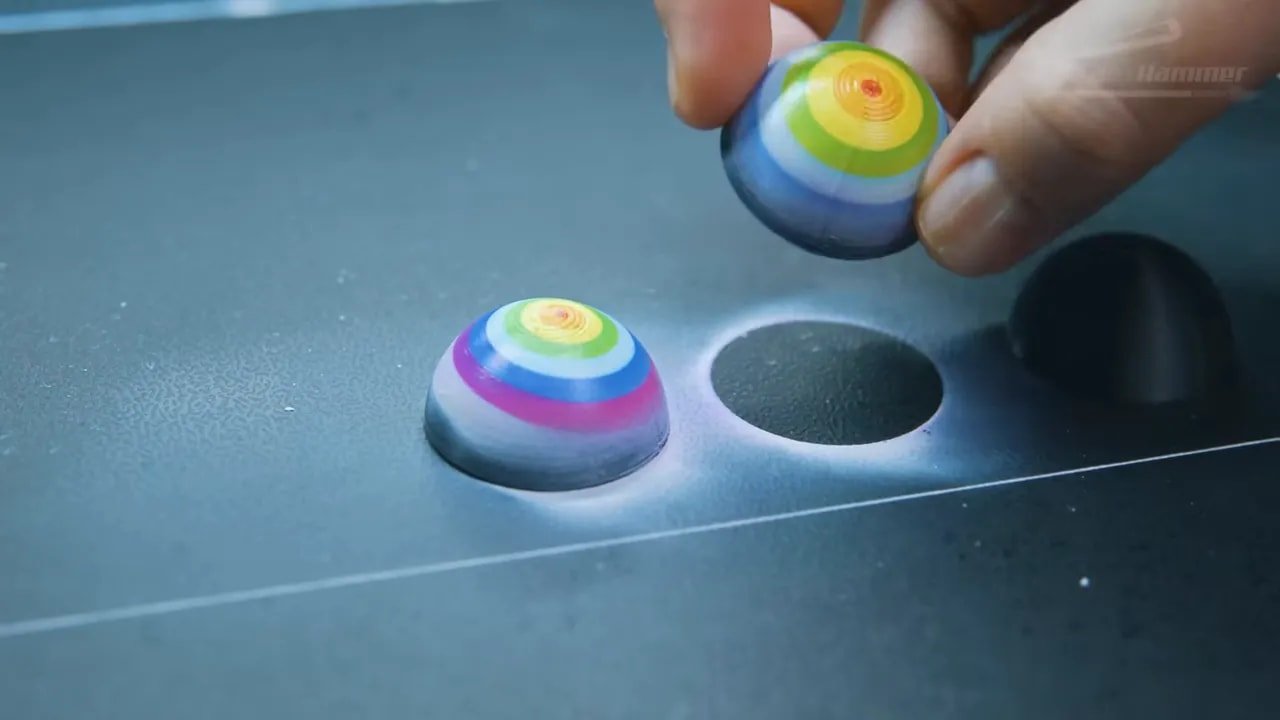
One of the cleverest things about the EufyMake E1 is how much the output changes depending on layer order.
Printing CMYK directly onto a transparent material gives a translucent result. Add white beneath it and the image suddenly gains body and punch. Print CMYK first, then white, and you can create effects suited to signage or window applications. Add another CMYK layer and you can create double-sided visual results.
This is where the machine starts to feel less like a toy and more like a genuinely capable creative tool.
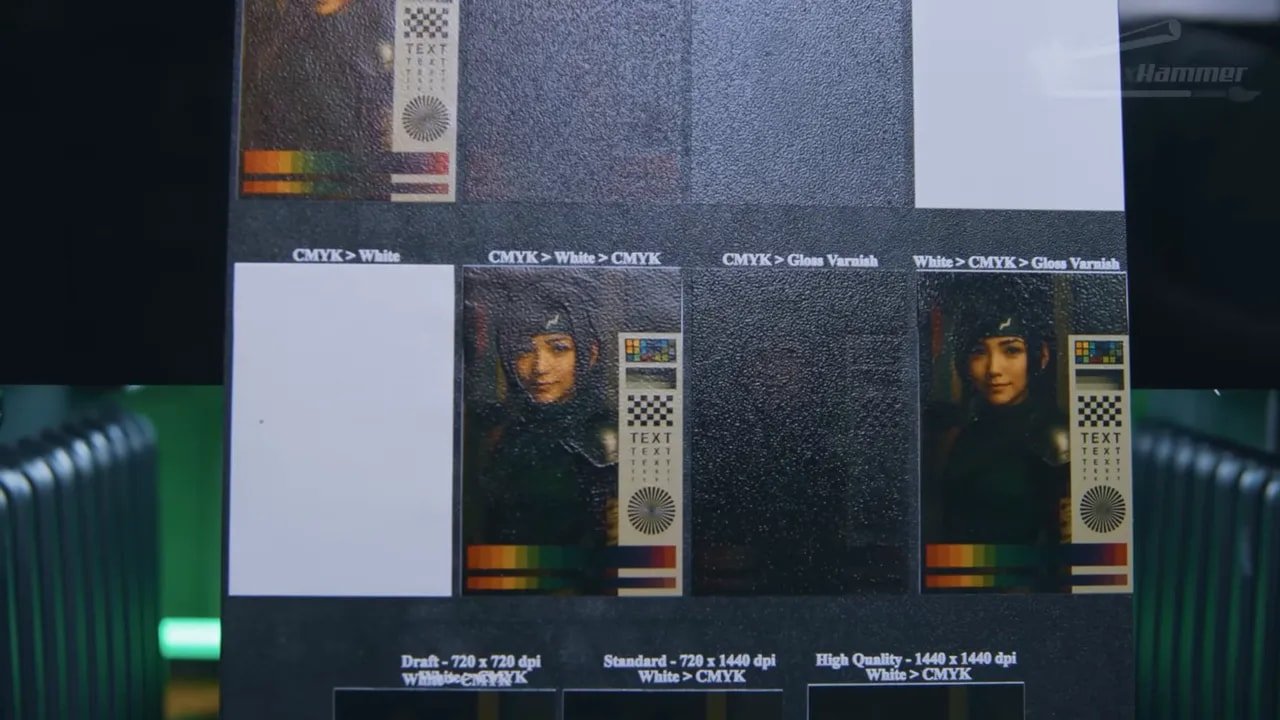
There are, however, some current quirks. One of the more obvious issues is a faint white halo around some images where the white underbase extends beyond the colour layer. A white underbase choke setting is reportedly being worked on to fix this by shrinking the white layer under the top colours, but at the time of testing that fix was still in beta.
That matters because the EufyMake E1 is very clearly a machine where software improvements can have a major effect on final output quality. The hardware is already good; a lot of the remaining refinement comes down to software logic, image prep tools and workflow polish.
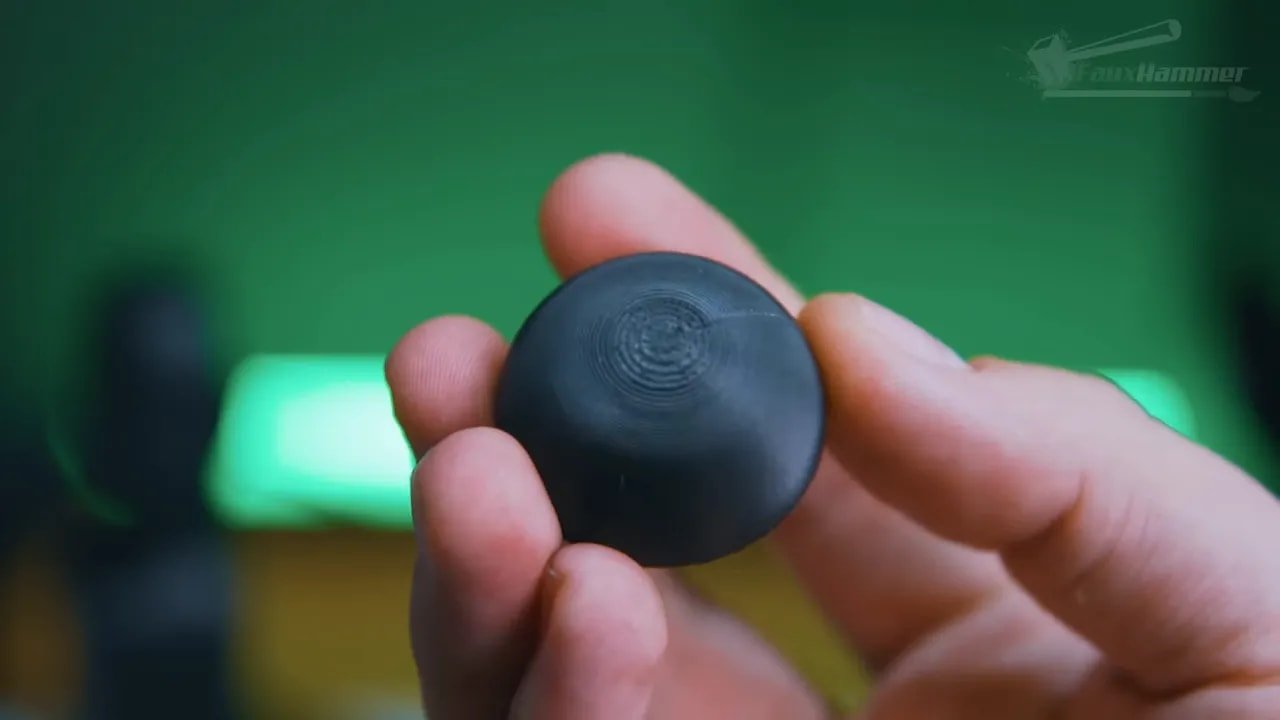
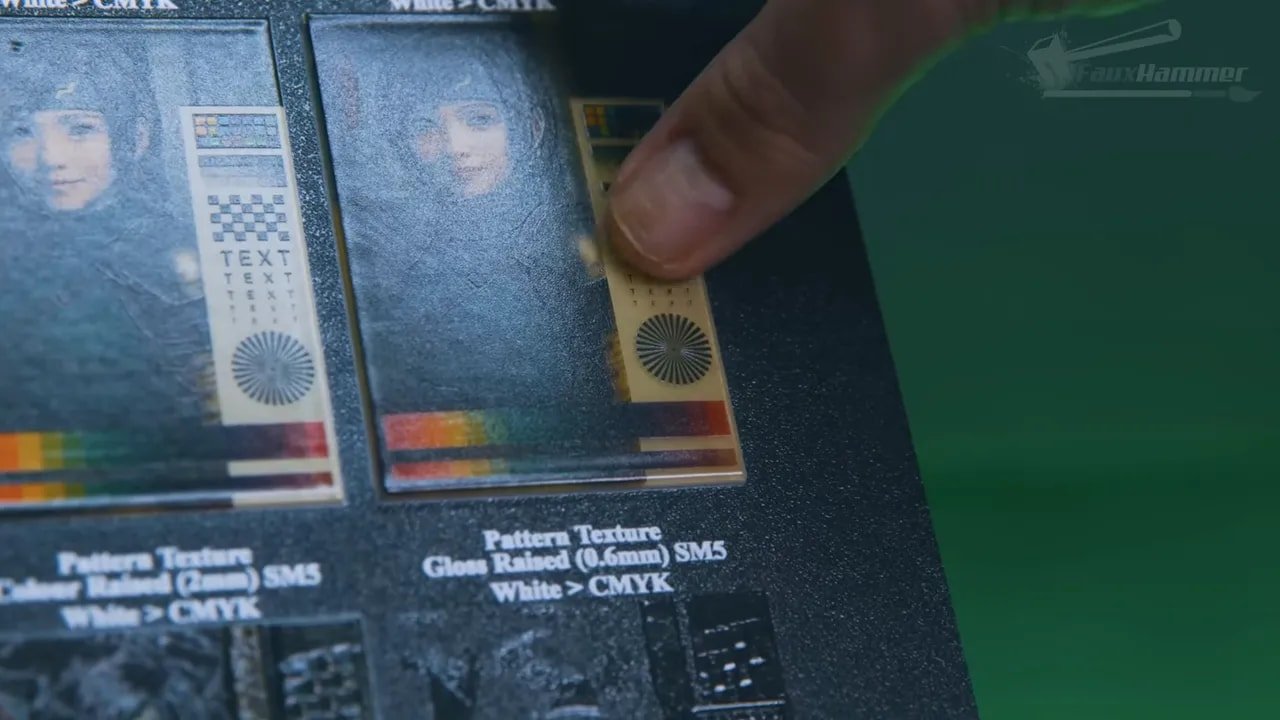
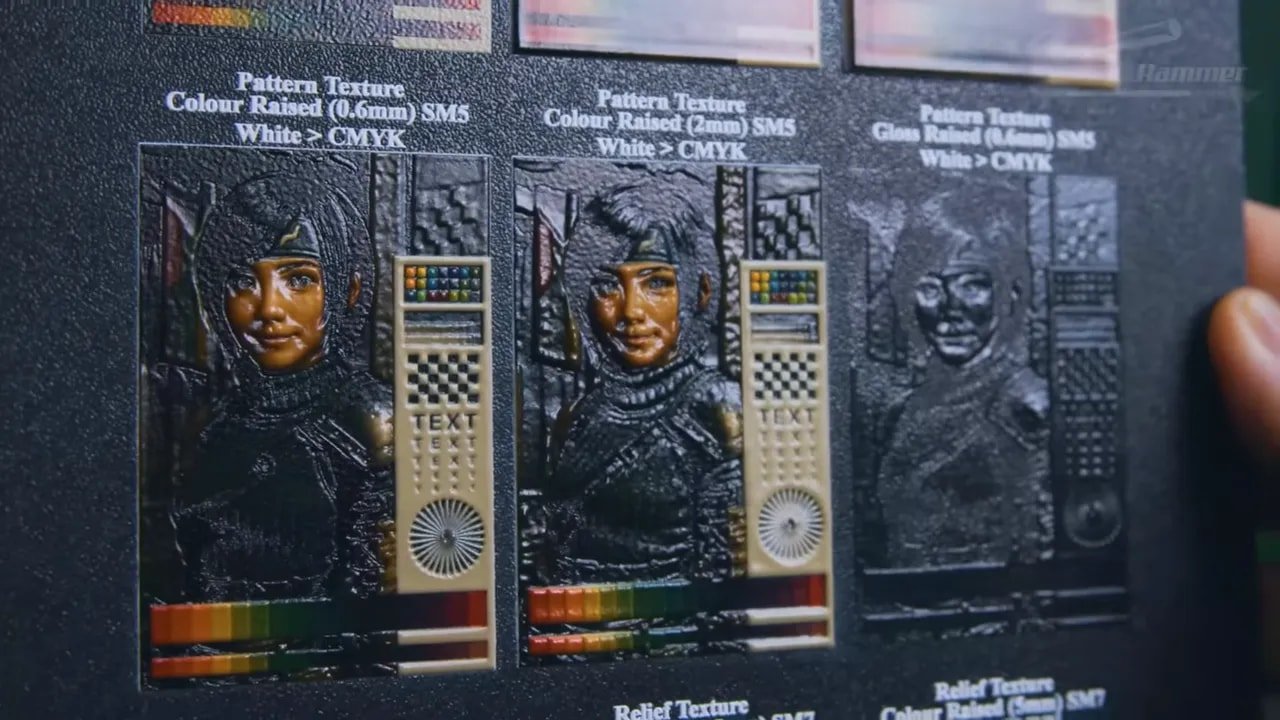
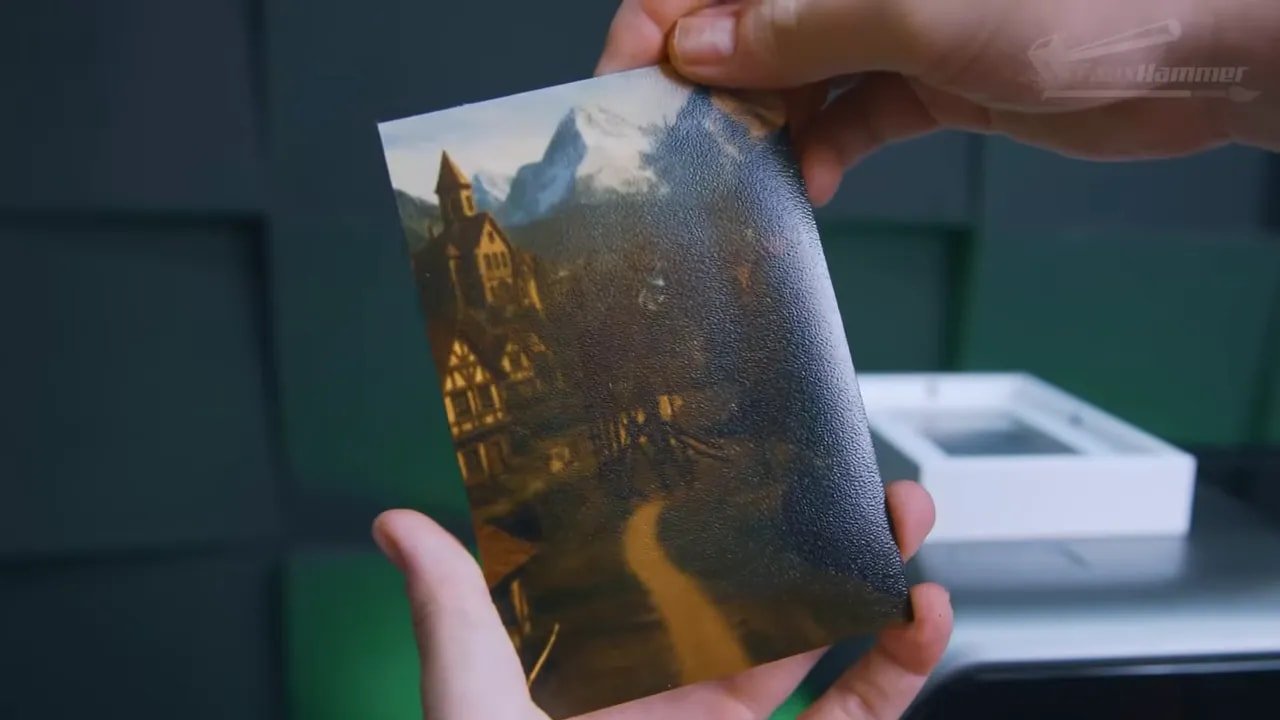
EufyMake E1 – Raised Texture and 2.5D Printing
The texture modes are a huge part of the appeal here. This is not just about printing graphics. It is about printing tactile graphics.
The EufyMake E1 offers three main texture approaches:
Flat: standard flat image printing
Raised: lifts the whole image uniformly, up to 3mm
Pattern texture: interprets dark as low and bright as high, up to 2mm
Relief texture: a machine-learning assisted mode that tries to build a more natural raised surface
Relief texture is the most interesting of the lot. It is not magic, but it is clever. It can also consume credits in the software platform, with monthly credits included and extras available to buy.

Testing included default and smoothed relief settings as well as a full 5mm maximum-height push. The results show both the machine’s creativity and its costs. Raised output can look impressive, but it is also where consumable use starts escalating very quickly.
There is another useful point here: you do not always need to add texture digitally if the object already has texture physically. The EufyMake E1 can print onto pre-textured objects as long as the surface height variation remains within its usable focus and deposition range.
That was demonstrated by printing directly onto Warhammer scenery after photographing the piece, editing the design externally, and sending the adjusted artwork back to the machine. The chosen colours and textures may have been ugly, but the concept worked—which is the important part.
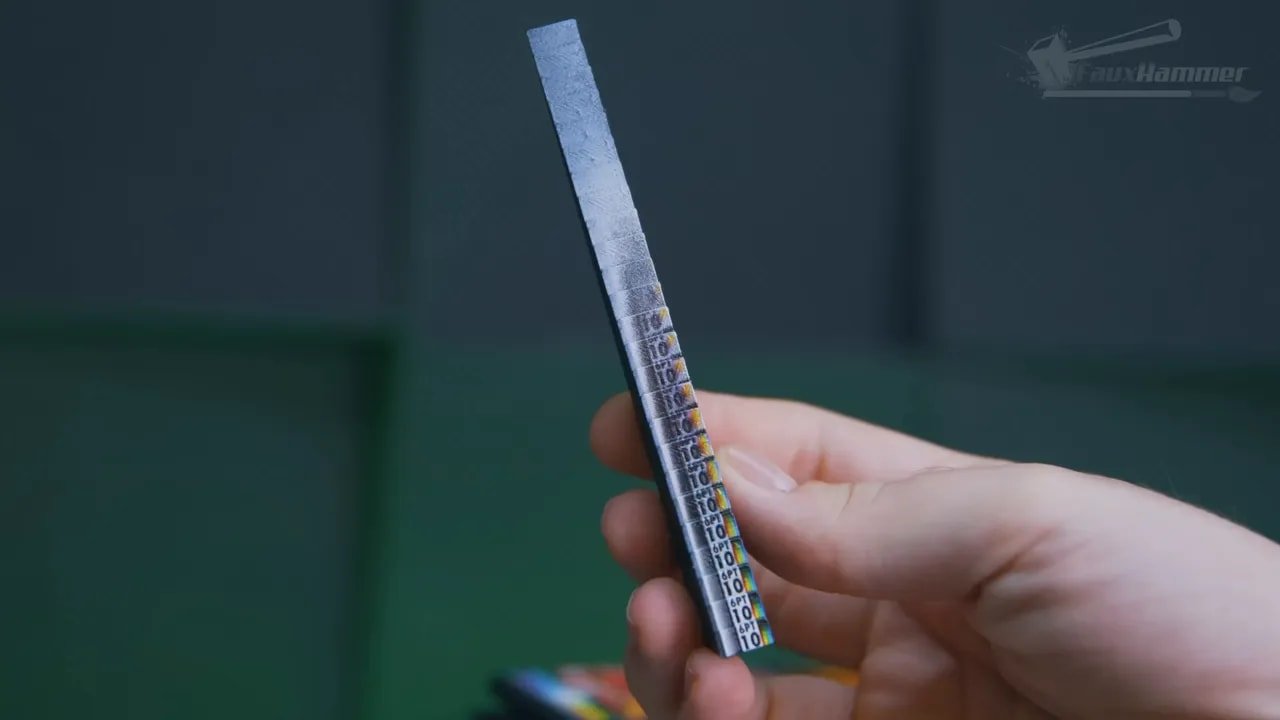
EufyMake E1 – Height Limits, Surface Variation and Real-World Constraints
This is where some of the marketing dream needs grounding in reality.
The EufyMake E1 can compensate for textured and uneven surfaces, but only up to a point. On a 35mm half-sphere, accurate printing was only possible down to roughly the halfway point. A stepped ramp test then showed the machine stayed very accurate through around 3mm of depth change, remained fairly decent to about 5mm, and then began steadily deteriorating on the way to around 10 or 11mm, after which the result was effectively blown out.
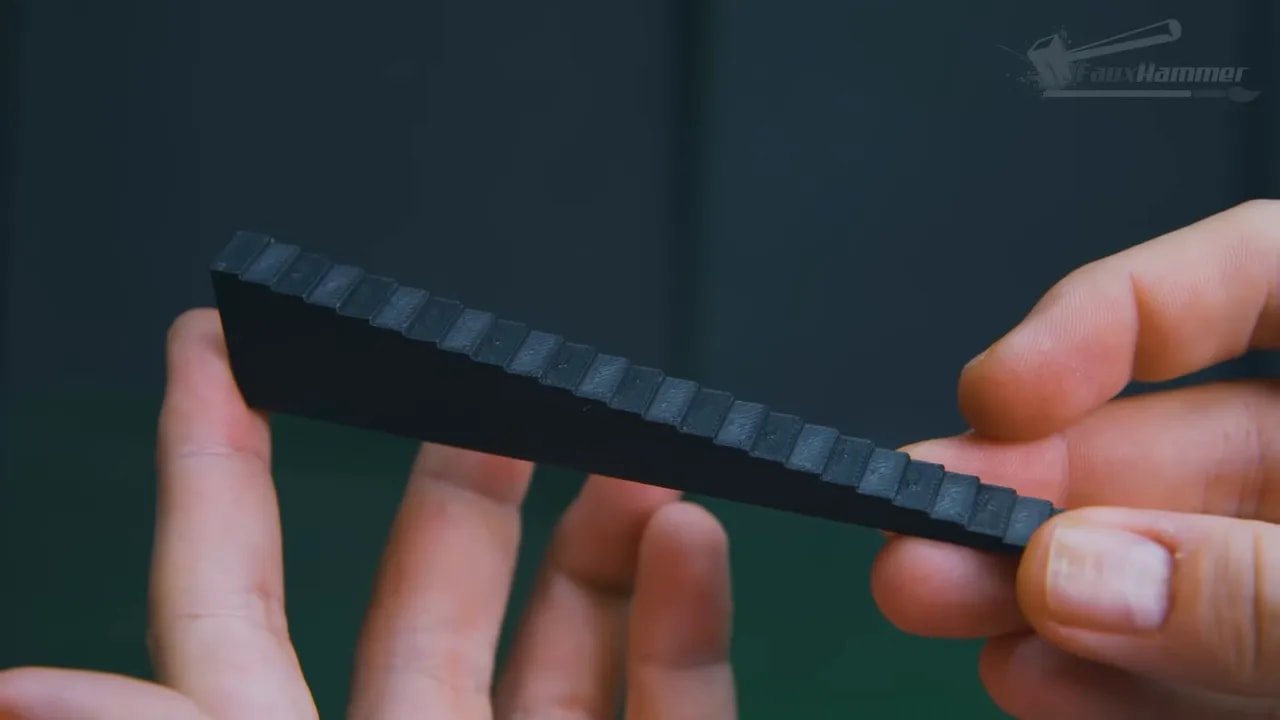
That is still useful. In fact, it is more useful than many would have expected. But it means you should think of the EufyMake E1 as excellent for low-relief surfaces and modest topography, not as a universal “print on anything” machine.
There is also one especially important workflow rule: do not mix objects of different heights in the same job. The printer focuses on the tallest object and treats everything else as if it sits at that height too. That can ruin alignment and quality on shorter items.
For batch work, that means consistency in substrate thickness matters.
EufyMake E1 – Consumables, Ink Costs and What Printing Really Costs
The machine is expensive. The inks are expensive. Let’s not dance around that.
EufyMake’s ink works out at around $0.50 per millilitre in the best-case scenario where you fully use the cartridge contents in actual output.
That sounds brutal until you look at some practical print examples.
A high-quality Garados print with six white layers was estimated around 0.24ml, roughly 12–19 cents
A small page of stickers used around 0.13ml, so under 10 cents
A large Midgar poster on metal used around 0.41ml, around 20–32 cents
So for flat image work, the costs are not as terrifying as you might expect.
Raised work is the real wallet hit. A sheet of raised profile tests on PLA used 30.34ml of ink. That puts it in the region of $15–25 just for that test sheet.
That changes the value proposition significantly. Flat colour work? Fairly reasonable for specialist output. Heavily raised tactile work? Suddenly very expensive compared with simply printing the depth separately using a conventional 3D printer.
And honestly, that is a fair conclusion: if your goal is substantial physical height, filament or resin from a dedicated 3D printer will usually be the cheaper route. The EufyMake E1 makes most sense when you want colour and texture together in a way that would otherwise take several machines and several stages of post-processing.
EufyMake E1 – Bed Wear, Scratches and Maintenance Reality
One consumable that deserves more attention is the print bed top sheet. Not the rigid base itself, but the peel-away surface layer and the grippy material underneath.
During testing, thin PLA plates occasionally contracted and curled as the UV-cured resin set, which caused them to lift from the bed and let the print head scrape them mid-job. That produced the scratches visible in some test results.
EufyMake already has a flexible white ink option intended to help with more flexible materials, and additional material options could improve this further. But for now, it is something to watch closely if you plan on printing onto thinner plastics or materials prone to movement.
Printing off the edge of an object—whether by accident or intentionally to get full bleed—also bakes resin onto the bed surface. You can scrape it away, but the sheet eventually loses adhesion. In aggressive testing conditions, that happened in about a week.
Real-world users will likely get much more life from a sheet by being less reckless, keeping the surface clean, and using jigs for repeated jobs. Replacement top sheets are expected to be relatively inexpensive, under $10 each, so while they are consumables, they are not catastrophic ones.
Still, this is not a “zero maintenance” machine. It just hides the maintenance burden better than most.
EufyMake E1 – Rotary Attachment and Sticker Workflow
Two accessories stood out in testing.
The first was the rotary attachment, and the surprising part is that the hardware itself is excellent. It locks in like a print bed and can hold a wide range of cylindrical objects, including handled cups. The lasers can even help compensate for tapered objects by adjusting tilt. That is properly clever engineering.
Where things currently slip is in software and repeatability. The machine often misread diameter, and while manual adjustment exists, the auto-measurement process could override those settings when starting a print. The result was overlapping wraps rather than perfect placement.
There is also no camera-based preview system for rotary jobs right now, which means start position in both height and rotation involves more guesswork than it should.
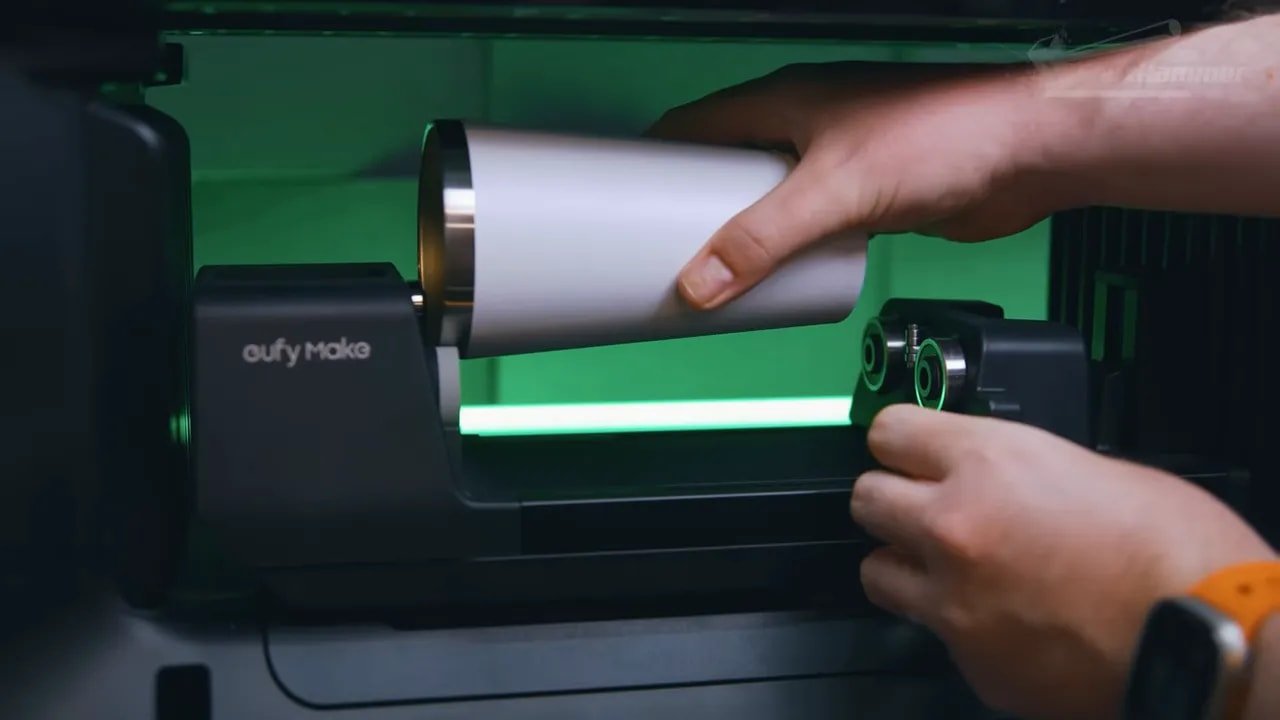
So rotary printing on the EufyMake E1 is promising but not yet as seamless as the flatbed side of the machine.
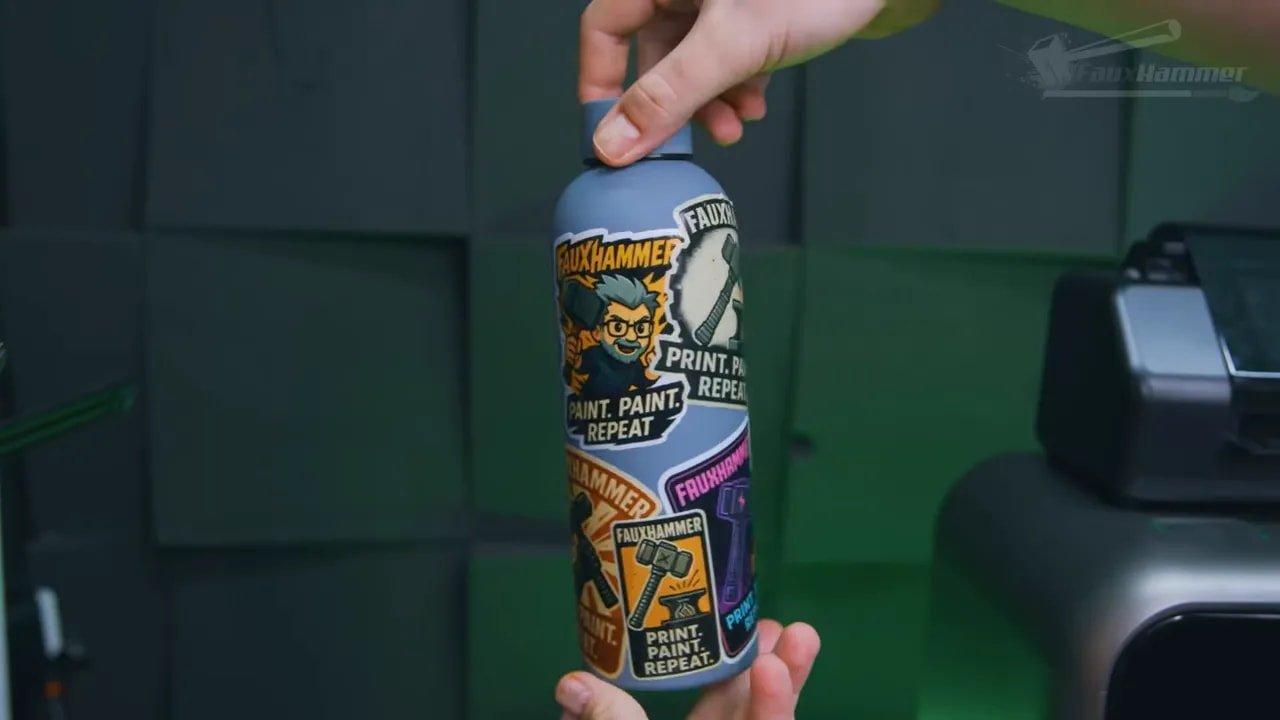
The second accessory workflow is much simpler: sticker sheets. Print your design onto the sheet, run it through EufyMake’s laminator, and you have durable stickers. This seems to be one of the easiest and most immediately practical workflows on the platform.
If you are the sort of person making short-run branded stickers, labels or decals, the EufyMake E1 starts making a lot of sense very quickly.
EufyMake E1 – Who It Is For and Who Should Skip It
The EufyMake E1 is not for everyone. It is far too specialised and far too expensive for that.
It makes sense for:
Hobbyists who like experimenting with surfaces, textures and customisation
Small businesses making short-run custom merch
Model makers who want full-colour textured details on bases, plaques, signs or scenery
Creators upgrading from vinyl, sublimation or more limited custom print methods
Anyone who values rapid idea-to-object workflow more than absolute cost efficiency
It makes less sense for:
People expecting cheap mass production
Anyone uncomfortable with resin-style safety precautions and VOCs
Users needing professional open colour management
Anyone whose main goal is thick raised geometry rather than colour-plus-texture output
The strongest endorsement here is not just that the machine works, but that it enables immediate creativity. The first proper project worked first try. That matters. In a space where specialist print workflows often begin with calibration pain, material waste and mild emotional damage, that kind of accessibility is a genuine competitive advantage.
If your interest sits more broadly in desktop printing for hobby use, FauxHammer also has a useful guide to the best 3D printers for miniatures, which helps put tools like this in context alongside more conventional FDM and resin options.
EufyMake E1 – Final Thoughts
I started this whole thing with baggage about the name. That feeling never really improved. The name still sounds daft. The machine, though, is another matter entirely.
The EufyMake E1 is one of the boldest consumer print products to appear in years, and the unusual thing is that the big swing has mostly landed. It is already useful, already enjoyable, and already capable of results that feel a bit like peeking into the next phase of desktop making.
There are obvious areas to improve:
White underbase refinement
Rotary workflow polish
Ongoing software updates
Better handling of diameter and placement logic
Continued expansion of materials
But the fundamentals are strong. More than strong, really. The EufyMake E1 manages something rare: it feels innovative without feeling unusable.
That is why the machine is so compelling. It doesn’t ask you to learn an entire new hobby just to use it. It tries, quite aggressively, to get out of your way so you can make things. When tech actually does that, it stands out.
So, should you buy the EufyMake E1? If you need what it does, you probably already know the answer. If your use case is flat customisation, stickers, plaques, textured graphics, small-batch merch, or experimental hobby projects, it is incredibly tempting. If you mainly want a cheaper way to build 3D height, there are better tools.
Either way, this is not a product that feels like a dead-end novelty. It feels like the start of something.
EufyMake E1 – FAQ
Is the EufyMake E1 a 3D printer?
Not in the normal sense. The EufyMake E1 is a UV printer that can build limited physical height with cured resin, which is why it is often described as a 2.5D printer. It can create raised textures and embossed effects, but it is not a conventional freeform 3D printer for full objects.
What can the EufyMake E1 print on?
It can print on a wide range of flat substrates and some cylindrical objects with the rotary attachment. Examples tested include PLA boards, metal plates, sticker sheets and textured hobby scenery. Surface prep and material compatibility still matter.
How big is the print area on the EufyMake E1?
The mini bed is 333 x 88mm and the standard bed is 333 x 418mm, which puts it just slightly smaller than A3 in one dimension.
How tall can an object be on the EufyMake E1?
Although the head clearance is around 150mm, real-world object height is much lower. Items above roughly 60–70mm tend to trigger errors, so practical object height is limited.
How much does EufyMake E1 ink cost?
The ink is around $0.50 per millilitre in best-case usage. Flat prints can still be relatively affordable per item, but raised texture work uses far more material and gets expensive quickly.
Is the EufyMake E1 safe to use indoors?
It gives off VOCs and uses UV-curable resin, so proper ventilation and safe handling are important. The built-in carbon filter reduces fumes but does not remove them entirely. Gloves are recommended for maintenance and resin waste must be disposed of properly.
Does the EufyMake E1 work well for rotary printing?
The rotary hardware is very good, but the workflow still needs refinement. Diameter detection and start-position control are not yet as polished as the flatbed printing experience.
Is the software on the EufyMake E1 any good?
Yes, especially compared with a lot of software in adjacent print categories. It is still in beta and has rough edges, but it is intuitive, consistent across devices, and clearly designed around actual user workflow.
EufyMake E1 – Additional Resources
If you want to dig further into examples and related tools, these are worth a look:
An updated impressions follow-up on the machine
More printing reviews and hobby content on the FauxHammer website
The EufyMake E1 is expensive, occasionally awkward, and still evolving. It is also one of the most fun and promising pieces of print tech to show up on a desktop in a long time. That combination is rare.
Please Note: This site uses affiliate links. Our Affiliate Partners are shown below
(Affiliate links will result in compensation to the site on qualifying purchases)
Click this link & buy your hobby stuff from Element Games for the UK & Europe to support FauxHammer.com – Use Code “FAUX2768” at the checkout for double reward points.
Our Affiliates / Hobby Stores
- UK: Element Games, The Outpost, Wayland Games, Mighty Lancer, Goblin Gaming, Forbidden Planet, Model Scenery Supplies, eBay, Amazon
- US/Canada: MTechCave, GameKastle, eBay (US), eBay (CA), Amazon
- Germany: Taschengelddieb
- Europe: eBay (DE), eBay (FR), eBay (ES), eBay (IT), Amazon
- Australia: eBay, Amazon
- Global: RedGrass Games, Warcolours
- 3D Printers: Phrozen 3D, Elegoo, Anycubic