
Come realizzare una stazione di polimerizzazione UV fai-da-te per stampanti 3D in resina
Whilst you can Buy UV Curing Stations, or UV Curing Chambers online they are very expensive. I just don’t have the money to spend what they cost! So instead I built my own and I’ll show you the steps in our How to Make a DIY UV Curing Station for Resin 3D Printers guide.
Ok, quindi se mi segui Facebook o Instagram you’ll see from my posts I love my 3D printer. After buying this, however, I was surprised (due to my over-excited lack of actual research) that the parts you print actually need to be fully cured post-print with UV light.
Quindi, quando la mia prima stampa è venuta fuori dal piatto, stavo cercando in fretta qualcosa che sarebbe bastato. Per fortuna mia moglie aveva una stazione UV Cure per gel per unghie. Quindi l'ho usato per la prima settimana fino alla sua morte.
Still unable to afford one of the retail options, I was looking at how to make a decent cure station. Many people will just stick a print in the sunlight, but living in the UK during the winter, we don’t get much sun. Even when we do it’s probably raining anyway.
There’s a lot to consider when curing resin, if you want to cure it properly without it becoming too brittle or warping you need to regulate temperature and light intensity. You also need to balance it across the surface. When I was making base toppers for my miniatures and using my wife’s nail curing station thy started to curl from being left under the direct light.
Whilst you can’t really regulate temperature with a DIY Curing Chamber, you can easily keep the part rotating to get more even coverage.
How to make a DIY UV Curing Chamber – Parts
If you have a Resin printer, I’ll just assume you have plenty of Isopropanol for rinsing the parts and Nitrile gloves for handling uncured resin. Not that you need them for making this. I just didn’t realise how many gloves or how much Isopropanol I’d need for resin printing. so if you rea reading this before getting a printer, let me just say you need this stuff. Lots of it.
Let’s have a look at what you need to make a cure station
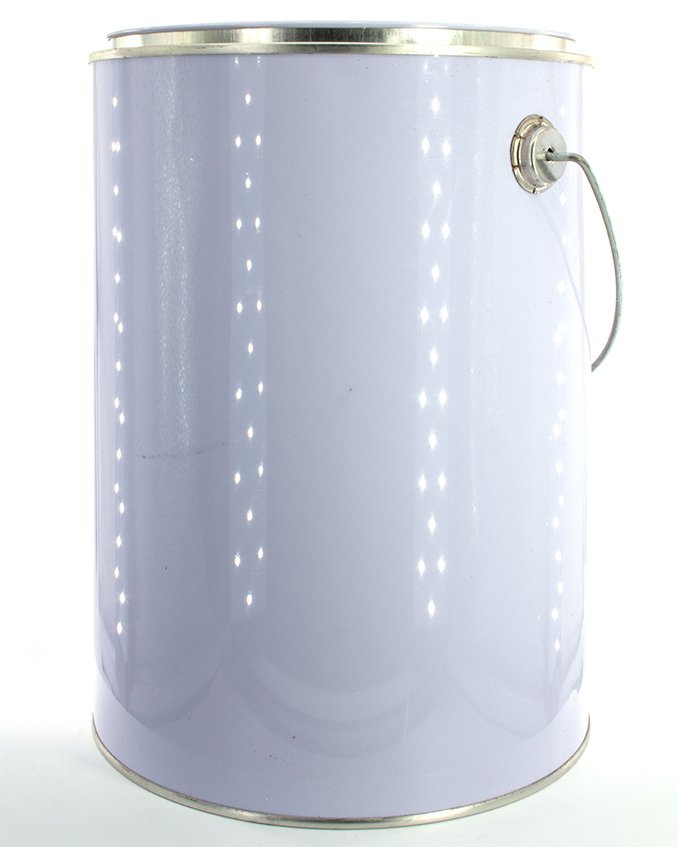
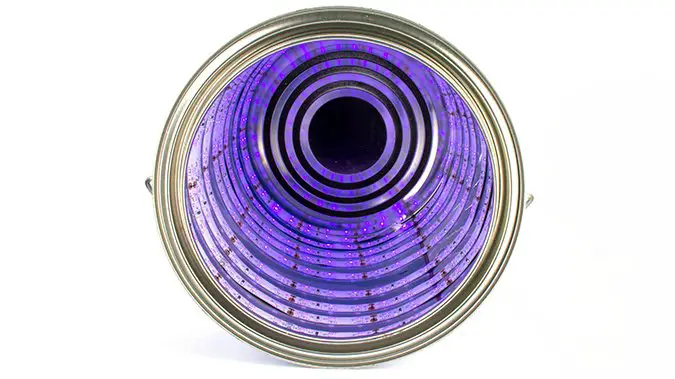
Barattolo di vernice vuoto
The reason I’ve picked a paint tin is becasue teh inside is already reflective. You will lose a lot of the UV’s power in reflected light but it’s still better to have some than none. Some people have gone as far as lining the inside with Aluminium tape to increase the reflectivity of the surface. For the amount of UV light that would reflect over the normal lining of a tin, I just couldn’t see it was worth the effort. But go ahead and do that if you want.
Per quanto riguarda le dimensioni, vuoi una latta da 5 litri (1 gallone). Ho provato con una scatola da 2,5 litri più piccola, ma era troppo piccola per la maggior parte delle parti stampate più grandi.
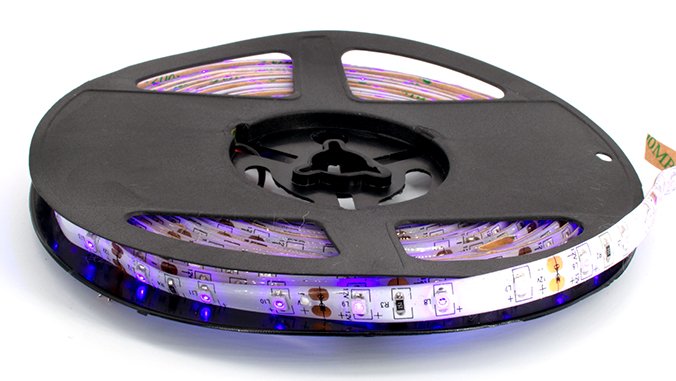
Striscia luminosa a LED UV
For this guide, I used a 5M LED Light strip, pretty much the cheapest I could find for 5m. You can get 10M and double up for more intense light. But I’ve found 5M is just fine.
Espositore rotante
Mi piacciono questi per visualizzare i modelli quando sono completati. sono davvero economici quando si caccia. ci sono in realtà 3 varianti. Uno che è alimentato dalla luce. e uno che ha la possibilità di aggiungere una batteria. Quello senza l'opzione batteria ha ancora lo scomparto per esso, solo nessun collegamento per la batteria a cui connettersi.
If you get the super cheaper one, this probably doesn’t have the battery, probably. this doesn’t mean the more expensive one will let you add a battery. Anyway, I got the cheap one because the UV lights will power it anyway.
UV Sicurezza di protezione Bicchieri
You’re working with UV Lights, protect your eyes.
Trapano (opzionale)
Depending on how you follow the steps ahead you may want to use a drill so that the power lead comes out of the bottom of the tin. You can have it coming out of the top if you want to do it the easy way but you won’t be able to close the lid flush. I drilled a hole for the lead becasue the DIY Cring Chamber looked neater as a finished item.
La tua chiamata.
You’ll need to measure the diameter of your power cable. I used a 12mm flat wood drill bit for mine.
Come realizzare una camera di polimerizzazione UV fai-da-te
Step 1 – Assemble Components
Semplicemente, prepara tutto, hai bisogno della tua latta di vernice vuota, trapano e striscia LED UV.
Step 2 – Drill a hole
You can skip this step and just have the power lead coming out of the top. but again the lid won’t sit flush and this just looks neater.

Go careful when doing this, these are really brittle tins and the drill can send shards flying everywhere. Go slow and steady, don’t push, just let the drill score the tin until it punches through.
Step 3 – Test Your LED Strip
I’ve seen a few people online mention how flimsy these Cheap LED strips can be. take a minute to make sure it works before your next step.
Step 4 – Measure the Tin & LED Strip
Depending what size tin you got you may need to get maths involved so you can evenly space the Led strip around the inside. Thankfully for me, I remembered some maths. thankfully for you, if you get the paint Tin size I recommended I’ve done the spacing here for you.
Per calcolare anche la spaziatura, avevo bisogno di sapere all'incirca quante volte avrei potuto avvolgere una striscia led da 5 m attorno alla circonferenza di questa latta dipinta.
Bene, tutti sanno C = πD (giusto?)
Puoi sempre evitare la matematica e utilizzare un metro da sarto avvolto attorno alla latta.
Quindi ho un diametro di stagno di 17,5 cm. 17,5 x π = 54.98cm (let’s say 55cm)
La lunghezza della striscia LED UV è di 500 cm. Quindi 500/55 è 9.1. così posso avvolgerlo all'interno della scatola 9 volte.
L'altezza della latta è di 22,5 cm. 22,5 / 9 è 2,5 cm. Praticamente un pollice
Ehi figo, ho un righello di pollice!
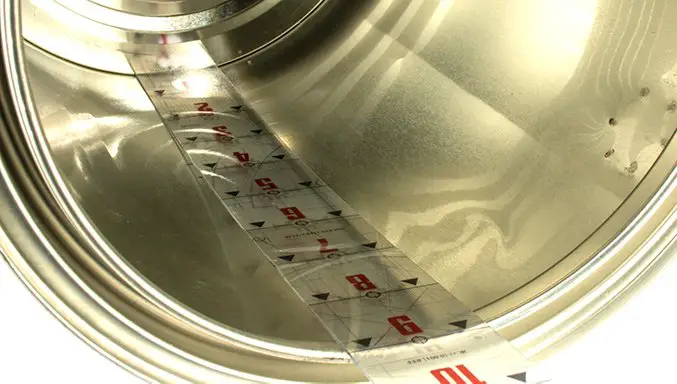
Step 5 – Mark the Tin
Usando un pennarello traccia le linee uniformemente distanziate all'interno della tua scatola. Questa è una guida da seguire nel prossimo passaggio
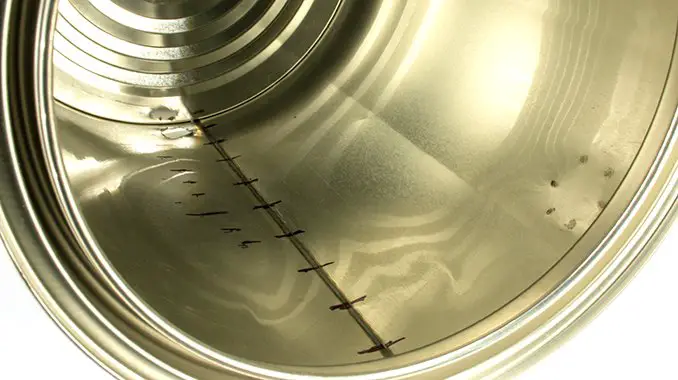
Step 6 – Stick in The LED Strip
Inserire il cavo di alimentazione attraverso il foro nella parte inferiore della scatola. Quindi, partendo dal basso, attacca la striscia Led all'interno della lattina. Cerca di seguire le tue linee guida nel miglior modo possibile su ogni rotazione completa per mantenerle uniformemente distanziate.
I left a little bit of LED sticking out of my tin near the power hole so I could see from the outside when it was on. It’s just enough so that when I flick the lights off in my office I can see it glowing, reminding me to actually turn it off.
When you are done you shouldn’ have any need to trim the LED strip as it should be a perfect fit. Assuming you measured correctly or got the bits we suggested above. any excess can just be doubled up a bit toward the top.
Step 7 – Add the Solar Powered Display Turntable
Se lo desideri, inseriscilo con pars a doppia faccia, ma l'ho appena posizionato nella base della latta in modo da poterlo sostituire se necessario.
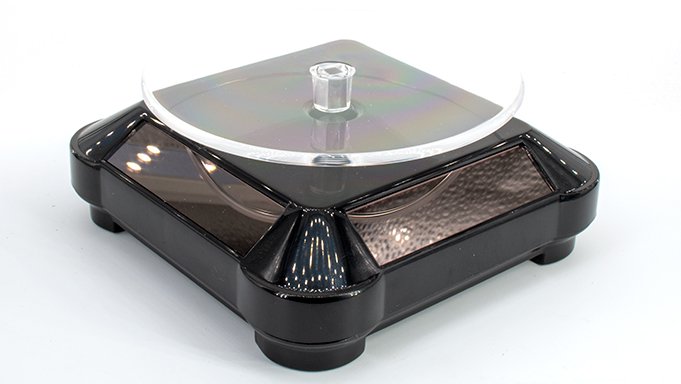
Ad alcune persone piace rivestire il giradischi stesso con un nastro di alluminio o un foglio di stagno. Nella mia esperienza, puoi finire con un po 'di infiltrazioni di resina dal tuo modello e inizierà a scolorire il foglio e strapparlo via.
How to make a DIY UV Curing Box – Complete
And that’s it. Once you have rinsed off your resin Model in Isopropanol and let it evaporate. just place it on top of the turntable and plug it in. The UV lights will power the turntable to keep it spinning.
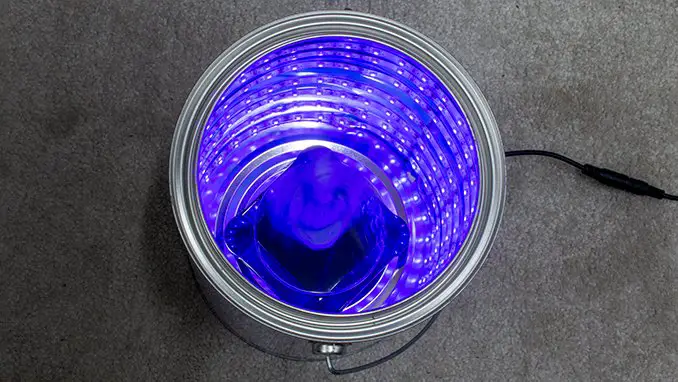
These LED strips are really low power so I tend to leave my parts in for anything up to an hour, then flip them over and do an hour on the other side. As I’m writing this I’ve just remembered I’ve left a part curing for the last 4 hours becasue I forgot about it!
I just checked it, it’s fine, fully cured and no warping.
Cosa ne pensi di questo? lezione? Per favore fateci sapere nei commenti.
If you like what we’re doing here you could really help encourage more content with a share on any social media platform.
Fai clic sui link di condivisione nella parte inferiore di questa schermata (o a sinistra per computer e tablet)
Vuoi essere aggiornato con il blog? Puoi iscriverti nella barra laterale per RSS o via e-mail qui sotto
(La barra laterale è sotto l'articolo sui dispositivi mobili)
Autore

Why you need rotating stand when lights are wound all around symmetrically? Also if one creates platform made of transparent plastic few inches above the bottom turning part over should not be needed either since it will be lit from the bottom as well