
Cómo hacer una estación de curado UV para impresoras 3D de resina
Si bien puede comprar estaciones de curado UV o cámaras de curado UV en línea, son muy caras. ¡Simplemente no tengo el dinero para gastar lo que cuestan! Entonces, en su lugar, construí la mía propia y le mostraré los pasos en nuestra guía Cómo hacer una estación de curado UV para bricolaje para impresoras 3D de resina.
Ok, entonces si me sigues Facebook o Instagram verás en mis publicaciones Me encanta mi impresora 3D. Sin embargo, después de comprar esto, me sorprendió (debido a mi sobreexcitada falta de investigación real) que las piezas que imprime realmente necesitan estar completamente curadas después de la impresión con luz UV.
Así que cuando mi primera impresión salió del plato, estaba buscando algo que fuera suficiente. Afortunadamente, mi esposa tenía una estación de curado UV que estaba hecha para geles de uñas. Así que usé esto durante la primera semana hasta que murió.
Todavía incapaz de pagar una de las opciones de venta minorista, estaba buscando cómo hacer una estación de cura decente. Muchas personas simplemente imprimen una huella a la luz del sol, pero al vivir en el Reino Unido durante el invierno, no tenemos mucho sol. Incluso cuando lo hacemos, probablemente esté lloviendo de todos modos.
Hay mucho que considerar al curar la resina, si desea curarla adecuadamente sin que se vuelva demasiado frágil o deformada, necesita regular la temperatura y la intensidad de la luz. También necesita equilibrarlo a través de la superficie. Cuando estaba haciendo toppers para mis miniaturas y usando la estación de curado de uñas de mi esposa, comencé a enroscarse al quedar bajo la luz directa.
Si bien no puede realmente regular la temperatura con una cámara de curado de bricolaje, puede mantener fácilmente la pieza girando para obtener una cobertura más uniforme.
Cómo hacer una cámara de curado UV para bricolaje - Piezas
Si tiene una impresora de resina, supongo que tiene mucho isopropanol para enjuagar las piezas y guantes de nitrilo para manipular resina sin curar. No es que los necesites para hacer esto. Simplemente no me di cuenta de cuántos guantes o cuánto isopropanol necesitaría para la impresión de resina. así que si lees esto antes de comprar una impresora, déjame decirte que necesitas estas cosas. Montones.
Echemos un vistazo a lo que necesita para hacer una estación de cura
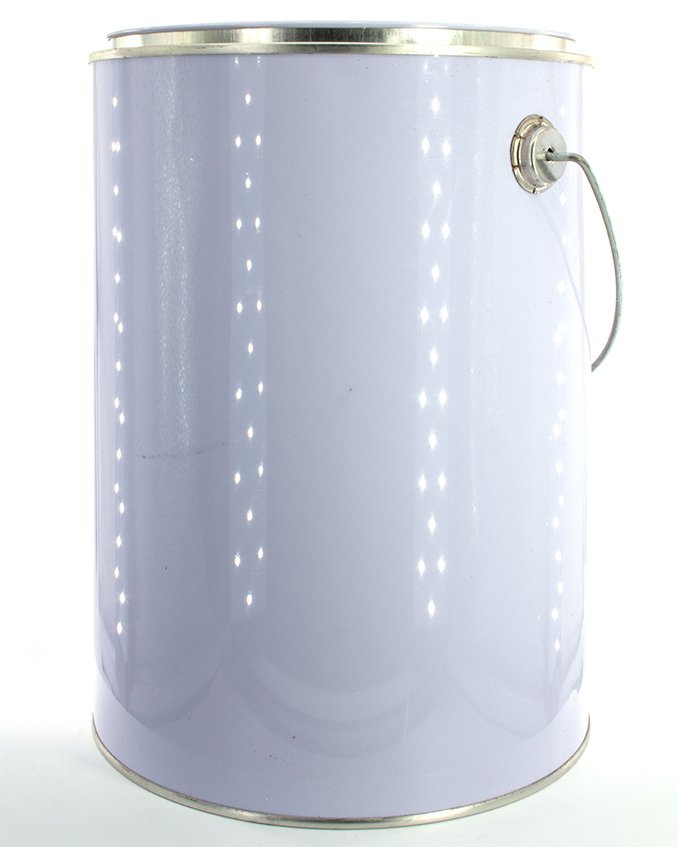
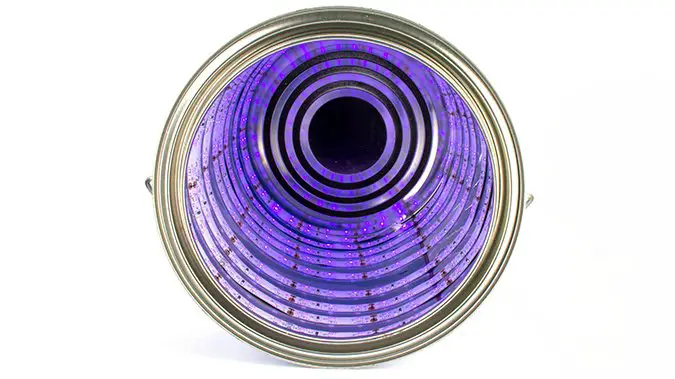
Lata de pintura vacía
La razón por la que elegí una lata de pintura es porque el interior ya es reflectante. Perderá gran parte de la potencia de los rayos UV en la luz reflejada, pero aún así es mejor tener algo que nada. Algunas personas han ido tan lejos como para forrar el interior con cinta de aluminio para aumentar la reflectividad de la superficie. Por la cantidad de luz UV que se reflejaría sobre el revestimiento normal de una lata, simplemente no podía ver que valiera la pena el esfuerzo. Pero adelante, hazlo si quieres.
En cuanto al tamaño, desea una lata de pintura de 5 litros (1 galón). Intenté con una lata más pequeña de 2.5L, pero era demasiado pequeña para la mayoría de las piezas impresas más grandes.
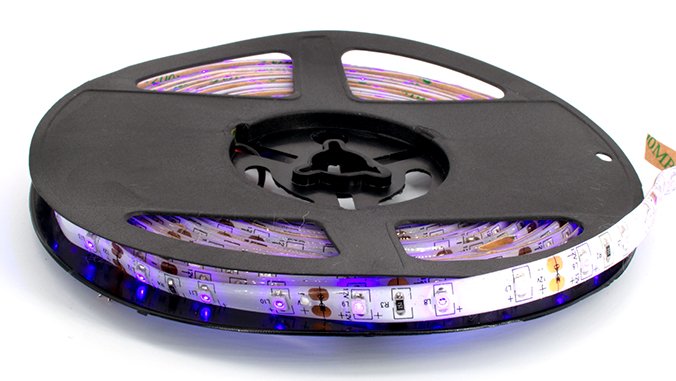
Tira de luz LED UV
Para esta guía, utilicé una tira de luz LED de 5M, casi la más barata que pude encontrar por 5m. Puede obtener 10M y duplicar para obtener una luz más intensa. Pero he encontrado que 5M está bien.
Expositor giratorio
Me gustan estos para mostrar modelos cuando se completan. son realmente baratos cuando cazas. En realidad hay 3 variantes. Uno que funciona con luz. y uno que tiene la opción de agregar una batería. El que no tiene la opción de batería todavía tiene el compartimento, simplemente no hay conexiones para que la batería se conecte.
Si obtienes el más barato, probablemente no tenga la batería, probablemente. Esto no significa que el más caro le permitirá agregar una batería. De todos modos, obtuve el barato porque las luces UV lo encenderán de todos modos.
UV Seguridad de la protección Vasos
Estás trabajando con luces UV, protege tus ojos.
Taladro (opcional)
Dependiendo de cómo siga los pasos a continuación, es posible que desee usar un taladro para que el cable de alimentación salga del fondo de la lata. Puede hacer que salga de la parte superior si desea hacerlo de la manera fácil, pero no podrá cerrar la tapa al ras. Taladré un agujero para el plomo porque la cámara DIY Cring parecía más ordenada como un artículo terminado.
Tu llamada.
Tendrá que medir el diámetro de su cable de alimentación. Utilicé una broca de madera plana de 12 mm para la mía.
Cómo hacer una cámara de curado UV para bricolaje
Paso 1 - Ensamblar componentes
Directamente, solo prepare todo, necesita su lata de pintura vacía, taladro y tira de LED UV.
Paso 2: perfora un agujero
Puede omitir este paso y simplemente tener el cable de alimentación saliendo de la parte superior. pero de nuevo la tapa no quedará al ras y esto se ve más ordenado.

Tenga cuidado al hacer esto, estas son latas realmente frágiles y el taladro puede enviar fragmentos volando por todas partes. Vaya despacio y constante, no empuje, solo deje que el taladro marque la lata hasta que atraviese.
Paso 3: prueba tu tira de LED
He visto a algunas personas en línea mencionar lo endebles que pueden ser estas tiras LED baratas. Tómese un minuto para asegurarse de que funciona antes de su próximo paso.
Paso 4 - Mida la tira de estaño y LED
Dependiendo del tamaño de estaño que tengas, es posible que necesites involucrar las matemáticas para que puedas espaciar uniformemente la tira de LED alrededor del interior. Afortunadamente para mí, recordé algunas matemáticas. afortunadamente para ti, si obtienes la pintura del tamaño de la lata, te recomiendo que haya hecho el espacio aquí para ti.
Para calcular el espaciado uniforme, necesitaba saber aproximadamente cuántas veces podría envolver una tira de LED de 5 m alrededor de la circunferencia de esta lata pintada.
Bueno, todos saben C = πD (¿verdad?)
Siempre puede evitar las matemáticas y usar una cinta métrica de sastre envuelta alrededor de la lata.
Entonces tengo un diámetro de estaño de 17.5cm. 17.5 x π = 54,98 cm (digamos 55 cm)
La longitud de la tira de LED UV es de 500 cm. Entonces 500/55 es 9.1. entonces puedo envolver esto alrededor del interior de la lata 9 veces.
La altura de la lata es de 22.5cm. 22.5 / 9 es 2.5cm. Más o menos una pulgada
¡Hola genial, tengo una regla de una pulgada!
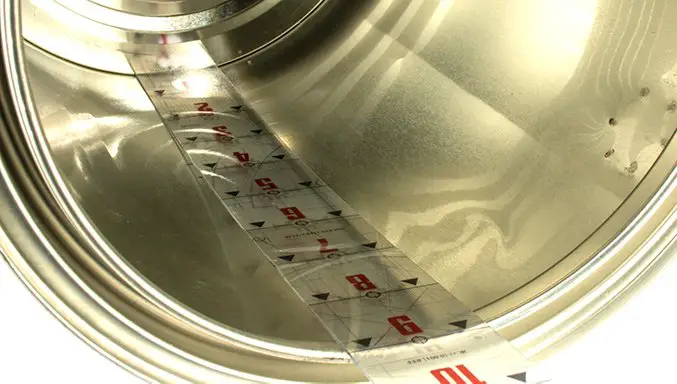
Paso 5 - Marque la lata
Con un rotulador, dibuje las líneas espaciadas uniformemente en el interior de su lata. Esta es una guía a seguir en el siguiente paso
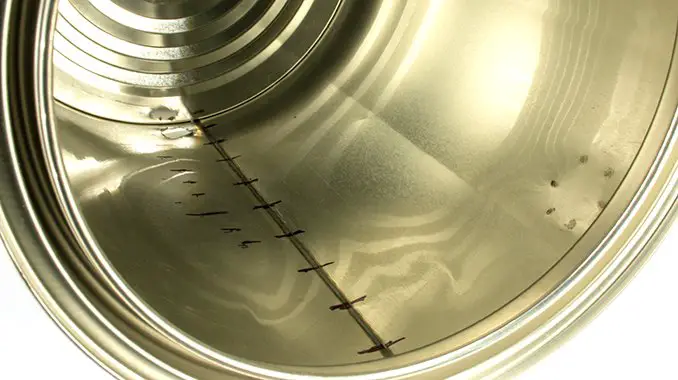
Paso 6: pegue la tira de LED
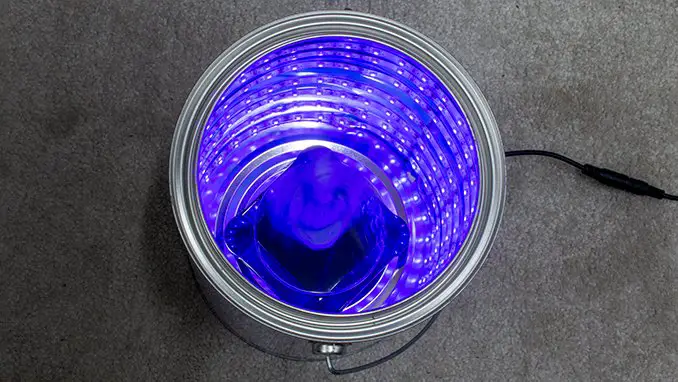
Pase el cable de alimentación a través del orificio en el fondo de la lata. Luego, comenzando desde la parte inferior, pegue la tira Led alrededor del interior de la lata. Intente seguir sus pautas lo mejor que pueda en cada rotación completa para mantenerlas espaciadas uniformemente.
Dejé un poco de LED que sobresalía de mi lata cerca del orificio de alimentación para poder ver desde afuera cuando estaba encendido. Es suficiente para que cuando apague las luces de mi oficina pueda verlo brillar, recordándome que realmente lo apague.
Cuando haya terminado, no debería tener ninguna necesidad de recortar la tira de LED, ya que debería ser un ajuste perfecto. Suponiendo que midió correctamente u obtuvo los bits que sugerimos anteriormente. cualquier exceso puede duplicarse un poco hacia la parte superior.
Paso 7 - Agregue el plato giratorio de pantalla con energía solar
Pégalo con papel de doble cara si quieres, pero lo acabo de colocar en la base de la lata para poder reemplazarlo si es necesario.
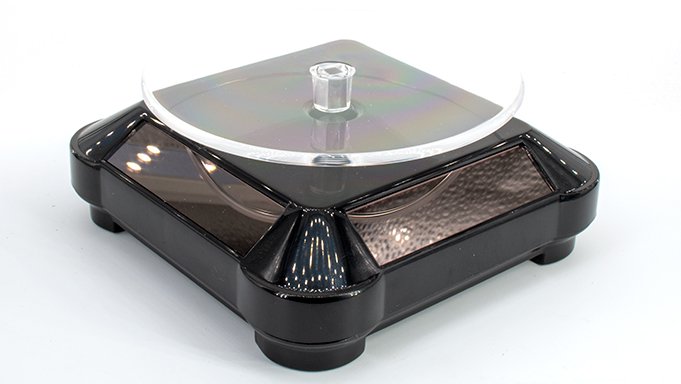
A algunas personas les gusta recubrir el plato giratorio con cinta de aluminio o papel de aluminio. En mi experiencia, puede terminar con un poco de filtración de resina de su modelo y comenzará a decolorar la lámina y arrancarla.
Cómo hacer una caja de curado UV para bricolaje: completa
Y eso es. Una vez que haya enjuagado su Modelo de resina en Isopropanol y deje que se evapore. simplemente colóquelo encima del plato giratorio y conéctelo. Las luces UV encenderán el plato giratorio para que siga girando.
Estas tiras de LED tienen muy poca energía, por lo que tiendo a dejar mis piezas dentro de una hora, luego las doy vuelta y hago una hora en el otro lado. Mientras escribo esto, acabo de recordar que he dejado una parte curando durante las últimas 4 horas porque lo olvidé.
Lo acabo de comprobar, está bien, completamente curado y sin deformación.
Que pensaste de esto Tutorial? Por favor, háganos saber en los comentarios.
Si le gusta lo que estamos haciendo aquí, realmente podría ayudar a fomentar más contenido con un recurso compartido en cualquier plataforma de redes sociales.
Haga clic en los enlaces para compartir en la parte inferior de esta pantalla (o en la izquierda para computadoras y tabletas)
¿Quieres mantenerte actualizado con el blog? Puede suscribirse en la barra lateral para RSS o por correo electrónico a continuación
(La barra lateral está debajo del artículo sobre dispositivos móviles)
Autor


Why you need rotating stand when lights are wound all around symmetrically? Also if one creates platform made of transparent plastic few inches above the bottom turning part over should not be needed either since it will be lit from the bottom as well